How to Transfer from the V1 Legacy On2Air Forms to On2Air Forms - JotForm Version
🔴 On2Air Forms - JotForm has been shutdown to focus on our On2Air Backups Airtable app Learn more about automated Airtable backups - on2air.com
⭐
We now have a brand new  On2Air Forms app for Airtable that doesn’t require JotForm! It connects directly to Airtable. You can sign up for free access at On2Air Forms Signup Learn more here - On2Air Forms
The On2Air: Forms app has been redesigned for a better user experience with even more helpful features and options for your forms.
Several key differences in the app include
- No longer having to complete a form and input a JotForm ID
- No longer need to generate a token to connect to each base
- No longer need to search for the field input index ID for parent fields and placeholders
- Webhooks are now integrated
- An additional option to transfer your form data directly to update a record or create a record in Airtable is now available
You can now connect directly with your Airtable API key and view all the bases in your Airtable account.
When transferring your forms and zaps to the new On2Air: Forms, you will need to transfer all your fields to the new version. The new version is not backward-compatible with the legacy version.
In this article
-
Select Field Options
-
Learn how to create a Select Field in the new On2Air: Forms
-
Video Tutorial Select Field
-
Sub-Select Field Options
-
Learn how to create a Sub-Select Field in the new On2Air: Forms
-
Video Tutorial Sub-Select Field
-
Placeholder Field Options
-
Learn how to create a Placeholder Field in the new On2Air: Forms
-
Video Tutorial Placeholder Field
-
Webhooks
-
Learn how to create a Destination in the new On2Air: Forms
-
Video Tutorial - Webhooks, Destination, Outputs, and Links
Select Field Options
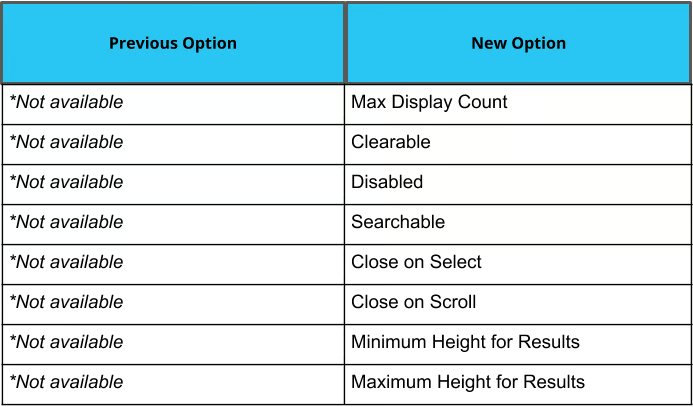
Section titled “Select Field Options”Please use the table below for reference when transferring your forms from the legacy On2Air: Forms to the new On2Air: Forms.
Many of the options are the same but are easier to select from your Airtable base as they are populated directly from your base. The options are listed in a more organized order and are separated into sections.
Learn how to create a Select Field in the new On2Air: Forms
Section titled “Learn how to create a Select Field in the new On2Air: Forms”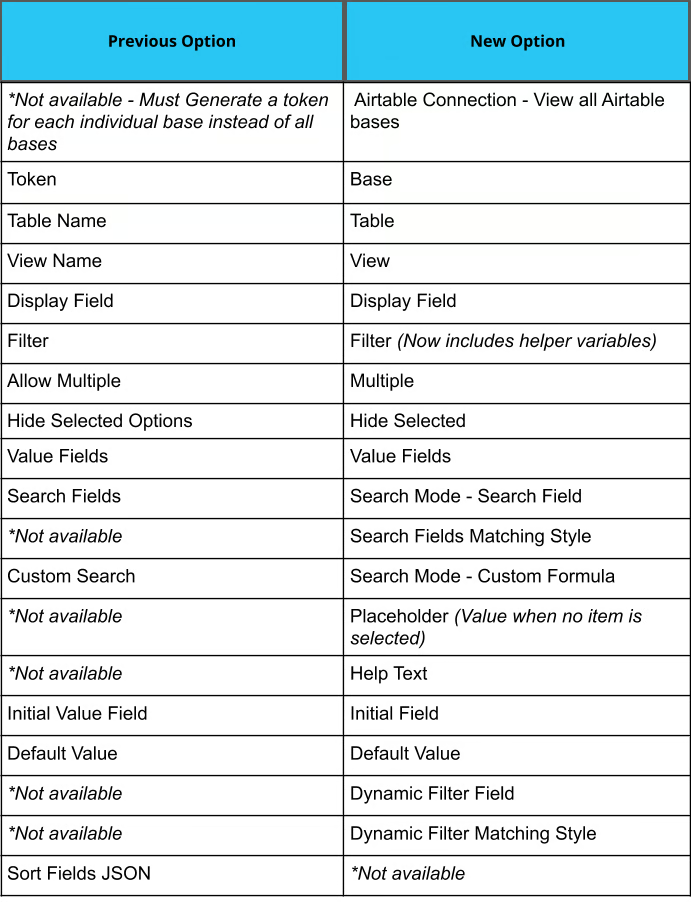
Select Field Advanced Display Configuration Options
Video Tutorial Select Field
Section titled “Video Tutorial Select Field”Sub-Select Field Options
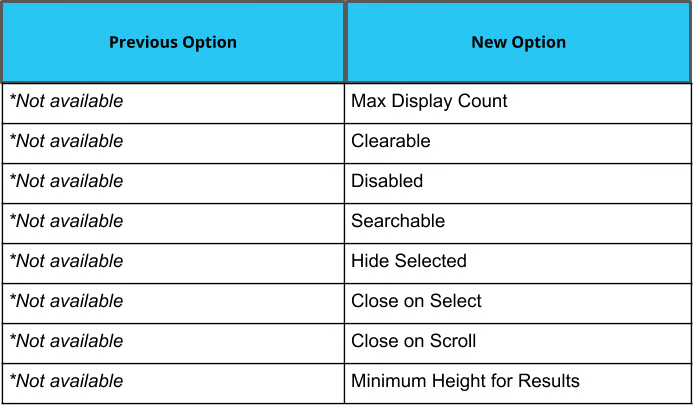
Section titled “Sub-Select Field Options”Please use the table below for reference when transferring your forms from the legacy On2Air: Forms to the new On2Air: Forms.
Many of the options are the same but are easier to select from your Airtable base as they are populated directly from your base. The options are listed in a more organized order and are separated into sections.
Learn how to create a Sub-Select Field in the new On2Air: Forms
Section titled “Learn how to create a Sub-Select Field in the new On2Air: Forms”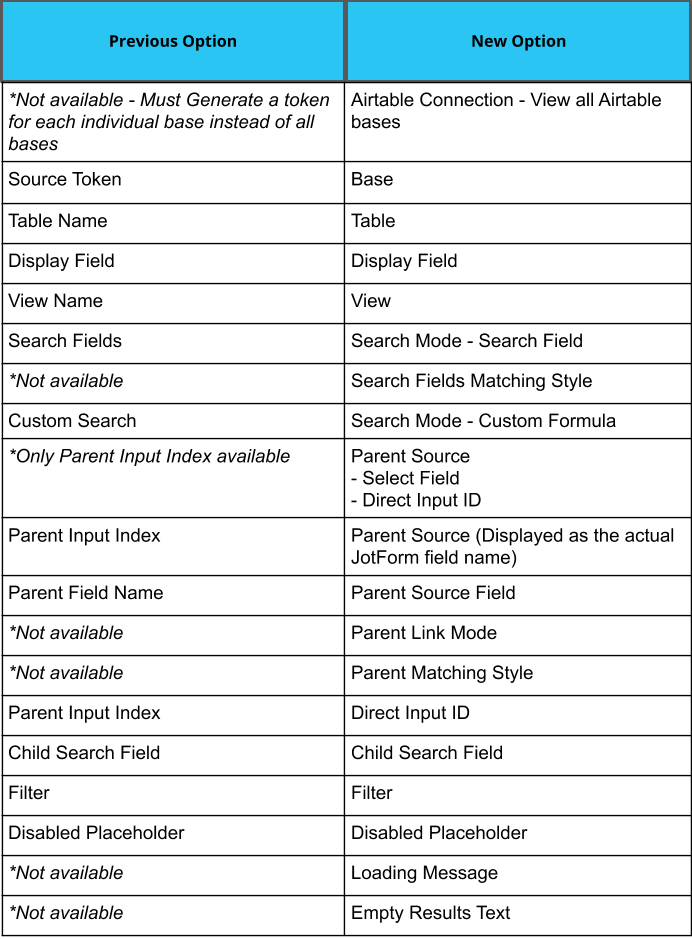
Sub-Select Field Advanced Display Configuration Options
Video Tutorial Sub-Select Field
Section titled “Video Tutorial Sub-Select Field”Placeholder Field Options
Section titled “Placeholder Field Options”Please use the table below for reference when transferring your forms from the legacy On2Air: Forms to the new On2Air: Forms.
Many of the options are the same but are easier to select from your Airtable base as they are populated directly from your base. The options are listed in a more organized order and are separated into sections.
The Placeholder Field now supports Markdown in addition to HTML.
Learn how to create a Placeholder Field in the new On2Air: Forms
Section titled “Learn how to create a Placeholder Field in the new On2Air: Forms”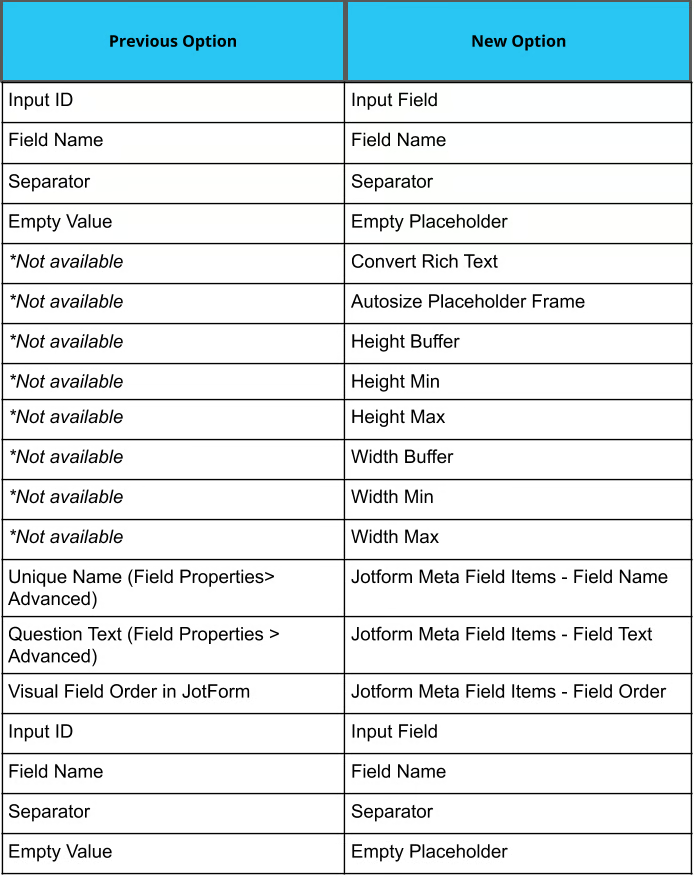
Video Tutorial Placeholder Field
Section titled “Video Tutorial Placeholder Field”Webhooks
Section titled “Webhooks”You can now replace your Webhooks by setting up Destinations in the new On2Air: Forms.
Destinations can be either a Webhook or an Output.
Outputs are used to send your completed form data to update records or create new records in Airtable.
A Webhook allows you to send your form data to other locations. You can even send data to both Airtable and webhooks at the same time.
Learn how to create a Destination in the new On2Air: Forms
Section titled “Learn how to create a Destination in the new On2Air: Forms”If you would still like to use your current webhooks and also the new On2Air: Forms, you will need to create a new Zap as the new On2Air: Forms is not backward-compatible with the legacy On2Air: Forms.