

Automations in Airtable make it easy to complete and schedule tasks in the background without having to manually update records, create new records, send emails, or update calendars.
At times, you may need to run automations on a set schedule, whether it’s once a day, every week, or once a month.
You can create a scheduler for your automations. Using this scheduler will prevent you from having to remember to run the automation each time it’s needed. You can continue with your work, knowing it will process at a set time.
Table of Contents
Creating the fields in Airtable for the scheduler
Setting up the Automation in your Airtable base
In this article
In this article, we’ll show you how to schedule automations in your Airtable base. You will be able to customize a schedule to fit your needs.
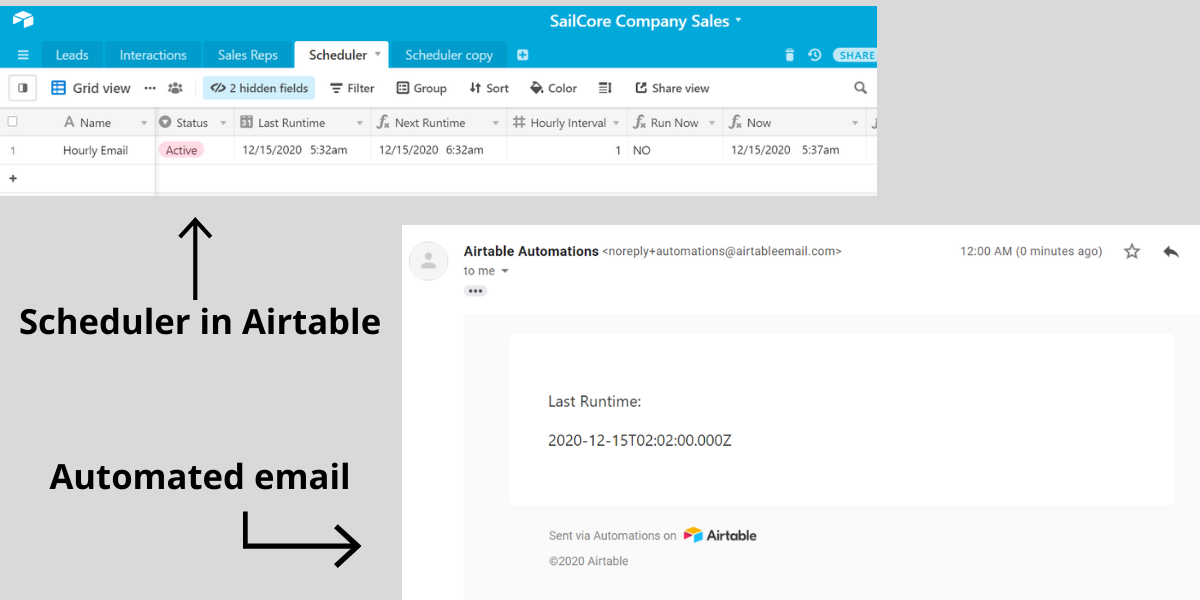
For the demo, we will schedule an email to send every hour with an update of the time.
Protect your Airtable data
Before starting
A couple of notes on scheduling automations
- The minimum recommended time to schedule is once per hour.
- You can set automations to schedule more frequently than every hour, but you must have your base open at all times. This is not ideal and is prone to error and your automation not running.
- NOW is an option for a time formula, but it isn’t always reliable. NOW will not always produce the actual time right now and will occasionally quit working when a base is closed.
- All times are in the GMT time zone.
Creating the fields in Airtable required for the scheduler
You can follow the instructions below or copy our Sales base with the Scheduler table.
- Create a table in your base called Scheduler
- Create the following fields
Fields Required
Hourly Interval – Number field type with format set to Integer
Add the number 1 to the record, so it will run every hour. You can change this to whatever number you need.
For example, if you want it to run once a day, you can set it to 24.
Status – Single-Select field type with options of Active and Inactive
This is the first of 2 trigger conditions to determine when the Automation will begin processing. You can set multiple records that are run by the same automation.
Last Runtime – Date field type with date format of Local, Include time field, 12 hours, and Use same time zone for all users
This displays the last time the automation ran.
Next Runtime – Formula field type
DATEADD({Last Runtime},{Hourly Interval},"hours")
This adds an hourly interval to the Last Runtime. In this example, it’s 1 hour after the Last Runtime.
Run Now – Formula field type
IF(OR({Force Run},HOUR(NOW())>=HOUR({Next Runtime})),"YES","NO")
This field is used as the second of 2 trigger conditions to determine when the Automation will begin processing. When the Hour is within the current hour of the Next Runtime field, this will display YES. It will also change to YES if the Force Run checkbox is checked.
Example: If NOW is 08:30pm and Next Runtime is inside the 8pm hour, the Run Now field will display YES and the automation will run.
Now – Formula Field type
NOW()
Displays the current date and time in GMT
Optional Fields
Now Hour – Formula Field type
HOUR(Now)
Displays the current hour from the Now field in a 24 hour time period
Next Hour – Formula Field type
HOUR({Next Runtime})
Last Hour – Formula Field type
HOUR({Last Runtime})
Setting up the Automation in your Airtable base
Now, we’ll create an automation that sends an email every hour.
Create the trigger – Trigger on Active Status and Run Now field is YES
- First, go to the Automations menu in your base and click +New automation
- Name it Email Once Daily
- Click + Choose a trigger
- Choose When a record matches conditions
- Choose your Scheduler table
- For the first condition, choose When Status is Active
- For the second condition, choose And Run Now contains YES
- Click Run test – you will need to set your Last Runtime to one hour prior to the date and time shown in the Now field to get it to display YES
- Click Done
Add an action – Send Email
- Next, create an action by clicking +Add action
- Click Send an email
- Enter an email address into the To field (preferably one you can check and verify the test)
- Add the Email subject – You can manually type in a subject or you can insert any field value
- Add the Message body – I typed Last Runtime then inserted the Last Runtime field value
- Click Run test
- Click Done
Add another action – Update the record after the automation is completed
This step resets the record, so it will run again next time. It will update the Last Runtime to the current time.
- Click +Add another action
- Choose Update record
- Select the Scheduler table
- Click the blue + icon
- Choose and insert the Record ID value
- In Fields, click Choose field
- Choose the Last Runtime field
- Click the blue + icon
- Choose and insert the Now field value
- Again, Click Choose fields
- Choose the Force Run field
- Click the blue + icon
- Choose and type a zero “0” (without the quotes) in the Force Run value – this will make sure it is unchecked
- Click Run test
- Click Done
- Turn the automation on

Using the scheduler
First, we will test it out without the automation turned on.
- In the Last Runtime field, change the time to a previous date and time from the current date shown in the Now field.
- This will change the Next Runtime field and the Run Now field should say NO
- Again in the Last Runtime field, change the date and time to an hour before the Now field. This will change the Next Runtime field to the same hour as the Now field.
- The Run Now field should say YES

Now, open your automation to the Update record action
- Click Test now to reset the fields
- Change your date and time again in the Last Runtime field to a previous date and time
- Turn the automation on
- Again, change the date and time in the Last Runtime to an hour before the Now field. This will change the Next Runtime field to the same hour as the Now field.
- You should see the Run Now change to YES
- Your automation will then run and reset the time and your Run Now should say NO again

Final Thoughts
Now, you know how to trigger automations on a schedule! Copy our base for your template and create the automation. Setting your automation on a recurring schedule eliminates having to manually process information.
For automated backups of your Airtable data, check out On2Air Backups.