Use Your Form to ‘Create OR Update Airtable Records’
🔴 On2Air Forms has been shutdown to focus on our On2Air Backups Airtable app Learn more about automated Airtable backups - on2air.com
With this option, you can use your form to both Create or Update Airtable Records.
💡
Other Options:  Use Your Form to ‘Create New Records Only’
  Use Your Form to ‘Update Existing Airtable Records Only’
-
Create Records
-
Create Configuration
-
Build Your Form
-
Default Record
-
Dynamic Defaults
-
Update Configuration
-
🎥How to Update Airtable Records Video Tutorial
-
Update Records Form Setup
-
Update Records with a URL or Button from Your Airtable Base
Create Records
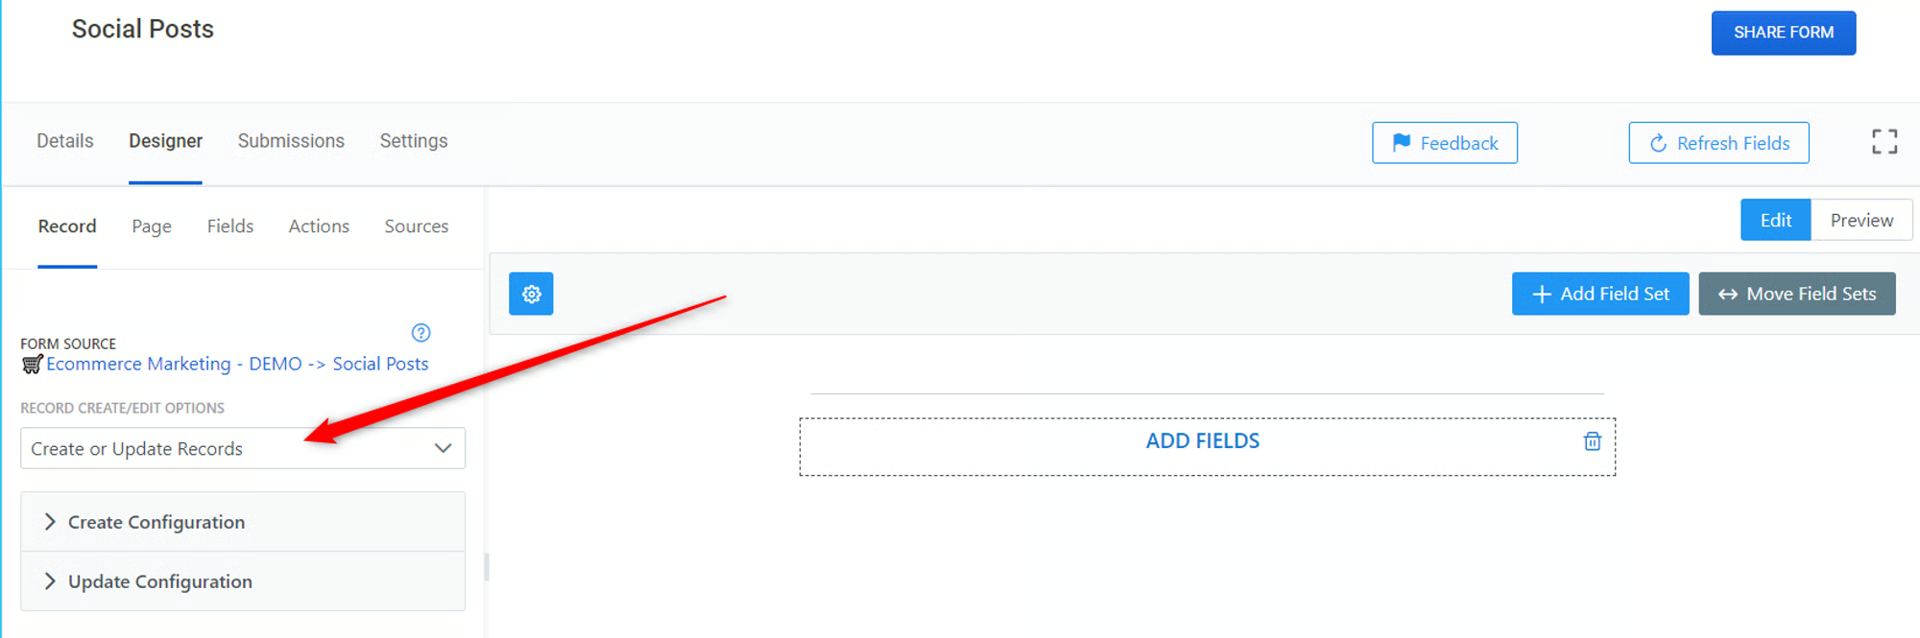
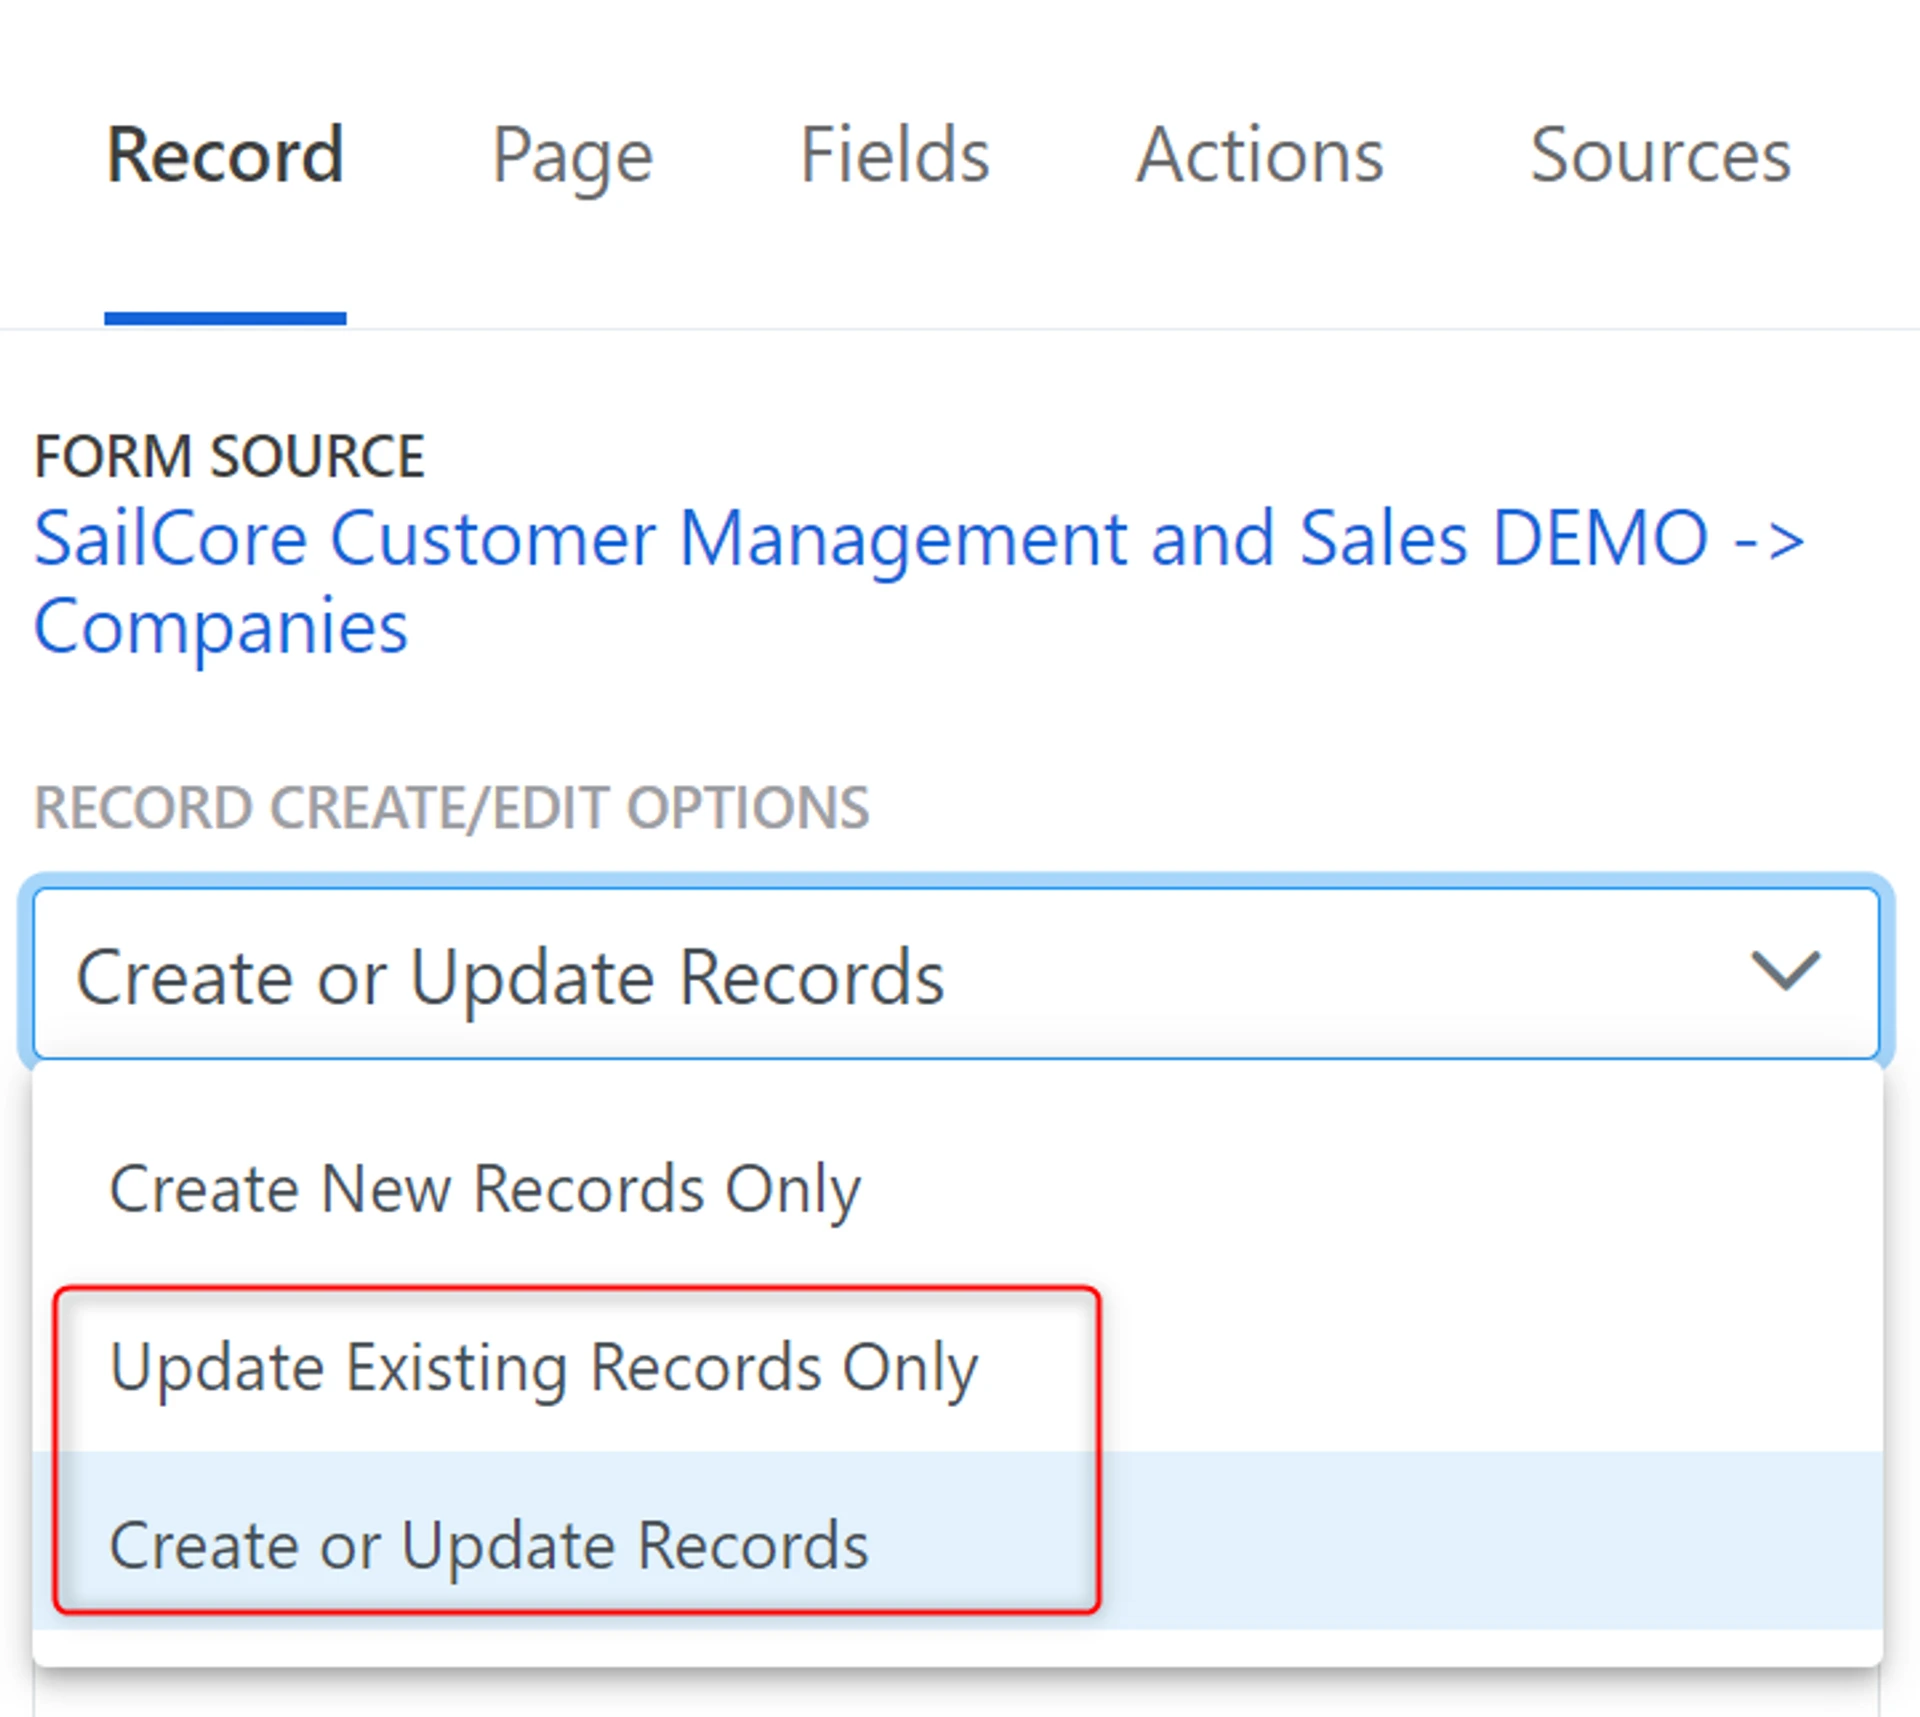
Section titled “Create Records”When building your form, you can set your form to either Create Records, Update Records, or both Create and Update Records.
When you first create a form, you’ll go to the Designer and it will be the first setting you see.
By default, a form is set to Create or Update Records
You can find this setting in Designer > Record > Record Create/Edit Options
Create Configuration
Section titled “Create Configuration”Let’s look at the Create Configuration options.
By default, you can start building your form without adjusting any of the Create Configuration settings.
Build Your Form
Section titled “Build Your Form”➡️
Learn  How to Create a Form with Airtable and On2Air Forms and
  How to Configure a Field and Use the Designer
Default Record
Section titled “Default Record”Defaults Record ID
With the Defaults Record ID, you can create a record in your Airtable base that contains multiple default values for your form fields. When you share your form with a form user, all the fields with values from your Airtable record will be added to the form fields automatically.
To use this setting
- Create a record in the Airtable Source table you used for your form that contains all your default values
- Copy the Record ID of the default record
💡
Related:  How to View Record IDs in Airtable
- Enter the Record ID in the Default Records ID field
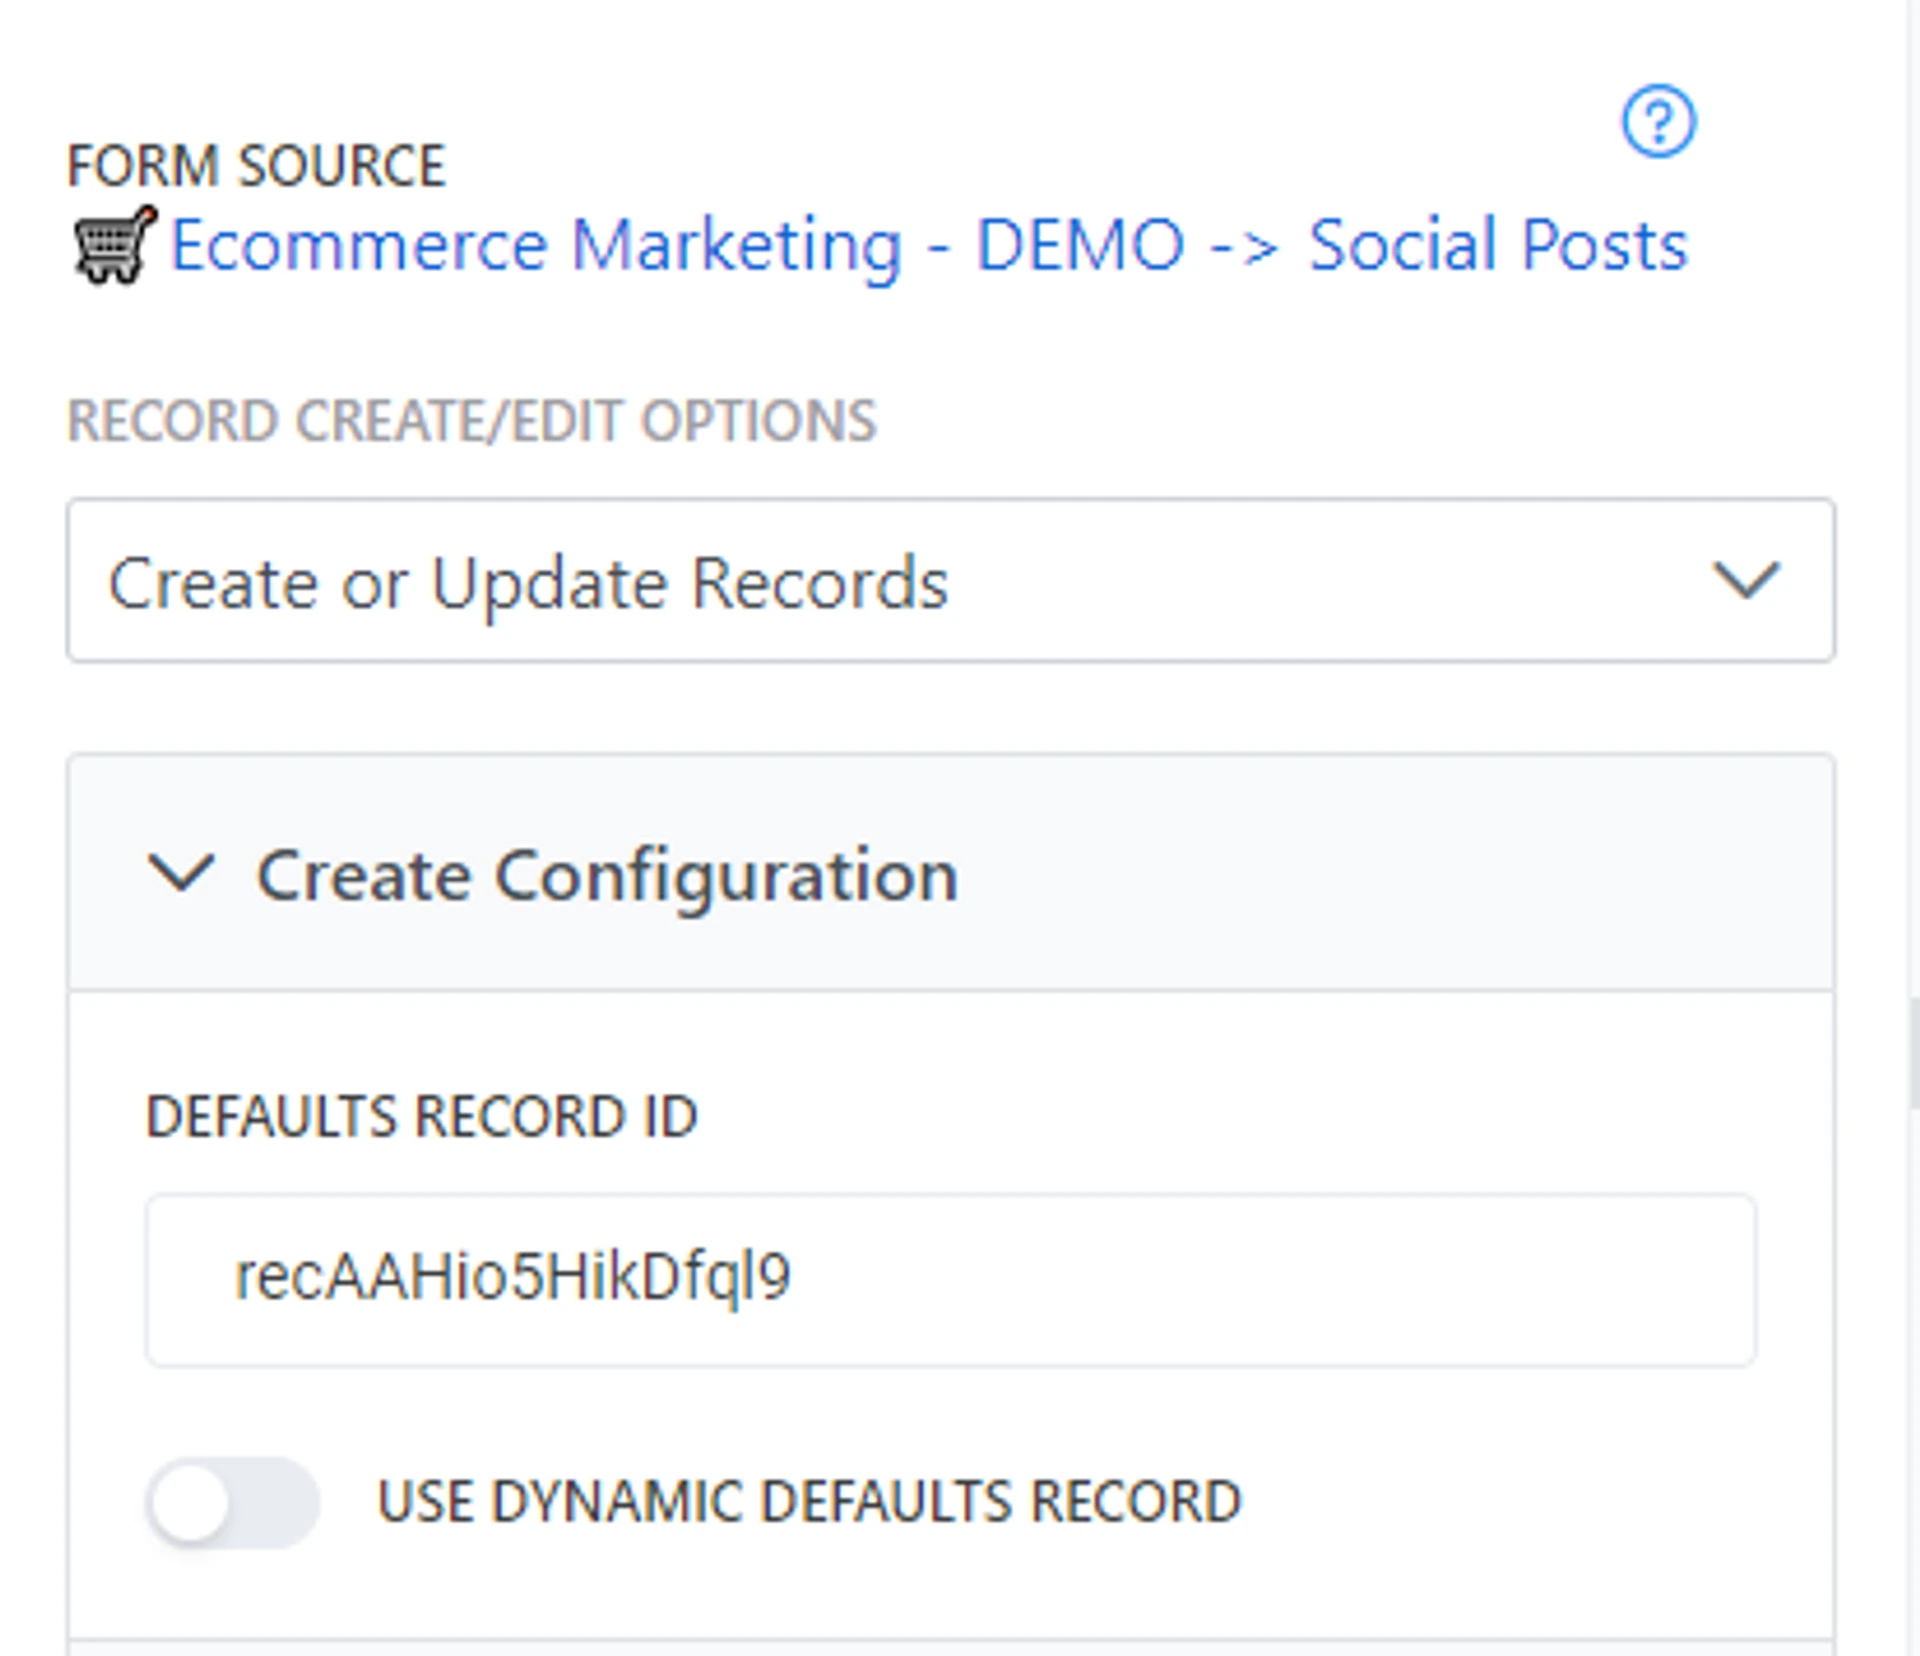
All form fields will contain the default values from the record you enter here. Use the Dynamic Defaults option below to use multiple Airtable records as default values based on what the user chooses.
💡
Related:
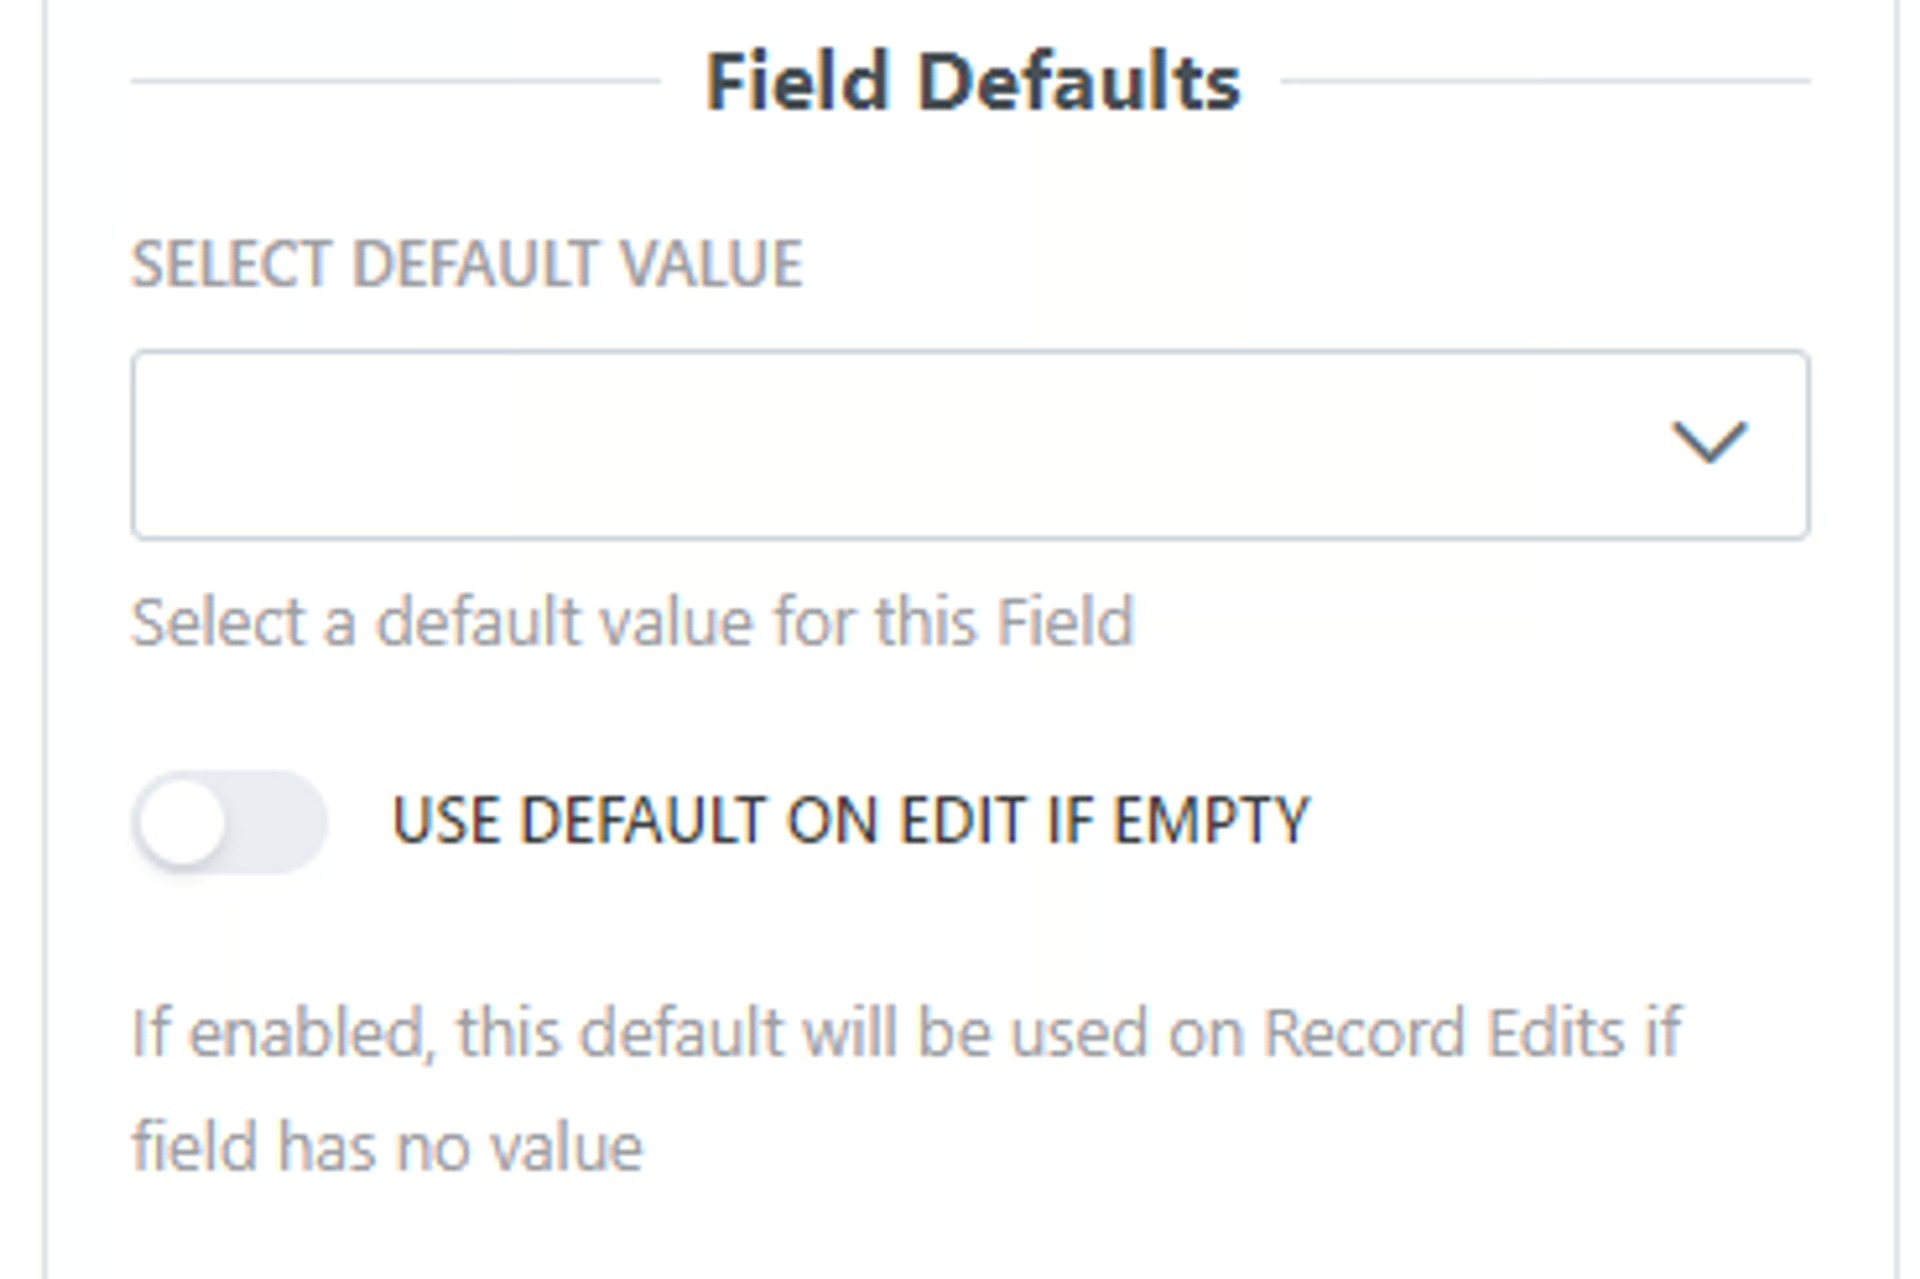
If you want to add field values in specific fields in your form, you can use the Field Defaults option on any field - Learn  How to Add Default Values to Your Form
Dynamic Defaults
Section titled “Dynamic Defaults”Use Dynamic Defaults Record
Dynamic Defaults can be used to add default values to form submissions based on what the form user chooses.
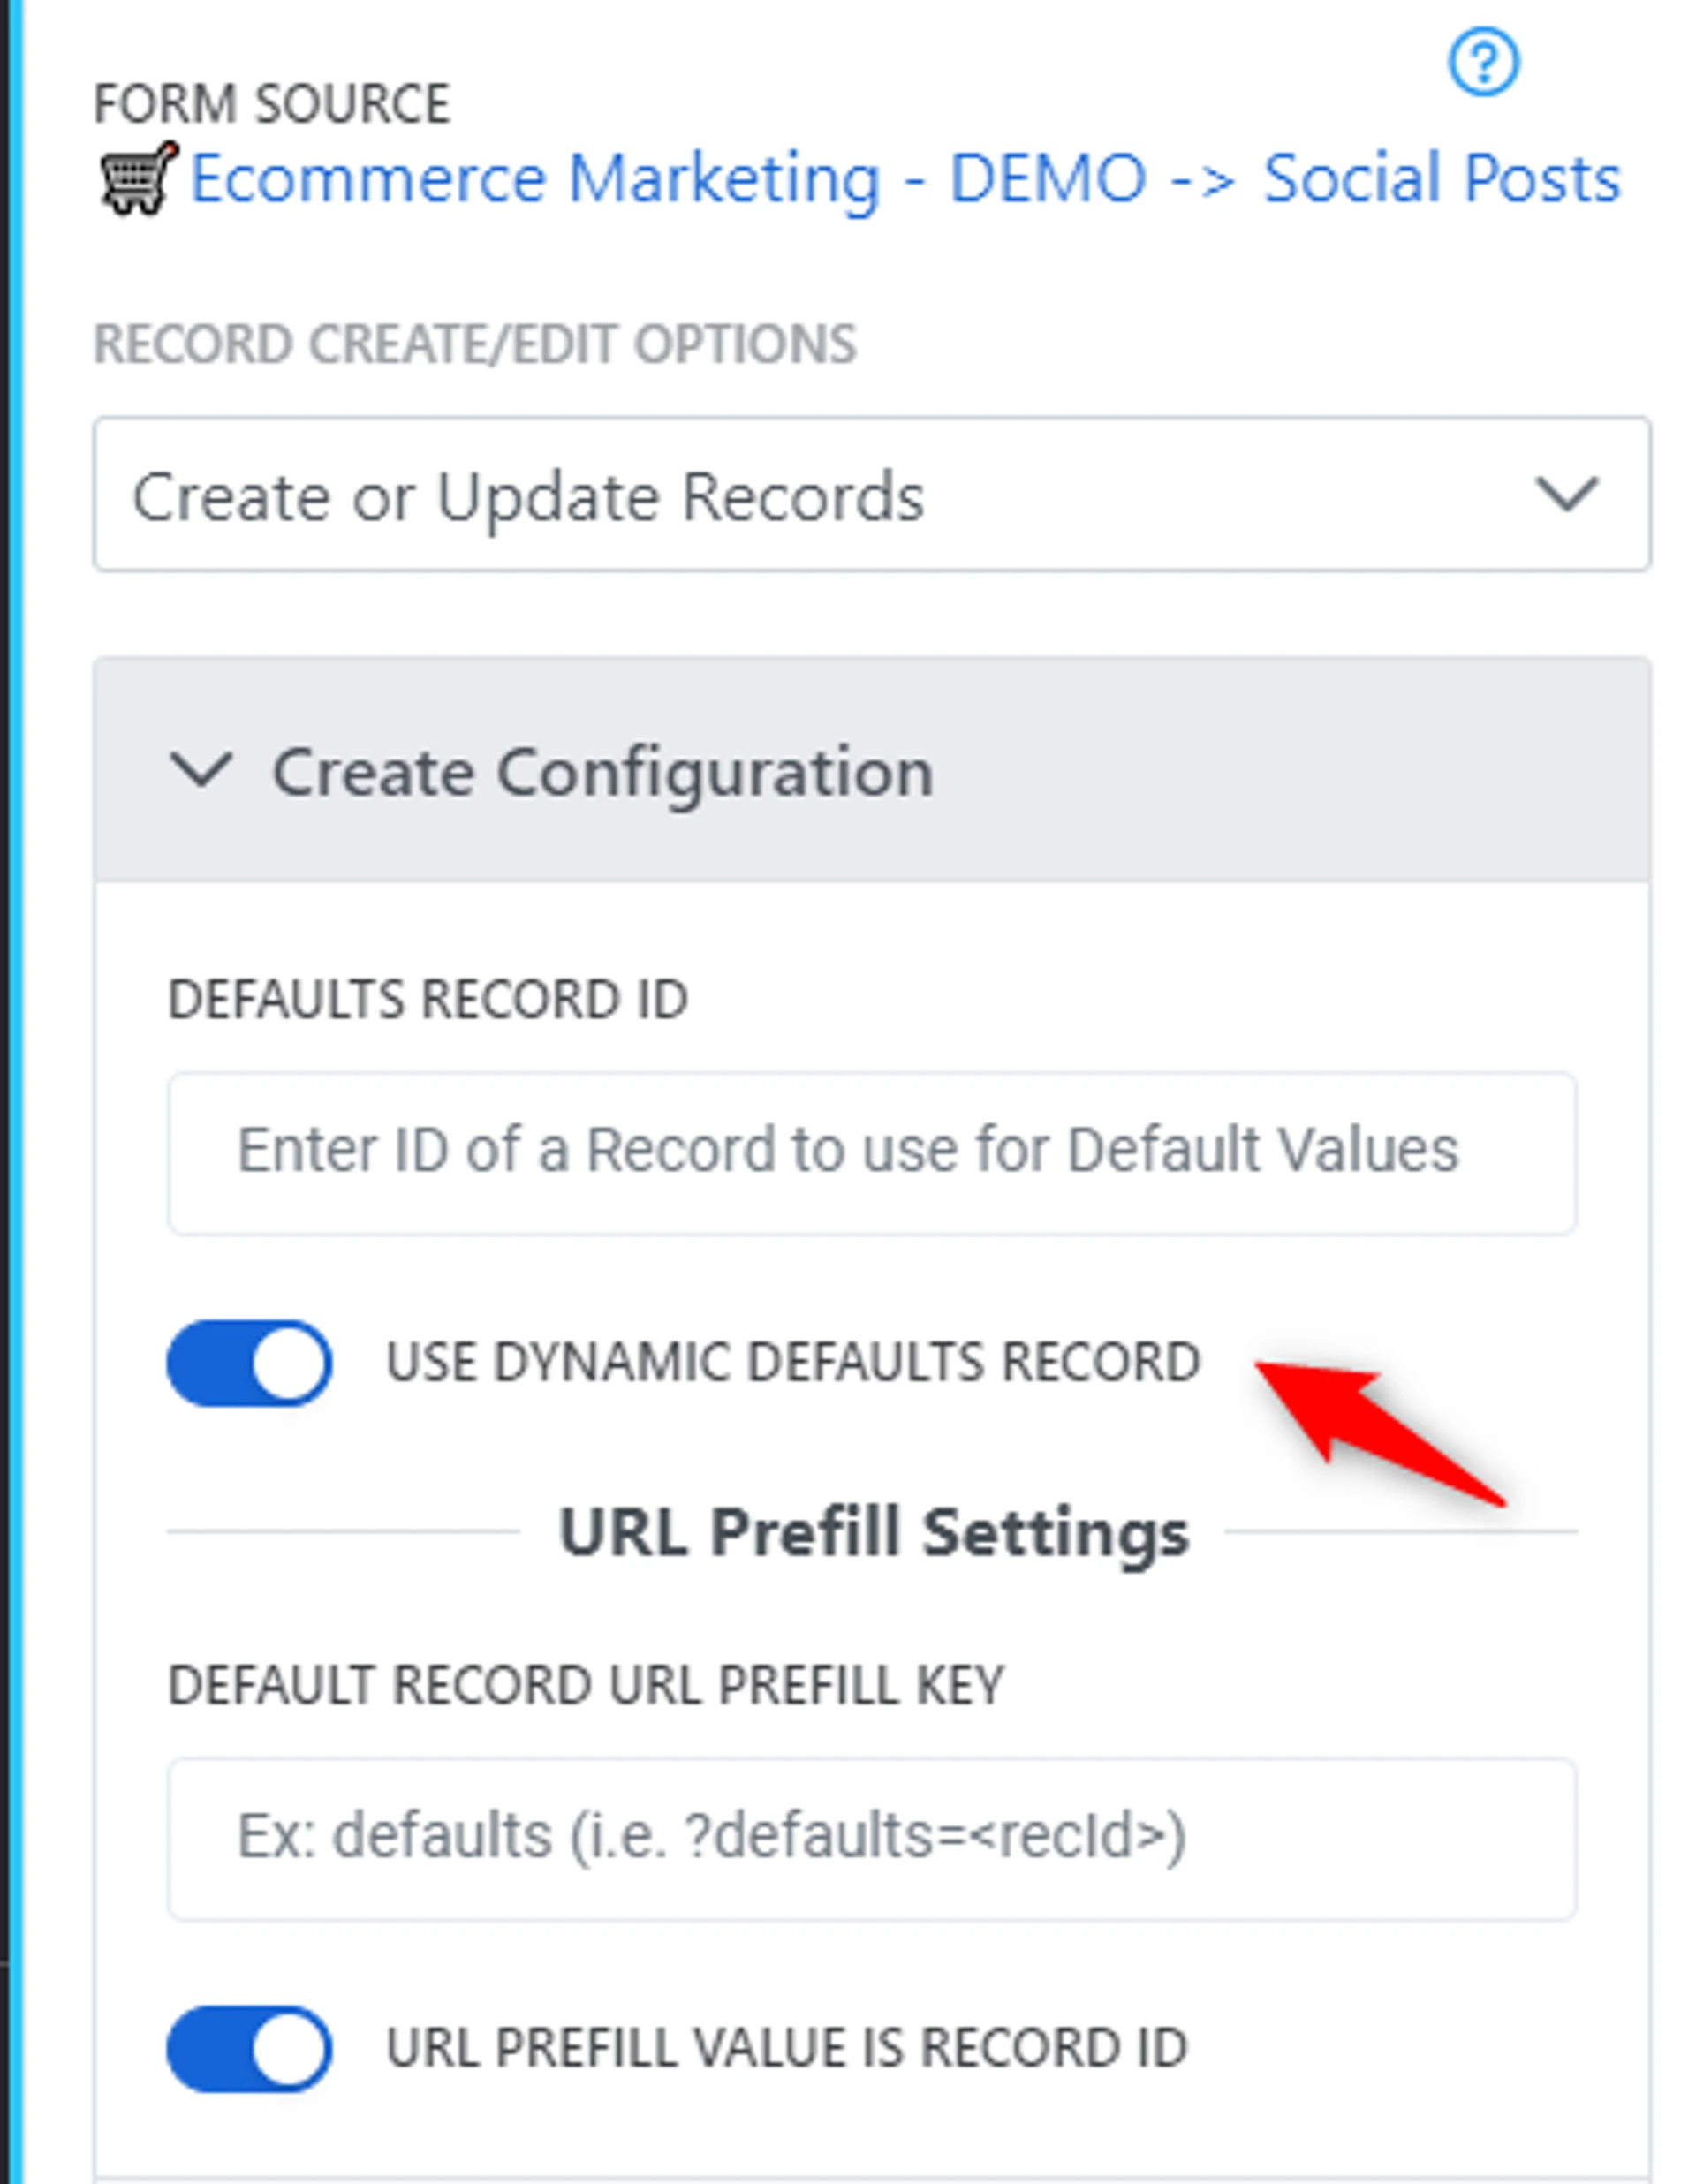
Default Record URL Prefill Key
Enter in the default Record URL Prefill Key
Example: If you want the prefill key to be defaults, with a URL that looks like on2air.com/form/formID?defaults=recordID, then the prefill key would be defaults
💡
Related:  What is a URL Prefill (Pre-Populated Fields) and How to Use Them in On2Air Forms
  On2Air Forms URL Format
URL Prefill Value is Record ID - By default, this will be enabled to use the Airtable Record ID as the URL Prefill Value
💡
Related: How to View Record IDs in Airtable
Case Sensitive Match - Enable if the Default Param Field needs to match exactly, including upper case, lower case, or other case
💡
Related: How to Add Default Values to Your Form Submissions
Update Configuration
Section titled “Update Configuration”🎥How to Update Airtable Records Video Tutorial
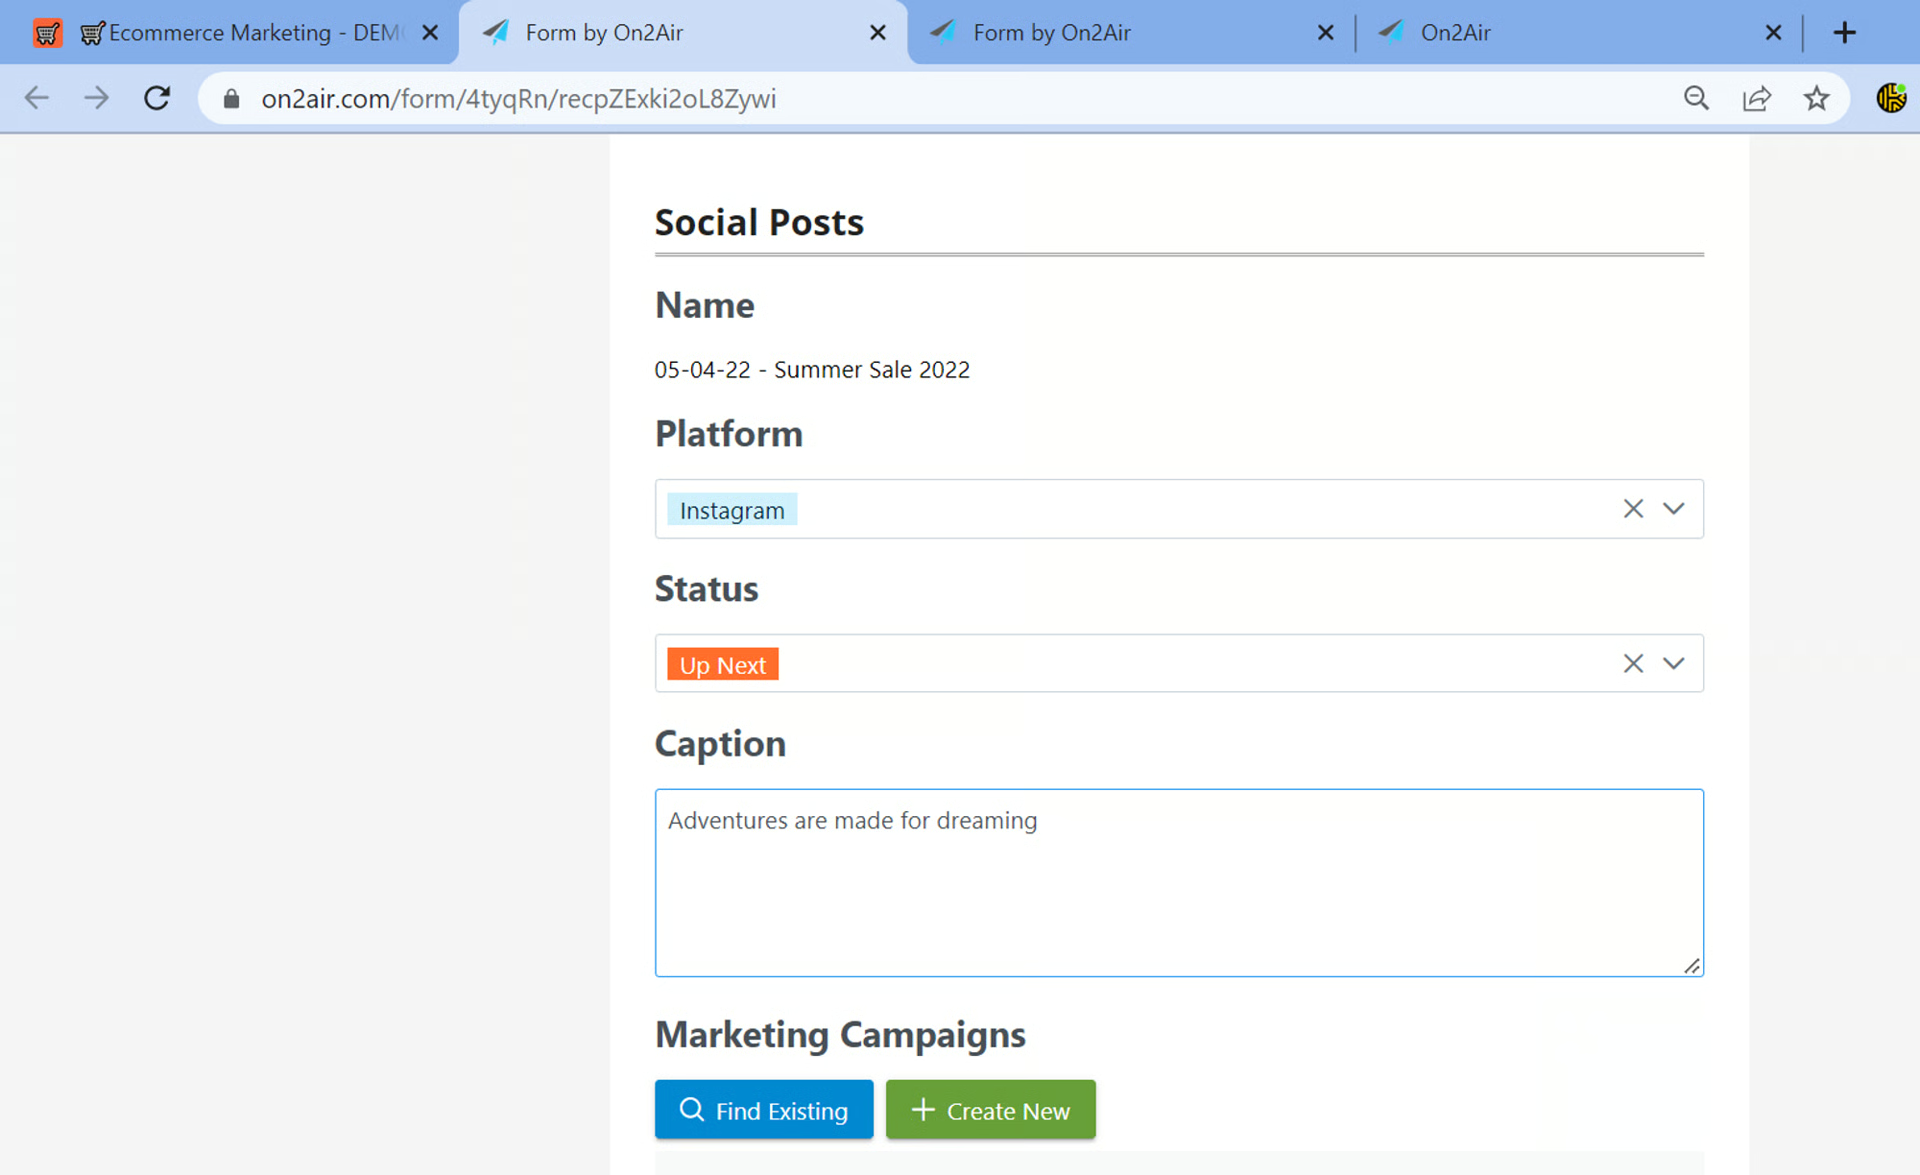
Section titled “🎥How to Update Airtable Records Video Tutorial”Update Records Form Setup
Section titled “Update Records Form Setup”- In the Record Create/Edit Options, set your form to either Update Existing Records Only or Create or Update Records
Set up the configuration for how existing records are matched in Airtable
How to Perform Match on Record to Update
Choose how the updated record will be matched in Airtable
- Use Record ID in URL Path - DEFAULT and Recommended
- Match with URL Prefill
Use Record ID in URL Path
Record Not Found/Invalid Message
- Use this to display a message if the record is not found or is invalid. Click the icon to open the message box. You can use the formatting options in the message box, Markdown, or WYSIWYG.
Match with URL Prefill
Update Match Field Prefill Key
Update Match Field
Case Sensitive
- Enable if Match Field needs to match exactly, including upper case, lower case, or other case
Record Not Found/Invalid Message
- Use this to display a message if the record is not found or is invalid. Click the icon to open the message box. You can use the formatting options in the message box, Markdown, or WYSIWYG.
Update Records with a URL or Button from Your Airtable Base
Section titled “Update Records with a URL or Button from Your Airtable Base”This will show you how to Update records in Airtable with On2Air Forms and a Formula or Button field in your Airtable base.
-
Build your form with the fields you want on your form
-
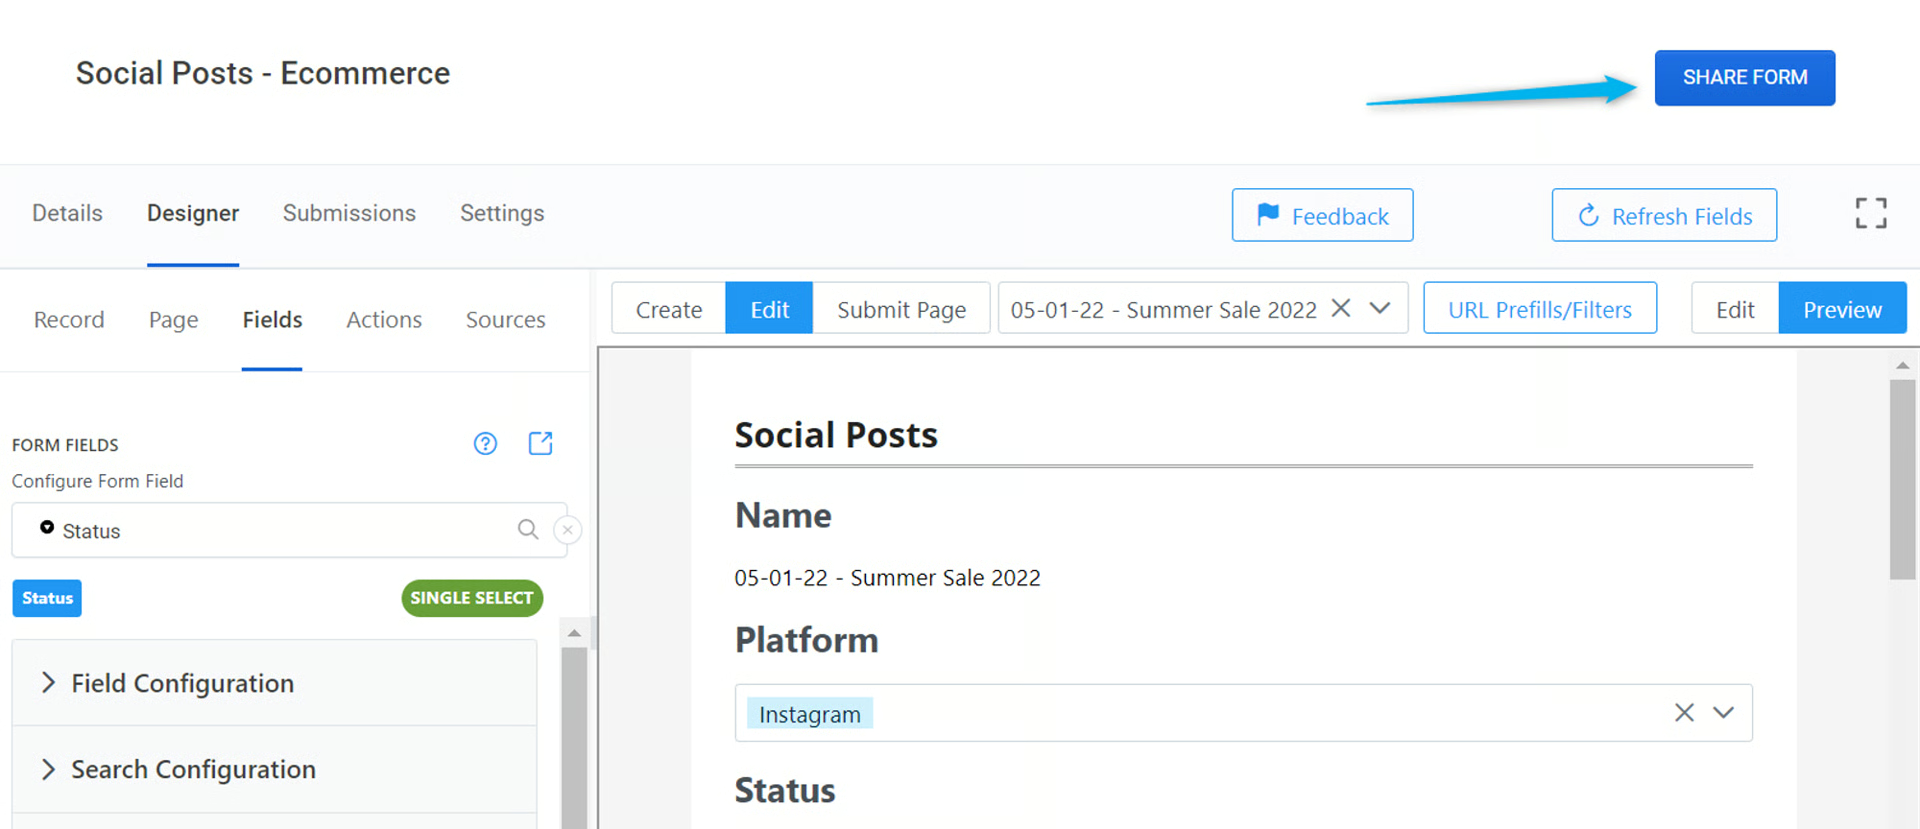
Click Share Form
- Choose the Update option and choose Airtable Link/Button
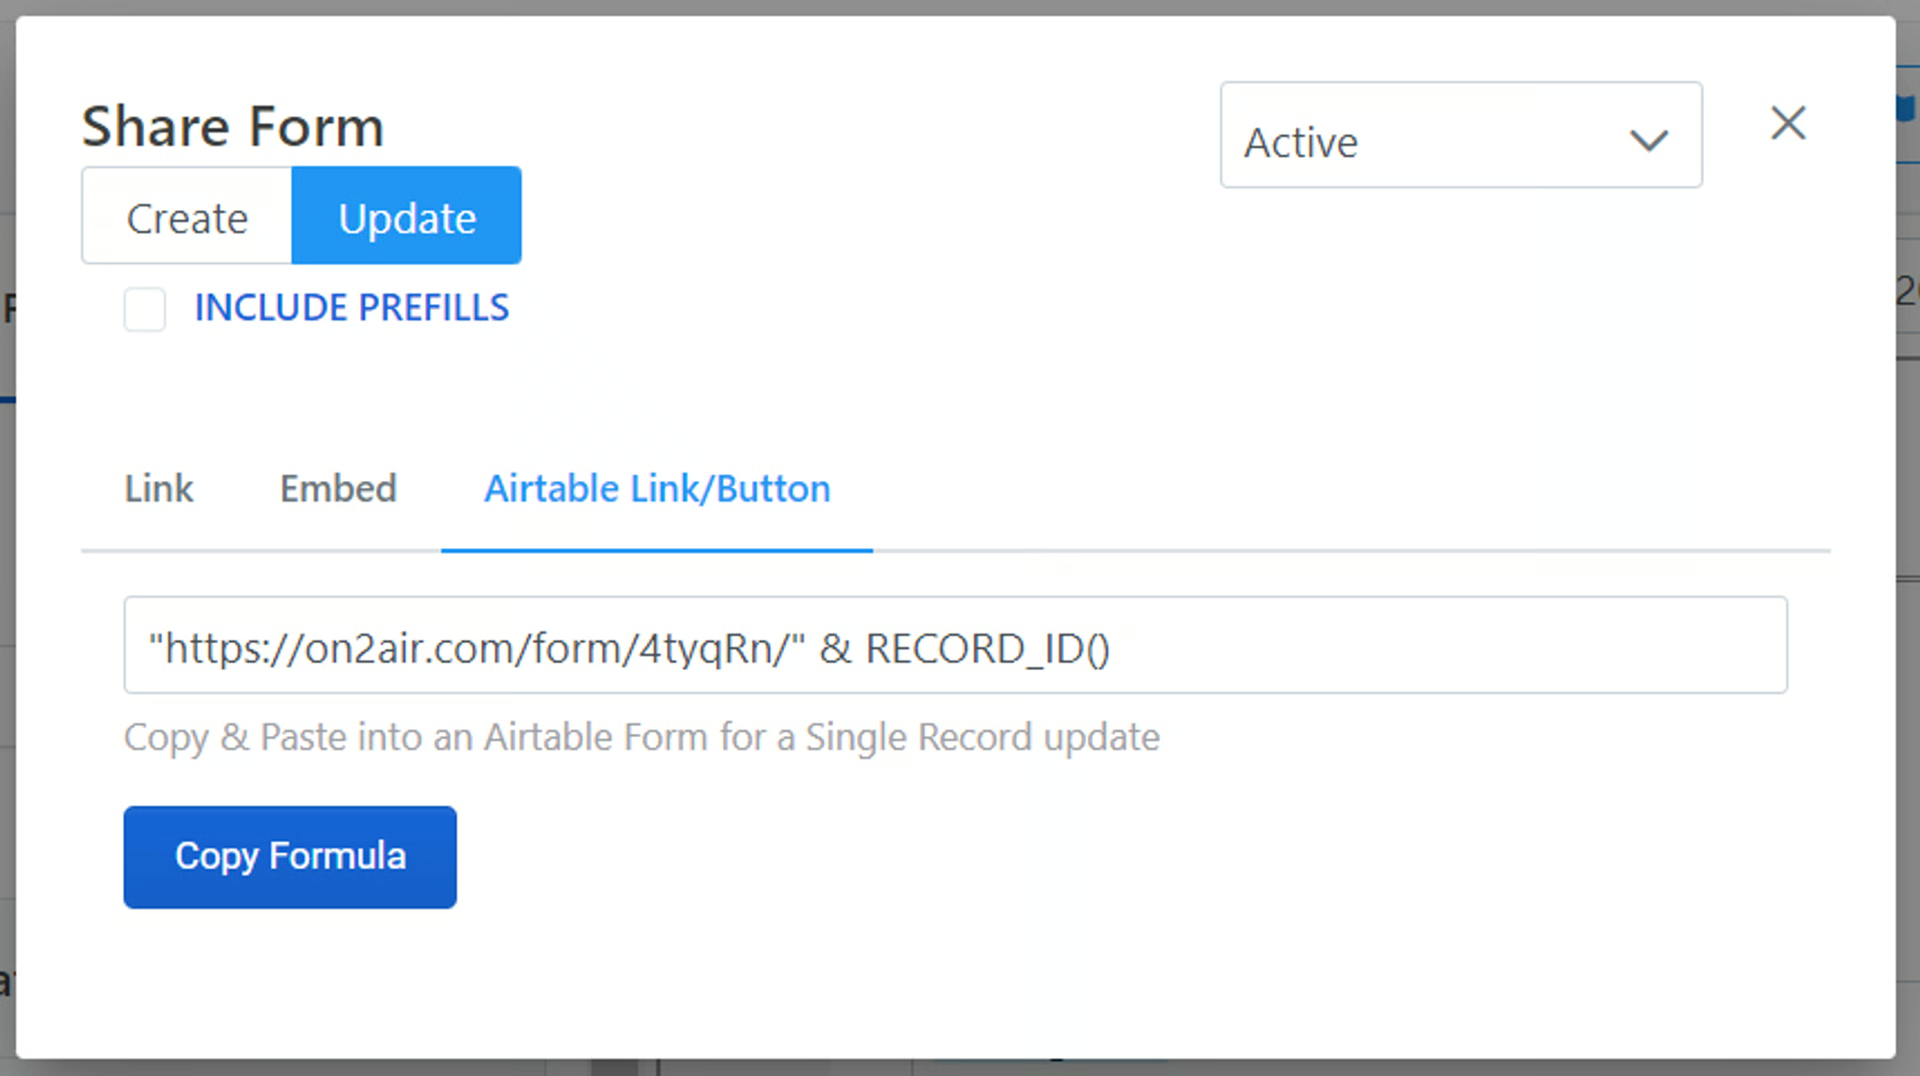
- Copy the Formula
- Add a Button or Formula field to your table in Airtable that’s the same as the Form source
- Paste the formula into your Airtable button or formula field
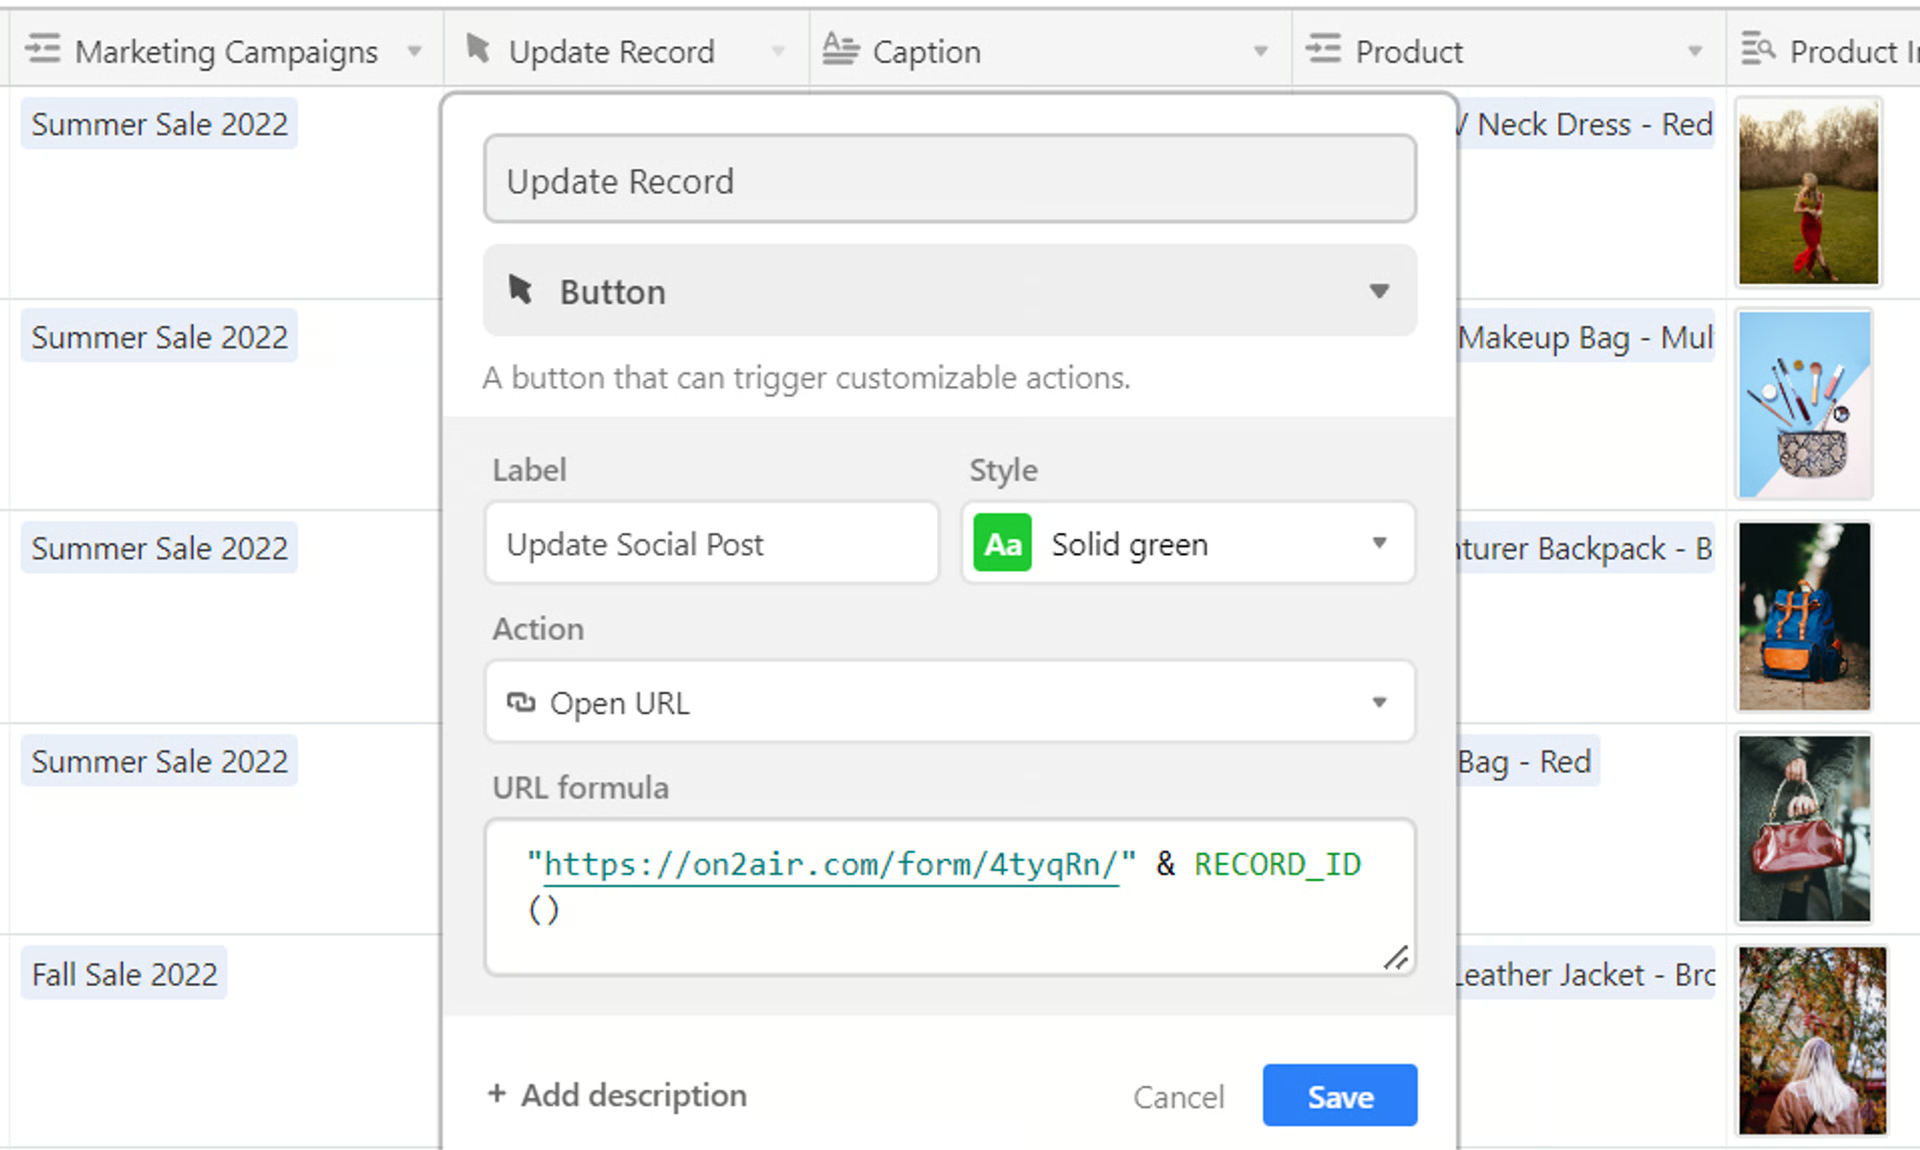
- If you used a Button field, you’ll see a dynamic button with the specific record URL created for every record in your table
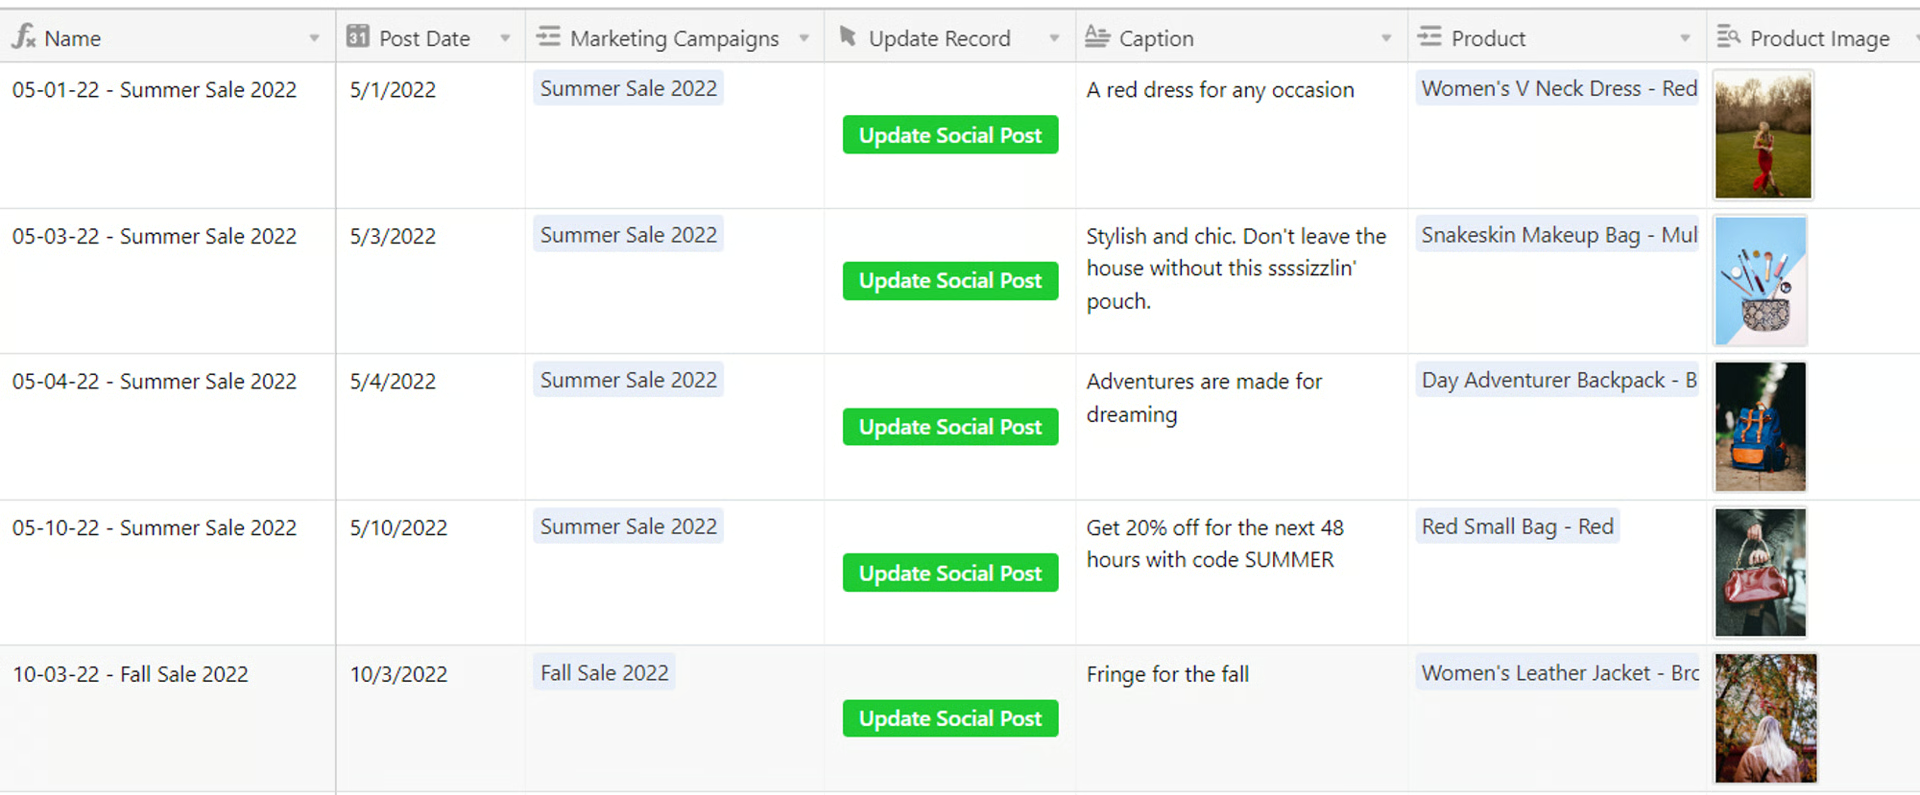
- If you used a Formula field, you’ll see a list of dynamic URLs for each record
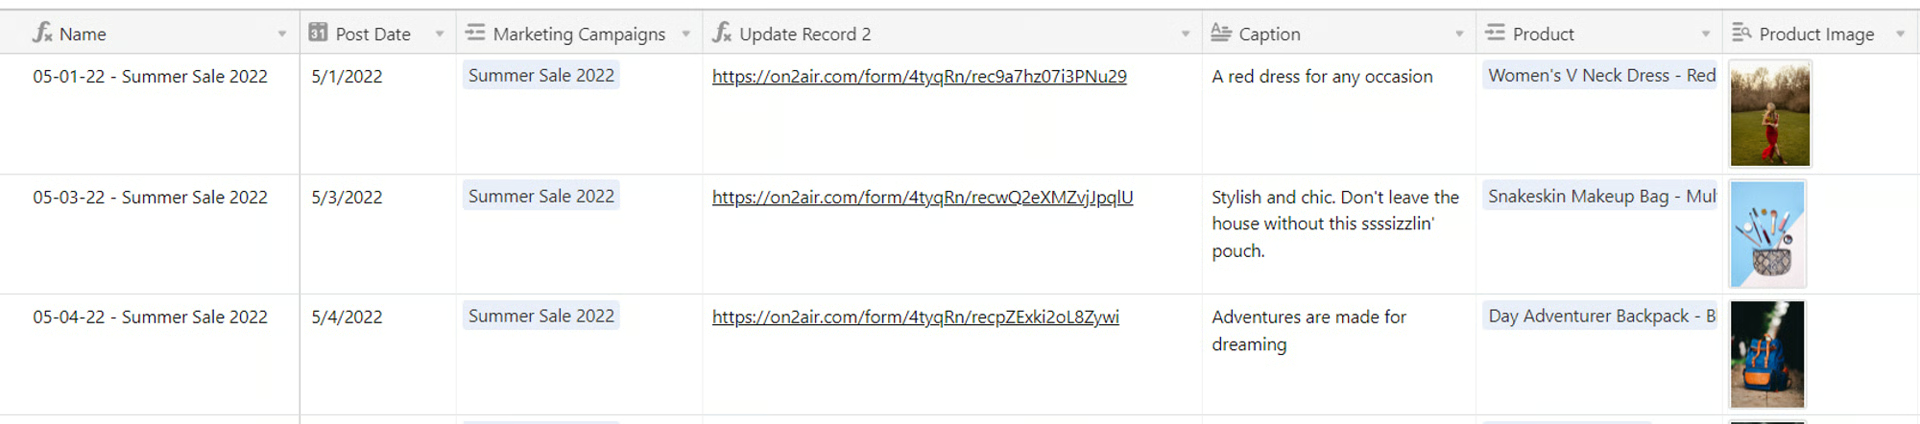
- When you click the Button or URL in a record, you’ll see the entire record with all the data (depending on your
 Permissions and Field Display Mode)
- You can use this URL to share with others to update a record or you can use internally to quickly update records