A 7-Step Guide to Restoring Deleted Airtable Data
Data loss in Airtable can be devastating. In this tutorial, you'll learn step-by-step what you need to do to restore your Airtable data.
A 7-Step Guide to Restoring Deleted Airtable Data
by Hannah Wiginton | Airtable, Airtable Automations, Airtable Backups, On2Air Backups

Data loss in Airtable through accidental error, incorrect automation setups, human-error, or anything else can be devastating. If you’ve just discovered that you’ve lost some data or you fear it will happen to you, this is the source you need.
In this tutorial, you’ll learn step-by-step what you need to do to restore your Airtable data.
Download tutorial and checklist as a PDF
On2Air Backups automatically backs up your Airtable data on a schedule to your storage drive. We can also restore your data if you have a backup from On2Air Backups.
In this article
- Get started with Airtable recovery immediately
- How do I restore my Airtable base data?
- If it just happened
- If it’s been less than 7 days
- If it’s been more than 7 days
- How to Restore Airtable Data with On2Air Backups
- Why should you have data backups?
- How can I prevent Users from deleting bases, fields, or data?
- Protect and secure your data stored in Airtable
Get started with Airtable recovery immediately
You’ve just discovered you have missing data, fields, views, bases, or workspaces.
Once you’ve discovered there’s a data discrepancy issue, it’s best to immediately start working on restoring your data as history and revision features in Airtable are all time-limited for restoration.
Let’s walk through the steps of what it takes to restore, or at the very least, try to get a version of your Airtable data back into your hands.
💡 See how Charm Industrial Backs Up Mission Critical Airtable Data with On2Air Backups – Read their story
How do I restore my Airtable base data?
If you discover your data or a base has been deleted or altered, follow these steps:
If it just happened
You just deleted data in a field or fields. If it just happened, you may be able to quickly undo it.
– Click CTRL Z on your keyboard or Undo in the base

If it’s been less than 7 days
— Check the Base Trash
To find tables, views, fields, extension, or records that have been deleted:
You can view the Base Trash. The trash function allows to see and restore the tables, views, fields, extensions, and records that have been deleted in a base in the past seven (7) days.
Open your base and click the History icon, then the Trash option
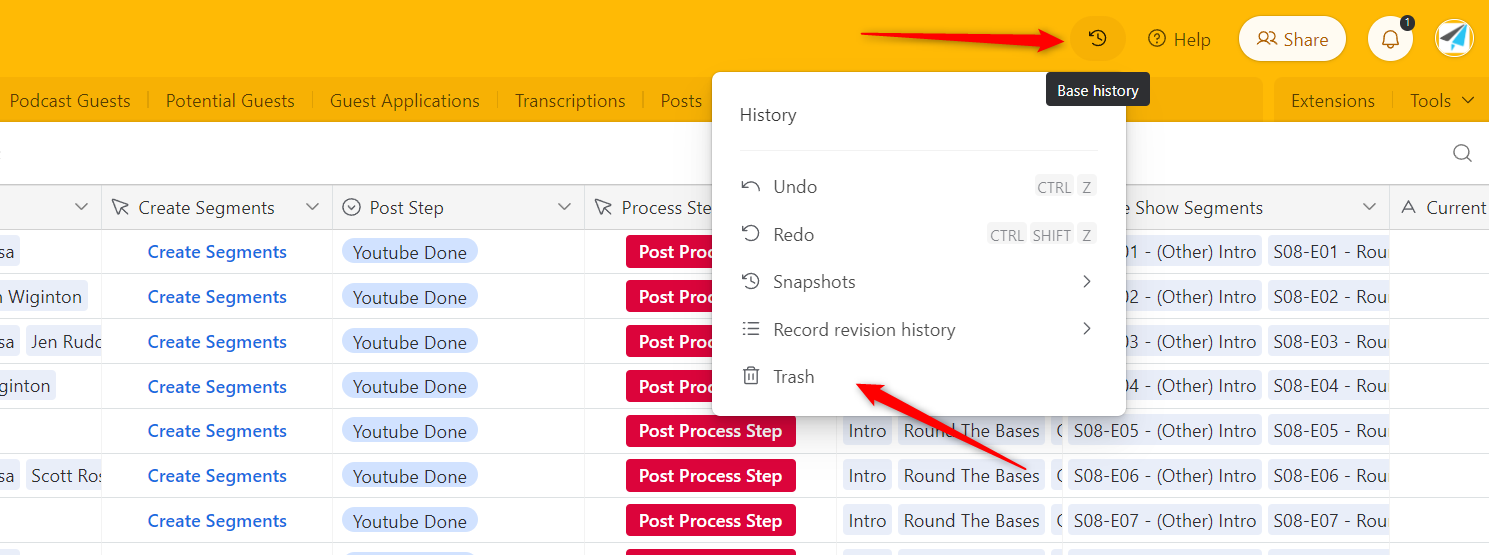
Learn how to use the Airtable Base Trash feature: Base Trash
You can view more in their Data Recovery and Deletion section
— Check the Workspace Trash
If you deleted a base or a workspace
A deleted workspace or base will be temporarily available in the workspace trash for seven (7) days.
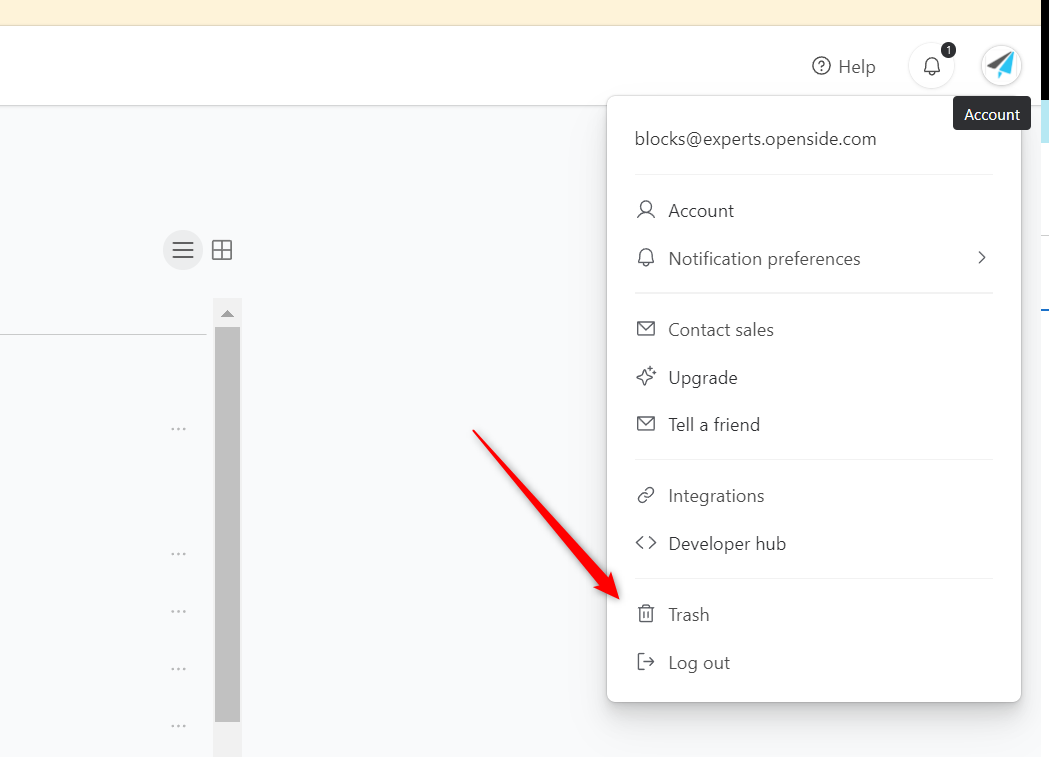
Learn more about the Workspace Trash
If it’s been more than 7 days
— Review Airtable Record Revisions
If a field value was deleted or altered in a record, use Airtable’s Revision features to review changes in a record. You’ll need to know what you’re looking for and look into individual records – Example: what record is missing data and what field value was possibly deleted or altered.
Inside of each record, you can see the history of record changes, when and if something was deleted and what was deleted.
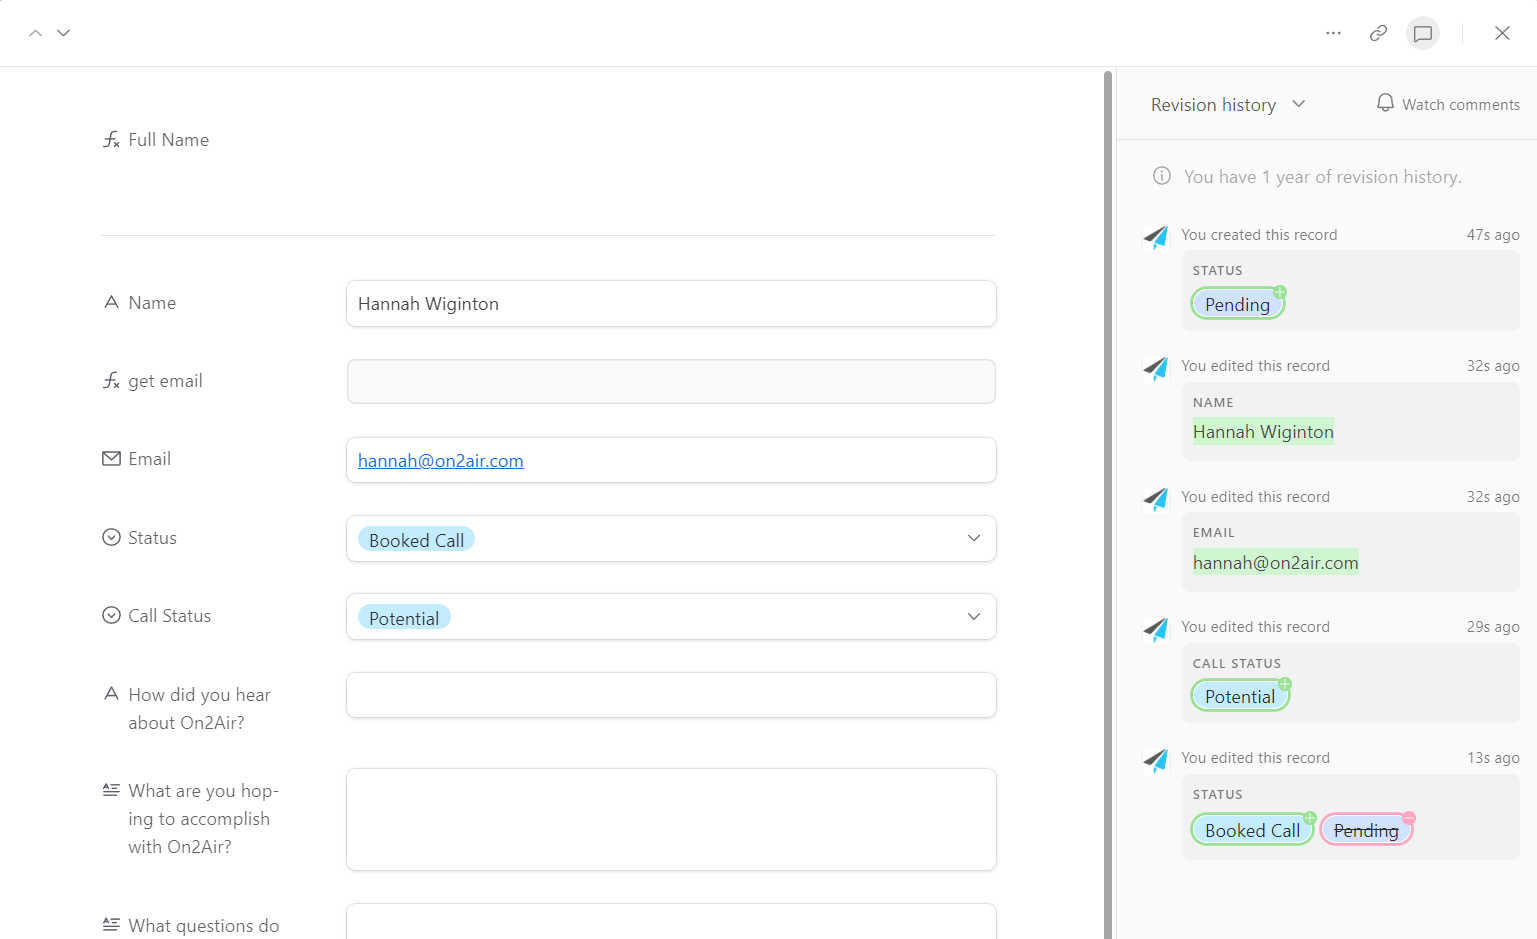
You can then see what happened and when it happened. Knowing a timeframe when it happened can help with the next steps.
Learn how to use Airtable’s record level revision history: Record-level revision history overview
- For the Pro plans, you will be able to see the past 1 years of revision history.
- For the Enterprise plans, you will be able to see the past 3 years of revision history.
— Restore from a Snapshot
Airtable periodically and automatically takes Snapshots of your entire Airtable base. This includes the entire base, fields, and data. Snapshots are not taken on a specific schedule. They are based on how active users are in a base. A snapshot might be taken once every day in a very active base or it might only be taken once a month or every couple of weeks in a non-active base.
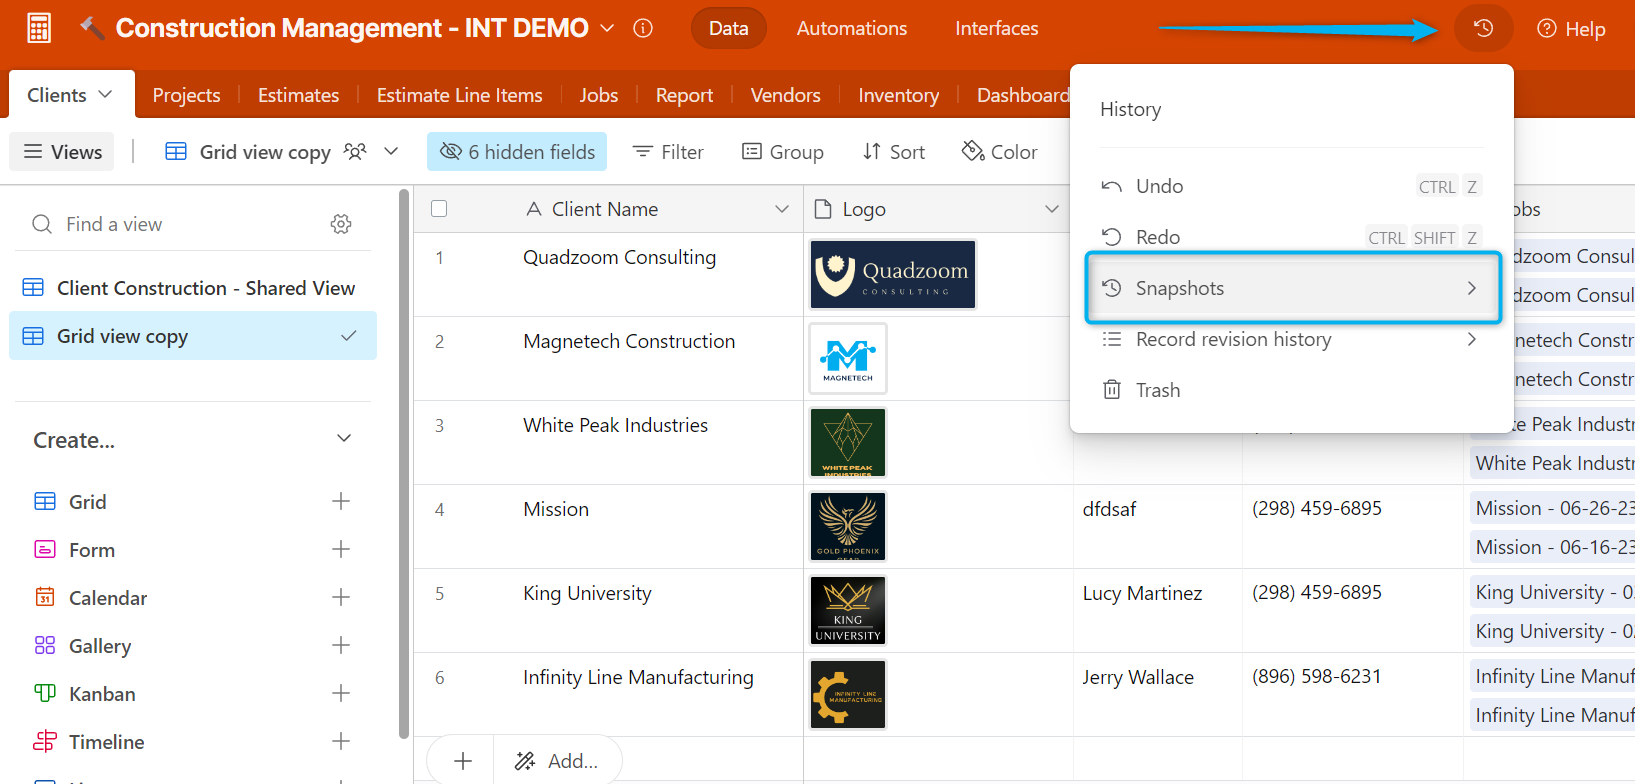
You can restore a base based on this Snapshot. When you restore a base, Airtable creates an entirely new base. They do not overwrite the current version of your base. You’ll then be able to look at your data in the new base and either copy the missing data to your current base or start using the new one.
Automatic Snapshots are saved for a certain period of time, depending on your plan:
- For the Free plan, you will be able to see the past 2 weeks‘ worth of snapshot history.
- For the Plus plan, 6 months‘ worth of snapshot history will be saved starting at your time of upgrade.
- For the Pro and Enterprise plans, 1 year’s worth of snapshot history will be saved starting at your time of upgrade.
Learn more about Snapshots in the official documentation – https://support.airtable.com/docs/taking-and-restoring-base-snapshots
How to restore a base snapshot:
- Click the base history icon, then snapshots, then choose the snapshot you’d like to restore:
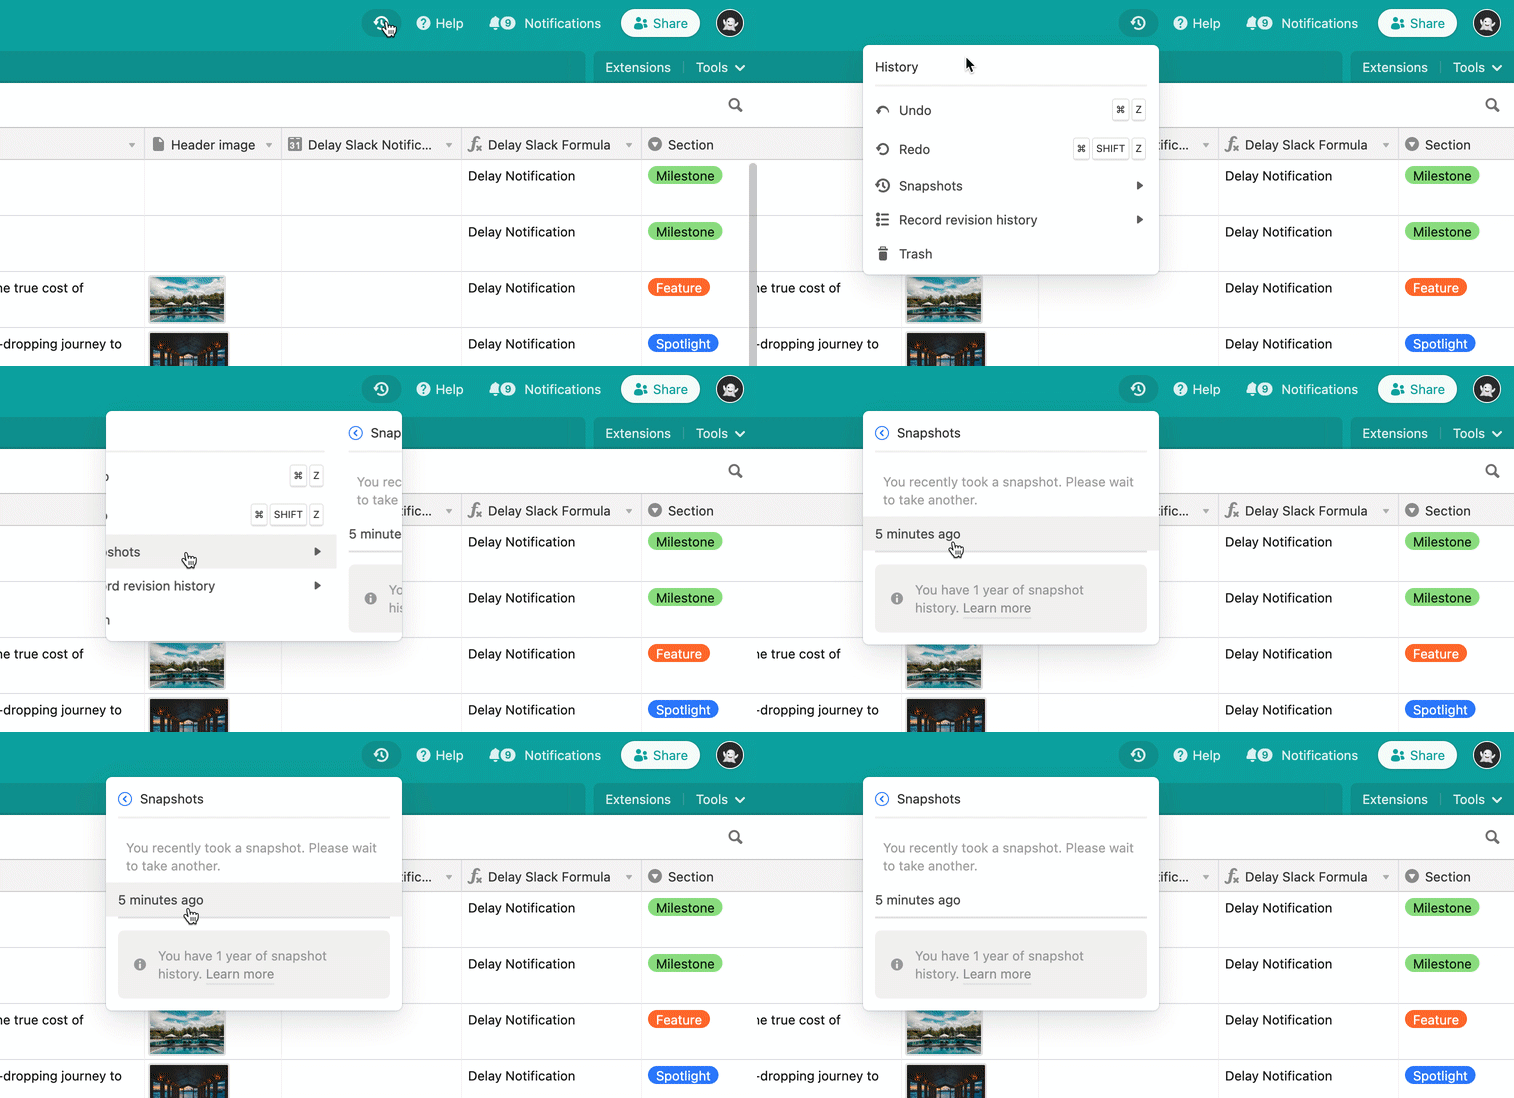
You will then be prompted to select a workspace into which to place the restored snapshot of your base.
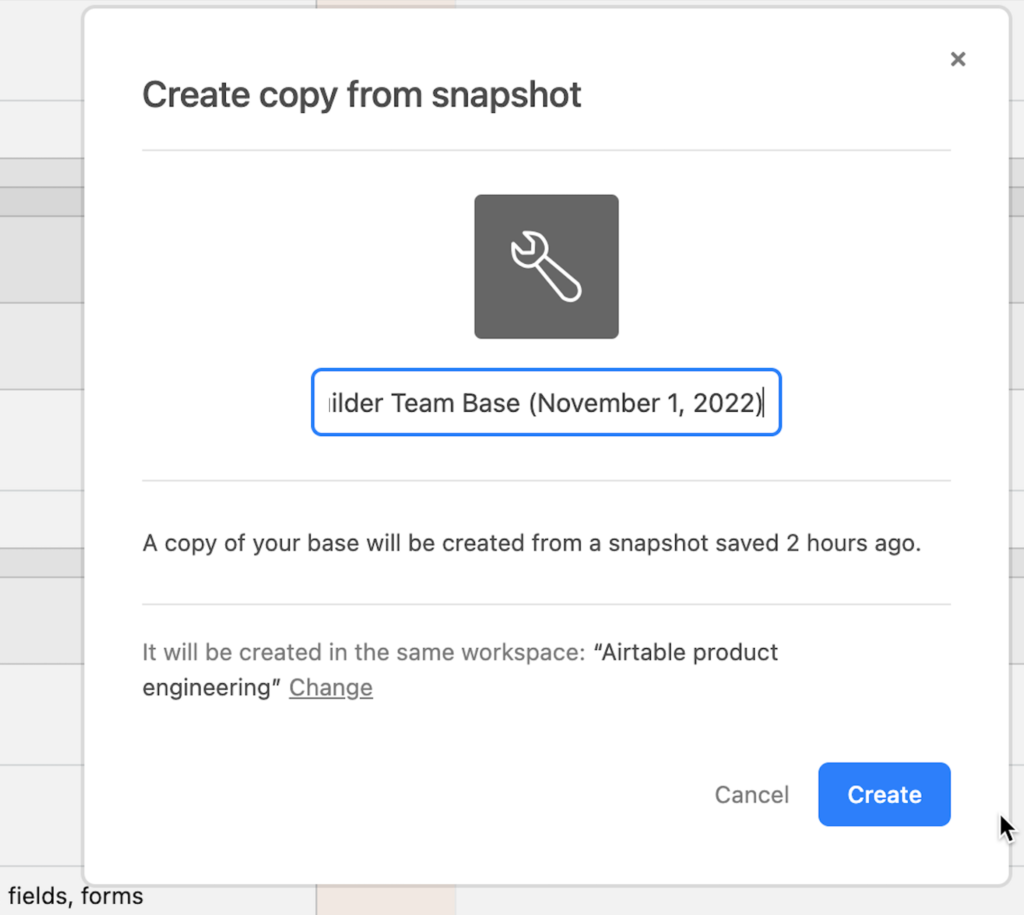
Snapshots are a previous version of the base. Since other changes may have occurred since the snapshot was taken, Airtable creates a new base in the workspace of your choice. T****hey do not overwrite the current version of the base.
— Contact Airtable Support
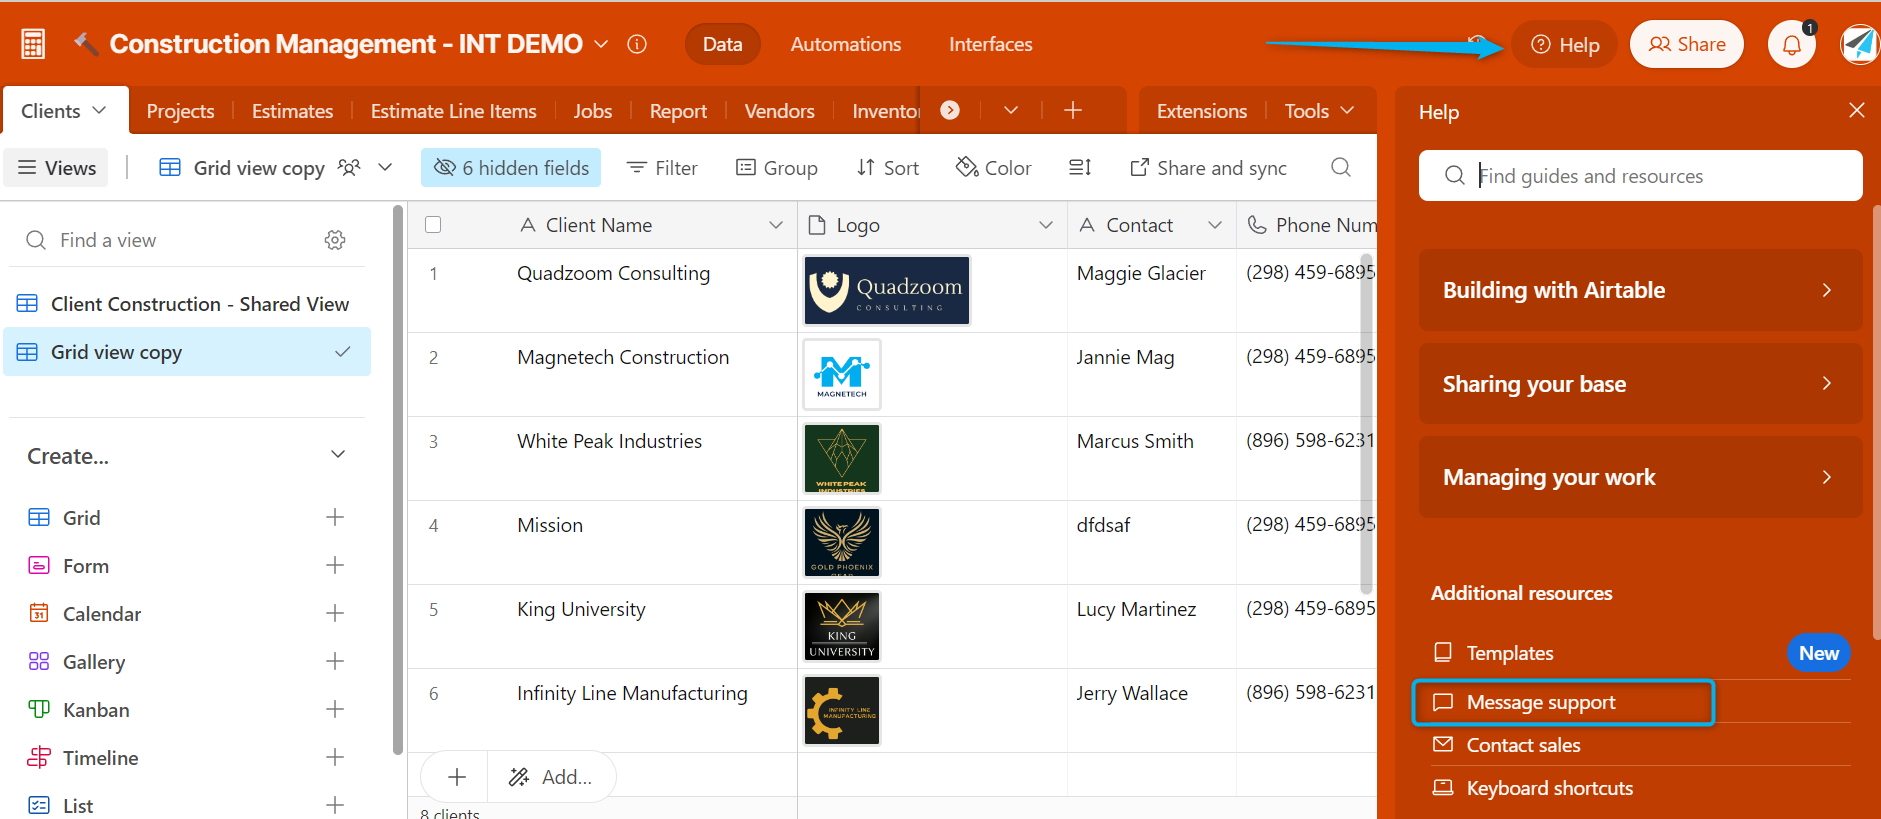
If you’ve tried all of the above steps without much success, reach out to Airtable support. You can ask if they will restore your account to a specific point in time.
However, there’s no guarantee they can or will restore your base or data. They’ll likely guide you through all the steps we listed above and have you use a base Snapshot.
— Hire an Airtable consultant
If you’re using On2Air Backups and have a version of your data or have previous spreadsheets stored somewhere, you can reach out to an On2Air Partner or an Airtable consultant to help you manually restore your data using your CSV and Attachment files created by On2Air Backups.
They have expertise in Airtable and may be able to help you assess the situation better. Once they understand all the moving parts of your data, they can restore and rebuild your base.

— Backup your data using On2Air Backups
While you hope to never have data deleted or be in a situation where your data is missing, it can happen to even the most careful. We can restore your data with an On2Air Backups automated backup.
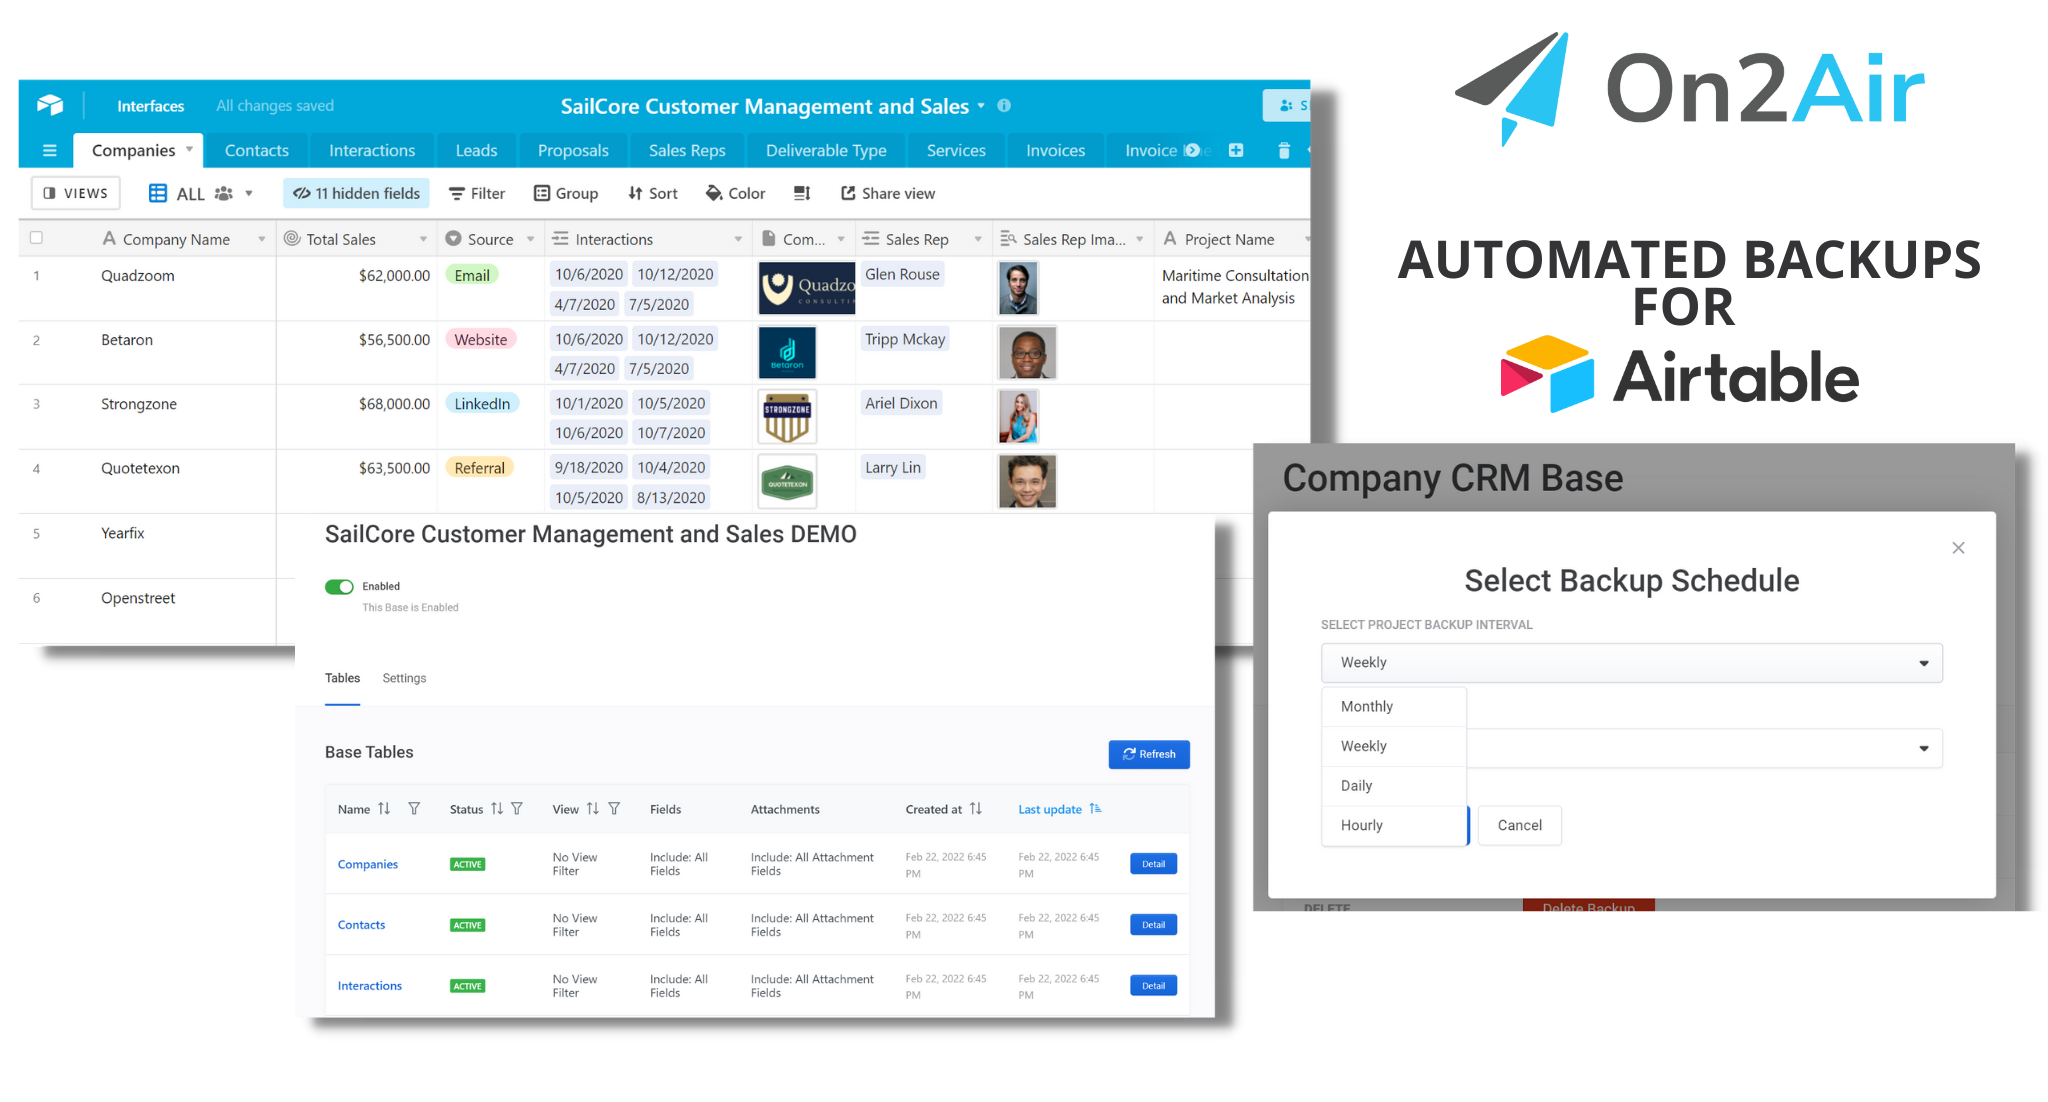
With On2Air Backups, your data from Airtable is automatically exported on a schedule you choose to Google Drive, Dropbox, Box, or OneDrive. This automation can be Hourly, Daily, Weekly, or Monthly.
💡 Learn more about best practices in our Essential Guide to Airtable Backups
How to Restore Airtable Data with On2Air Backups
You can restore with On2Air Backups after you have an automated backup from On2Air in your storage drive.

Why should you have data backups?
Many of our customers create an automated Airtable backup with On2Air Backups for one or more of the following reasons:
- Backup Best Practices (3-2-1 backup structure)
- Compliance
- Protect their own data
- Protect their client’s data
- Data redundancy
- Company growth with more users editing Airtable data
- Full Revision history
- Failsafe if access to Airtable is lost
- Ability to always have your data, no matter the software used
- If ever needed to move to a software solution other than Airtable
Data backups aren’t meant to be an afterthought, they’re deemed an essential element for ensuring cybersecurity in businesses and organization.
💡 See how LKF Marketing Creates a Backup of Their Airtable Bases with On2Air Backups and Ensures Their Clients’ Data is Safe – Read their story
How can I prevent Users from deleting bases, fields, or data?
– Implement Strict User Permissions
To prevent deletion or changes of your Airtable base layout like fields, tables, and views, you can create Users at an Editor level rather than an Owner/Creator.
More about Airtable User Permissions
You can also create Airtable Interfaces to give the user a front-facing portal without access to the database layer.
– Use an Airtable External Portal Tool
For even further mitigation of altering records or base layout schema, use a portal/dashboard that displays your Airtable data, but doesn’t allow any schema edits.
Tools like this include Airtable Interfaces, Glide, Noloco, Fillout, Softr, Pory, or Stacker and can be valuable to limit risk.
Protect and secure your data stored in Airtable
Hopefully, at least one of these steps has helped you recover your critical company data.
While data loss and errors do happen, having preventative measures and automated backups of your data with On2Air Backups make the loss less devastating.
💡 Sign up for On2Air Backups for Airtable to start protecting your data.
