Create and Edit Linked Records with Subforms (Update Multiple Tables from 1 Form)
🔴 On2Air Forms has been shutdown to focus on our On2Air Backups Airtable app Learn more about automated Airtable backups - on2air.com
You can create SubForm within a main Form in On2Air Forms. Subforms are useful for creating or updating linked records and tables from a single form.
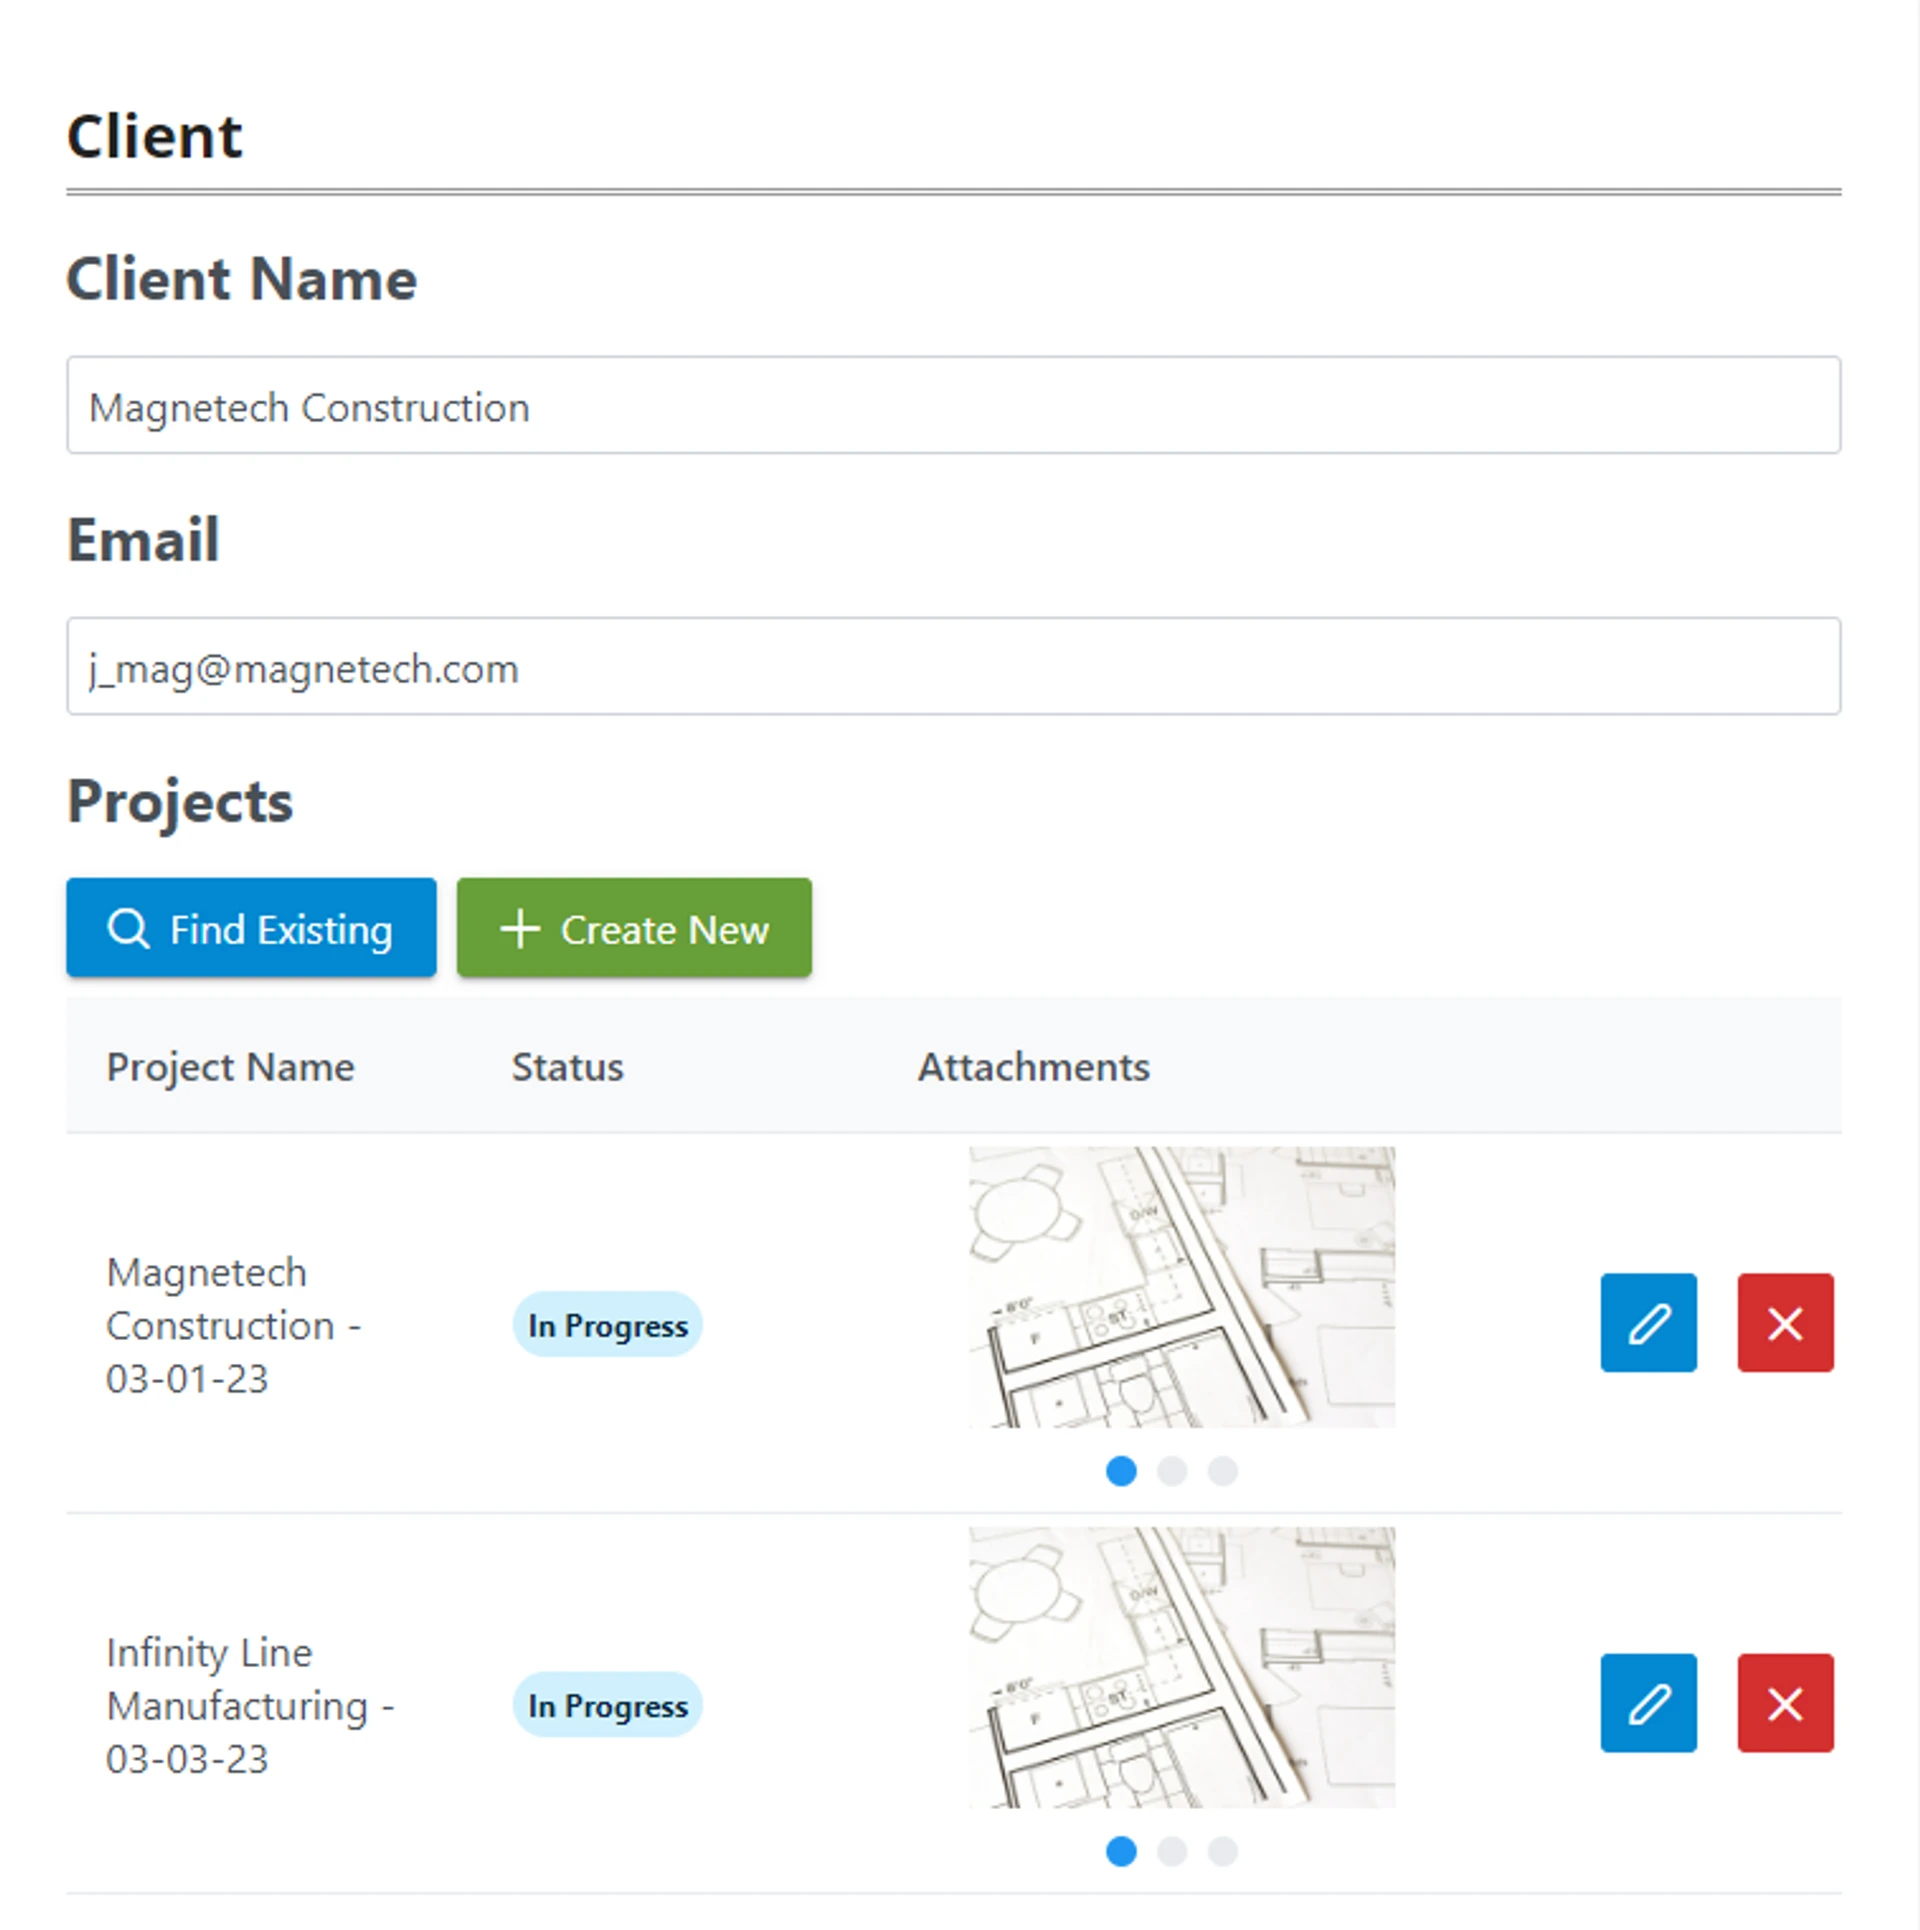
In this example, Client is a table in the Airtable base and Projects is a Linked record to the Projects table in the same base.
Subforms are Linked Tables/Records in the Airtable Source table you chose for your main form. You can go even further and create Subforms inside of your Subforms to link several tables deep.
If you have a Linked Record field in your main forms, you can add a Subform to create or update records in the Linked table.
-
🎥 How to Set up Linked Records to Create or Edit Linked Records
-
Before you create a Subform, create your main form
-
Initial Set Up of the Subform
-
Display Configuration
-
Setup Your Linked Records Lookup Display
-
Build Your SubForm - (Manage Create/Edit SubForm)
-
SubForm Permissions
-
Lookup Search Configuration
-
Search Fields
-
Sort Fields
-
Lookup Filter Configuration
➡️
Related:  How to Update Existing Records with a URL or Button
  Linked Record (+ SubForms)
🎥 How to Set up Linked Records to Create or Edit Linked Records
Section titled “🎥 How to Set up Linked Records to Create or Edit Linked Records”Before you create a Subform, create your main form
Section titled “Before you create a Subform, create your main form”You must first create your main form. Choose your Airtable Source table that you want as the main form fields. In the next steps, you then add your Linked Table to be your Subform as a field in your form.
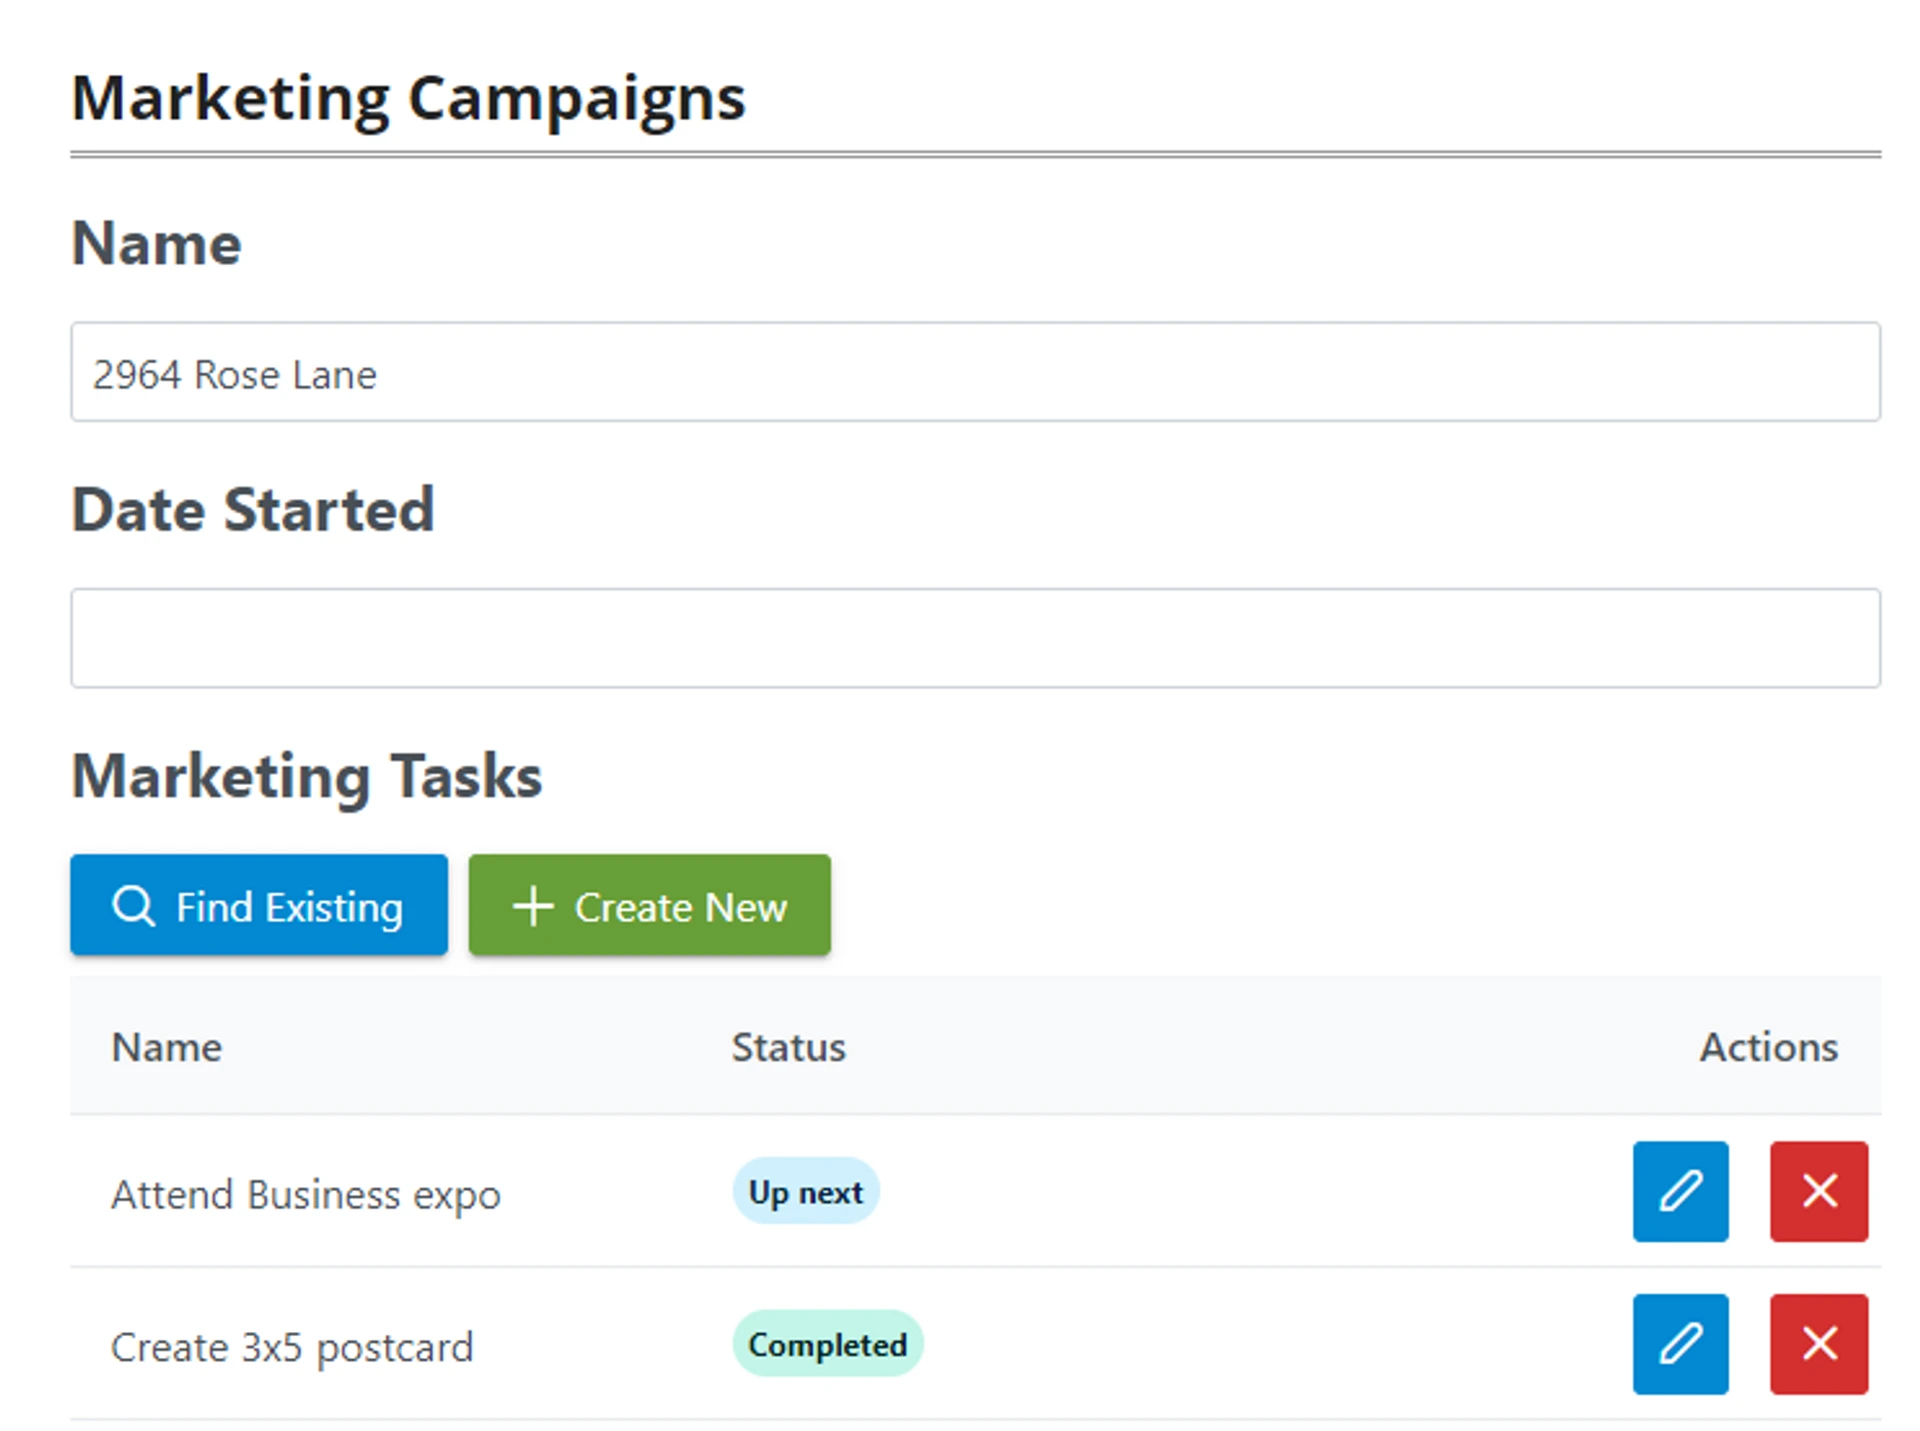
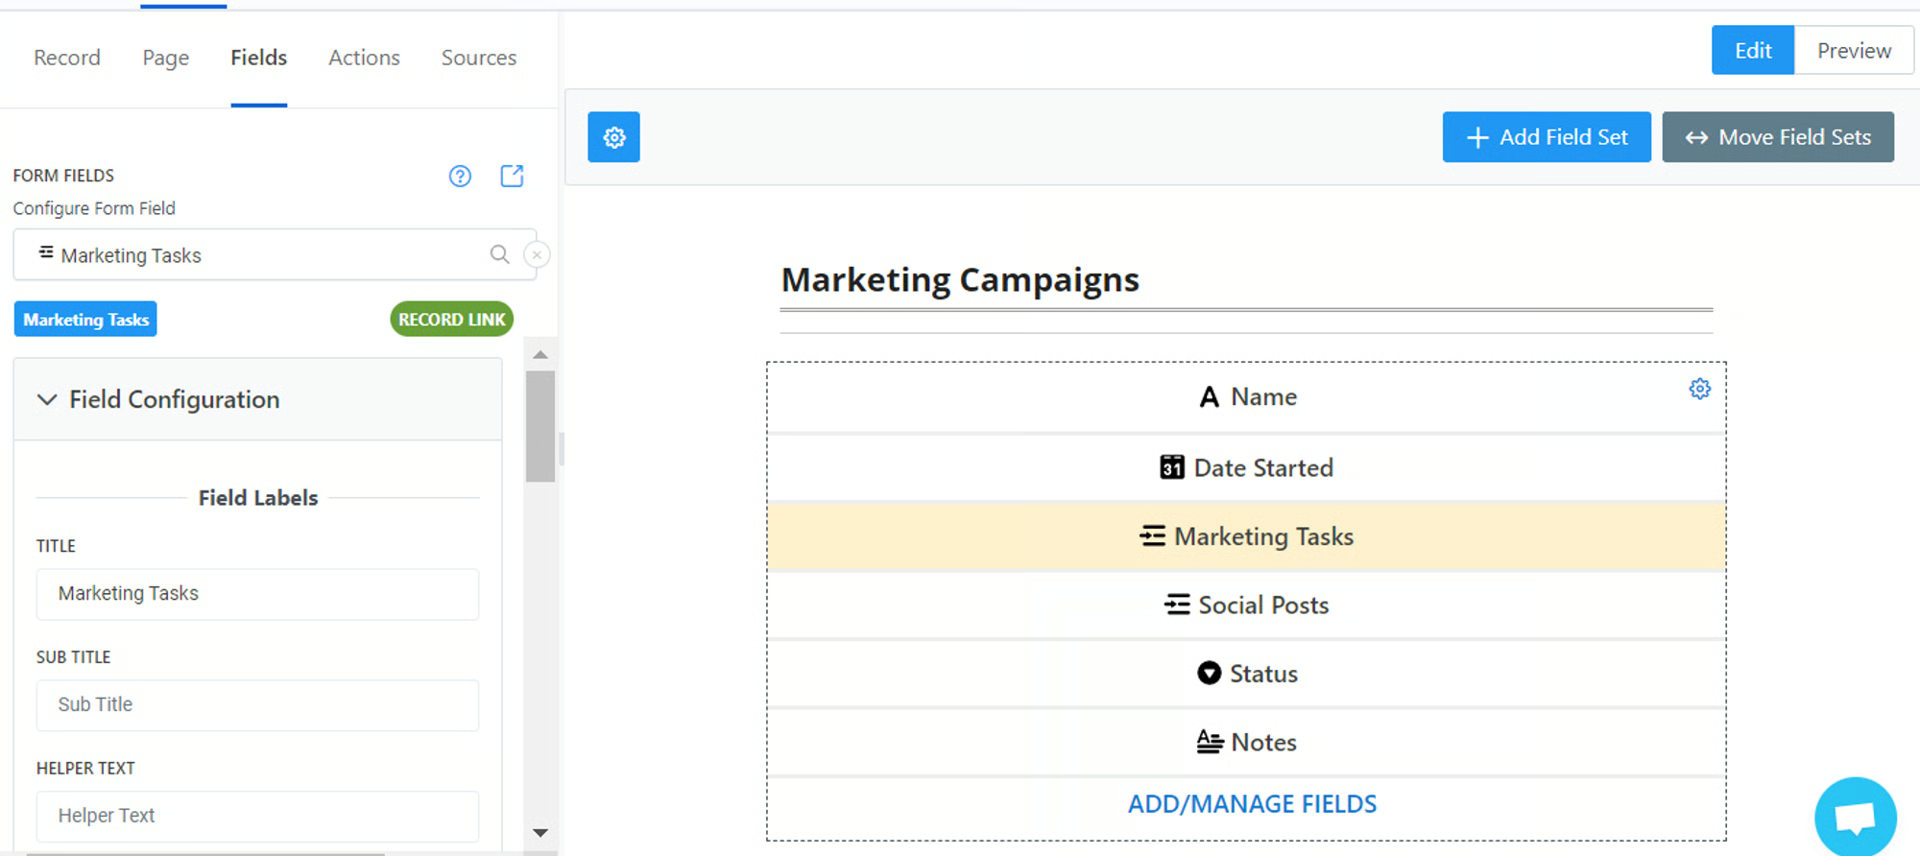
Example: My main form will be from the “Marketing Campaigns” table in my Airtable base. I’m then going to add a Linked Record field - “Marketing Tasks”
Initial Set Up of the Subform
Section titled “Initial Set Up of the Subform”- Add your Linked Record Field to your Form
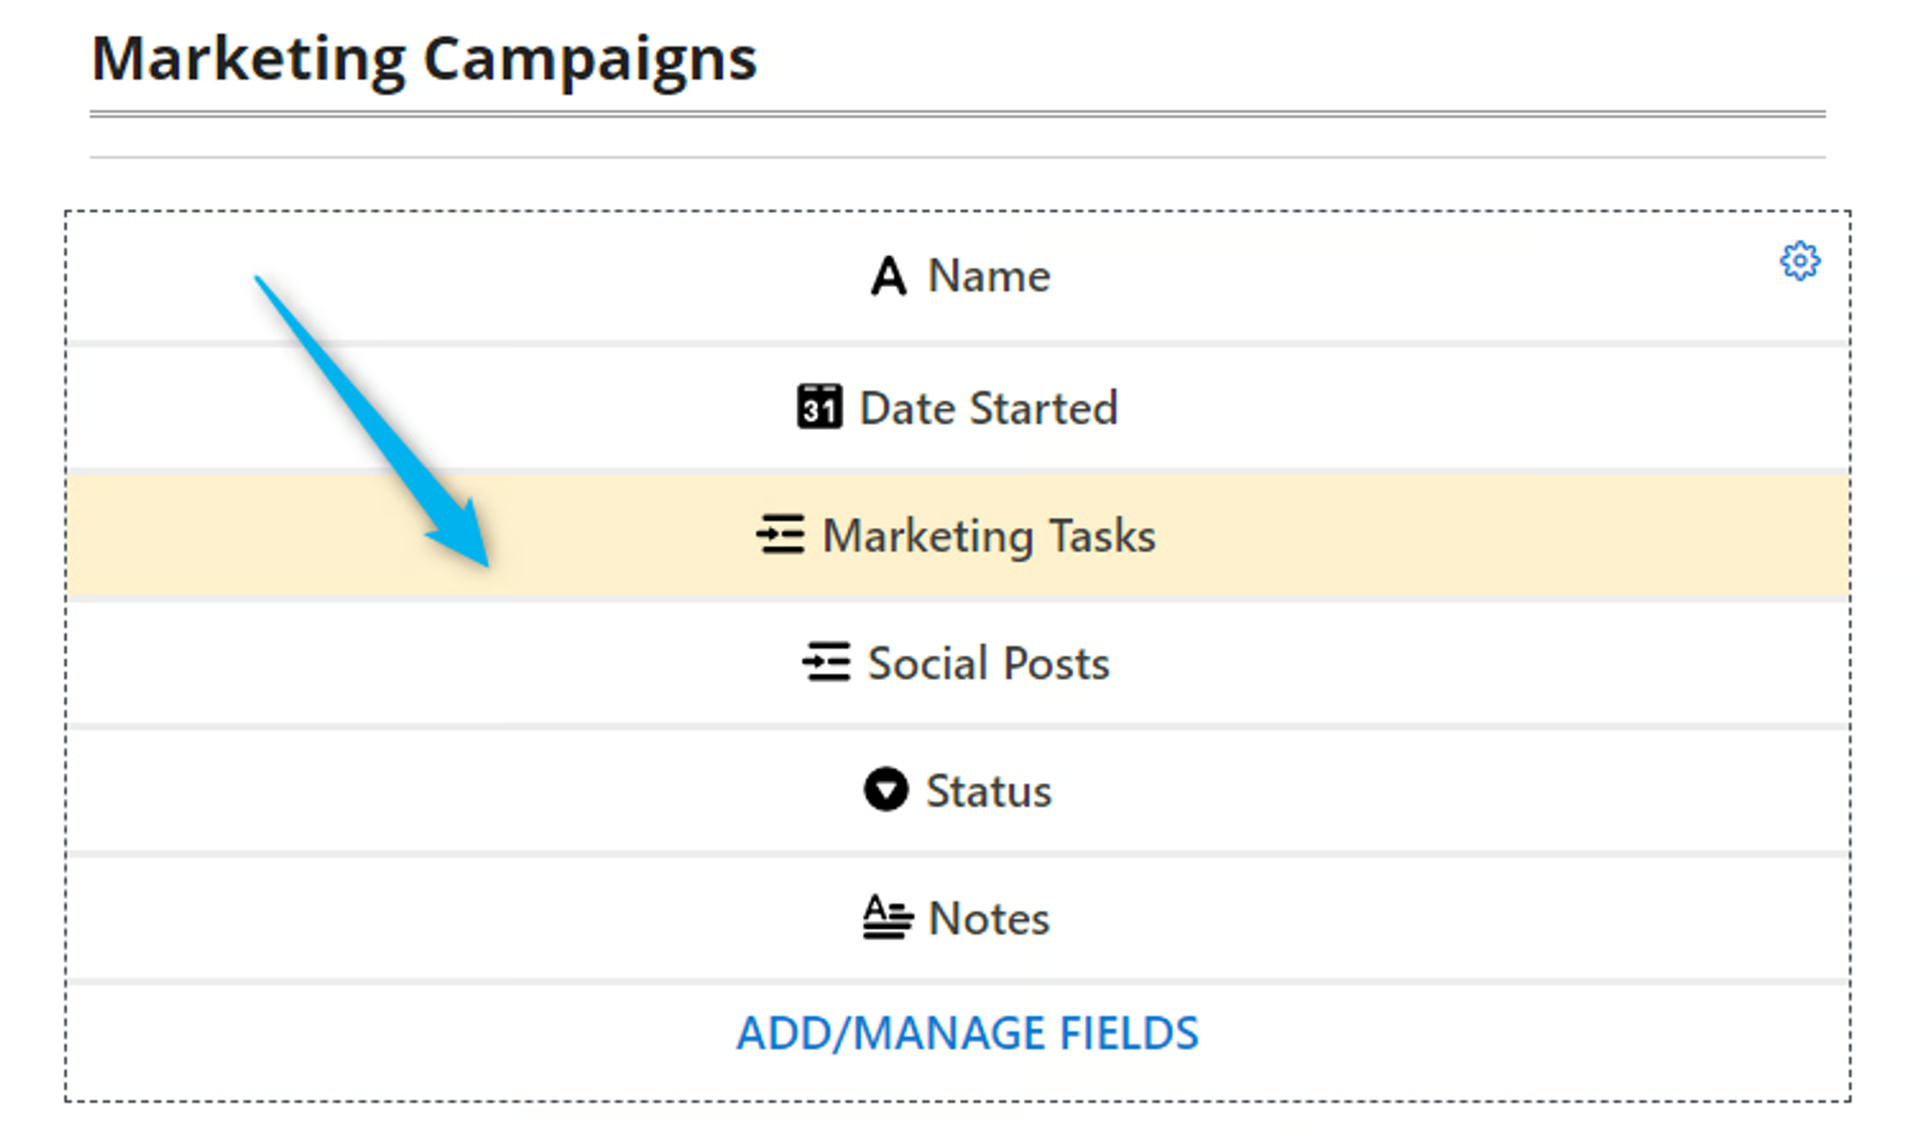
- Set up your basic Field Configurations on your Linked record field in the field menu like the title, display mode, defaults, and URL prefills
➡️
Related:  What is a URL Prefill (Pre-Populated Fields) and How to Use Them in On2Air Forms
Display Configuration
Section titled “Display Configuration”Display Configuration is where you’ll choose what Fields display on both your Linked Record table and in Linked Records lookup/search displayed on your form. Any fields you will need on your table or lookup/search must be added from here. There are options on each field to display or hide it on the table and/or lookup.
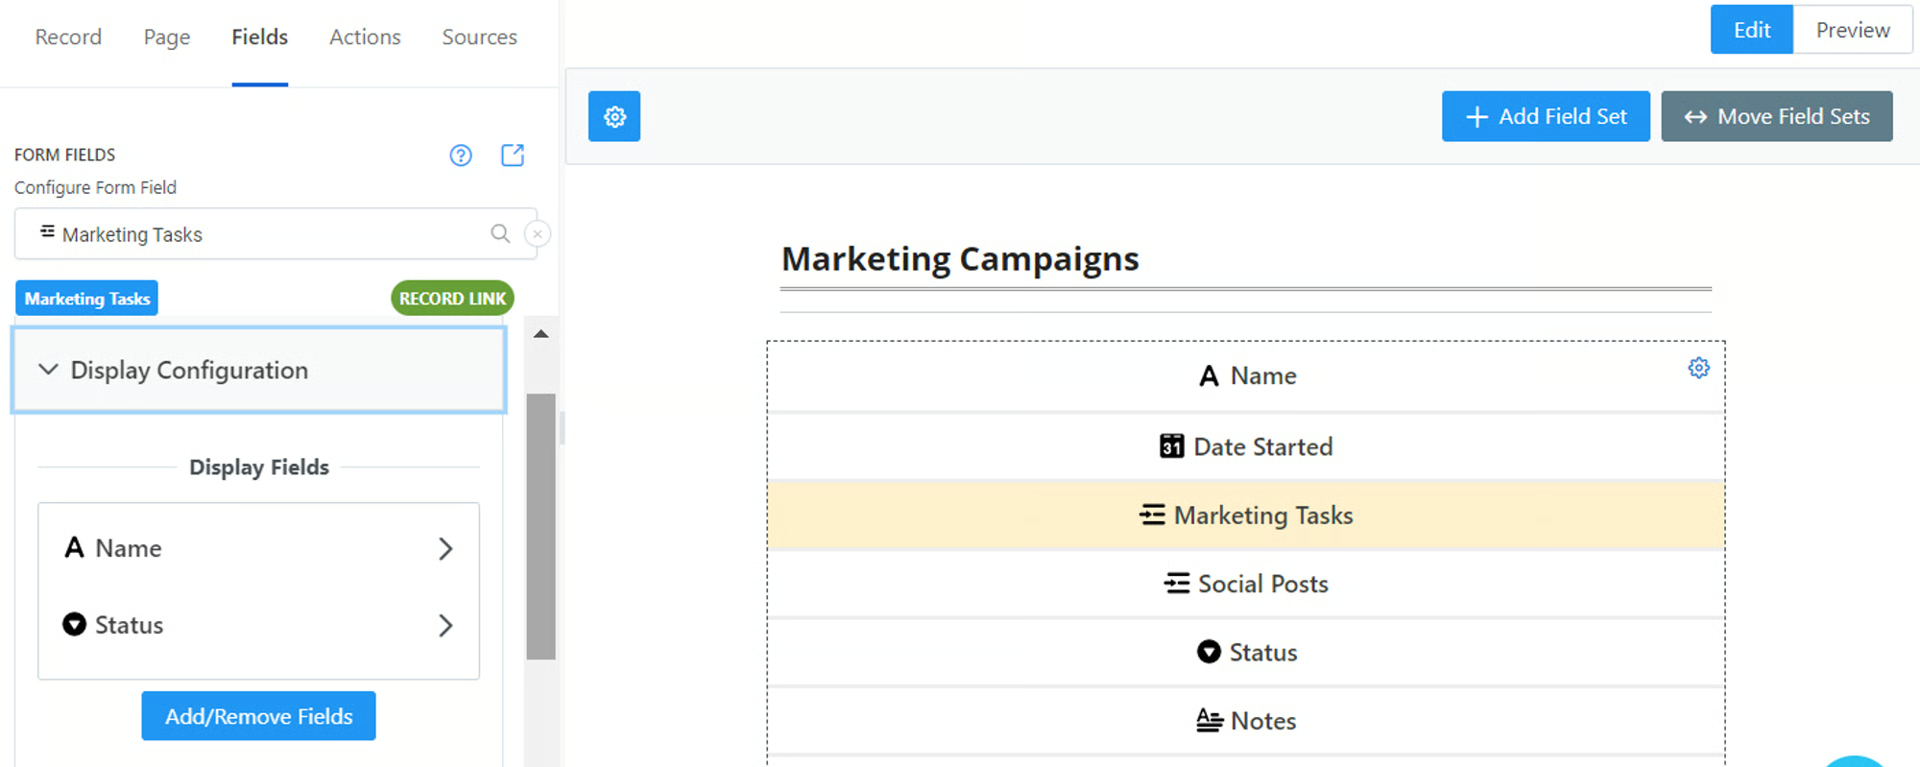
Setup Your Linked Records Lookup Display
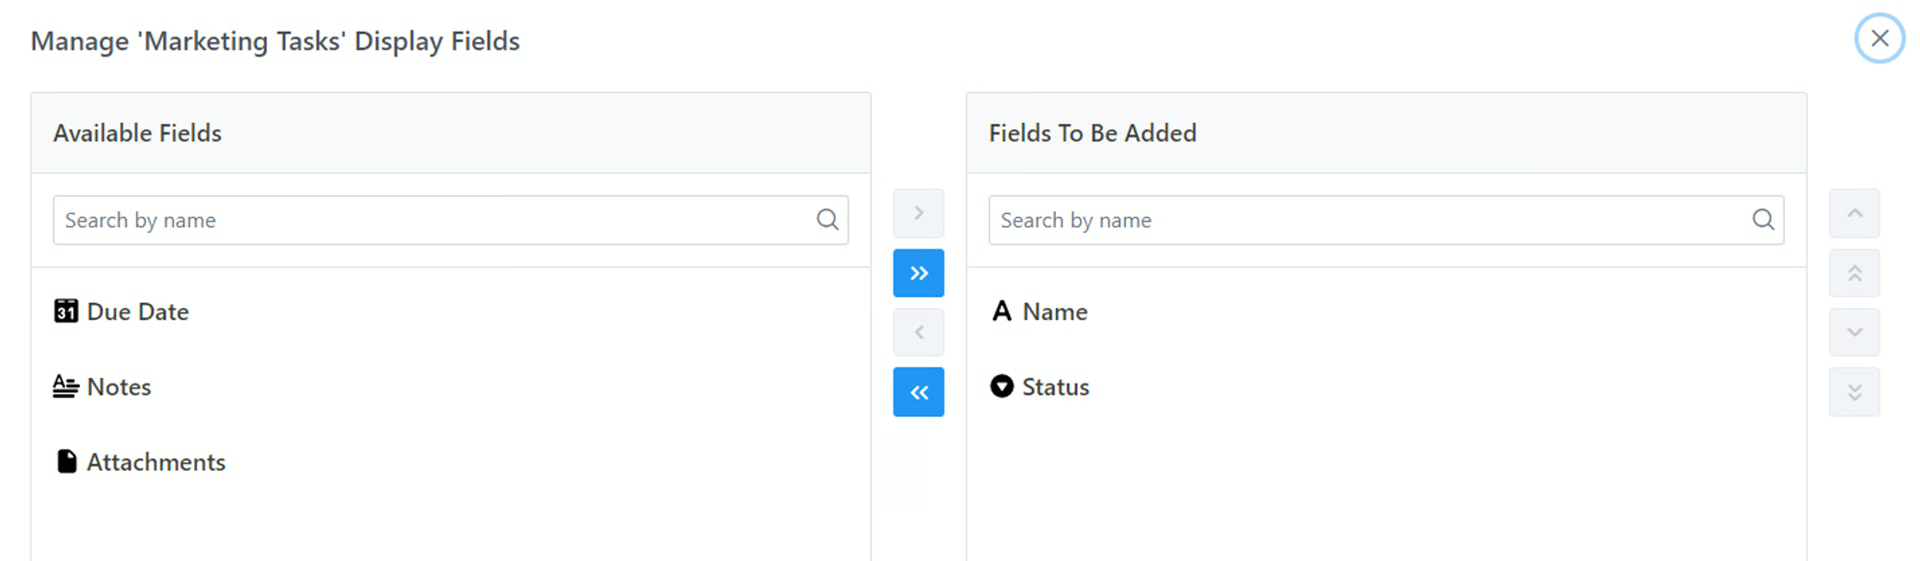
Section titled “Setup Your Linked Records Lookup Display”- Click Add/Remove Fields
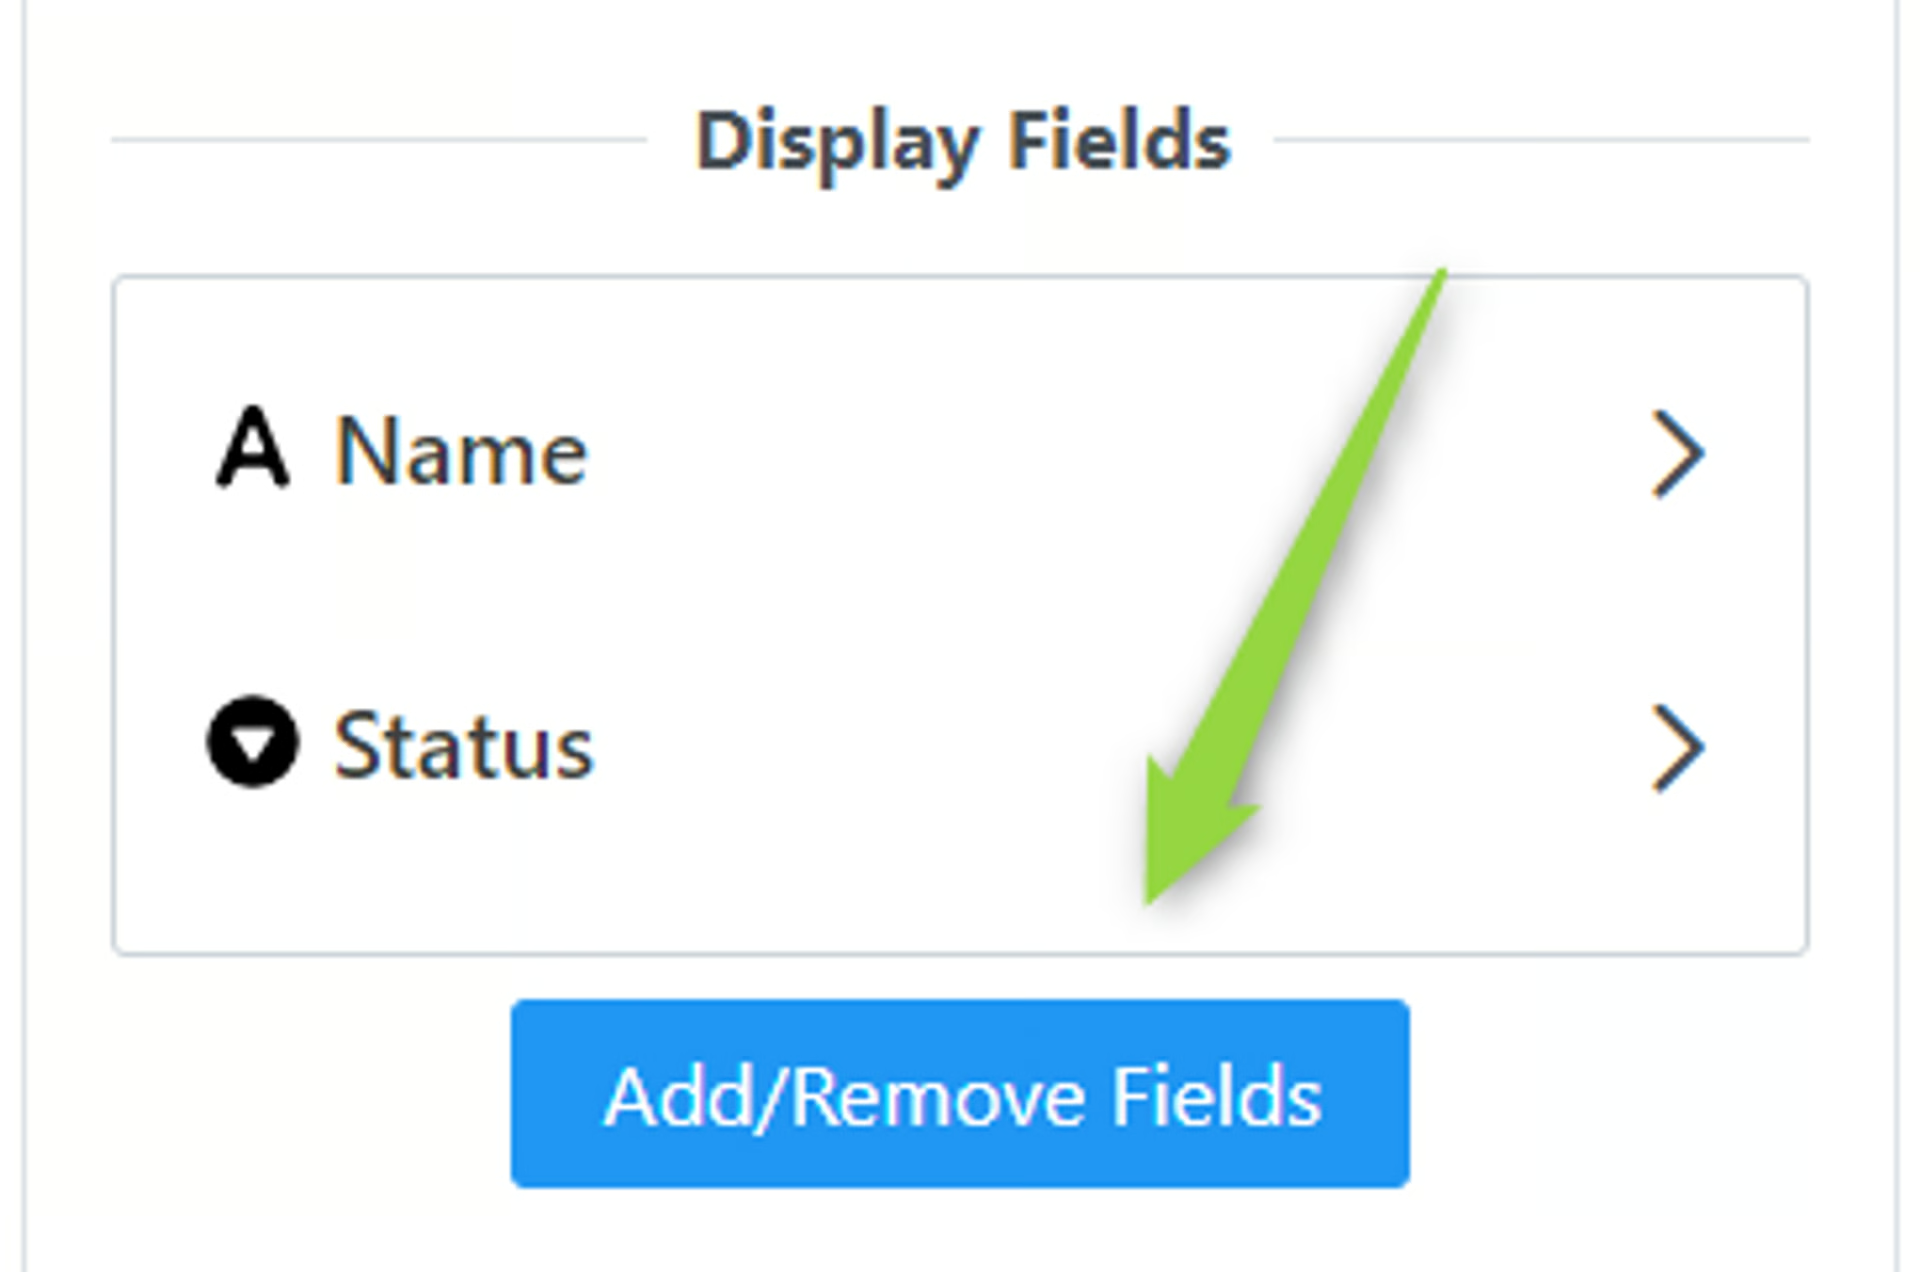
- Choose any field you want displayed or used (even hidden ones) on your form table and click the > arrow. To add all fields, click >> and then click Done
-
Once you’ve added your fields to the Display, click on each field in the Display Fields list and set up the Display Field Configuration options. By default, all fields are displayed in your Linked Records table and Lookup/Search box.
-
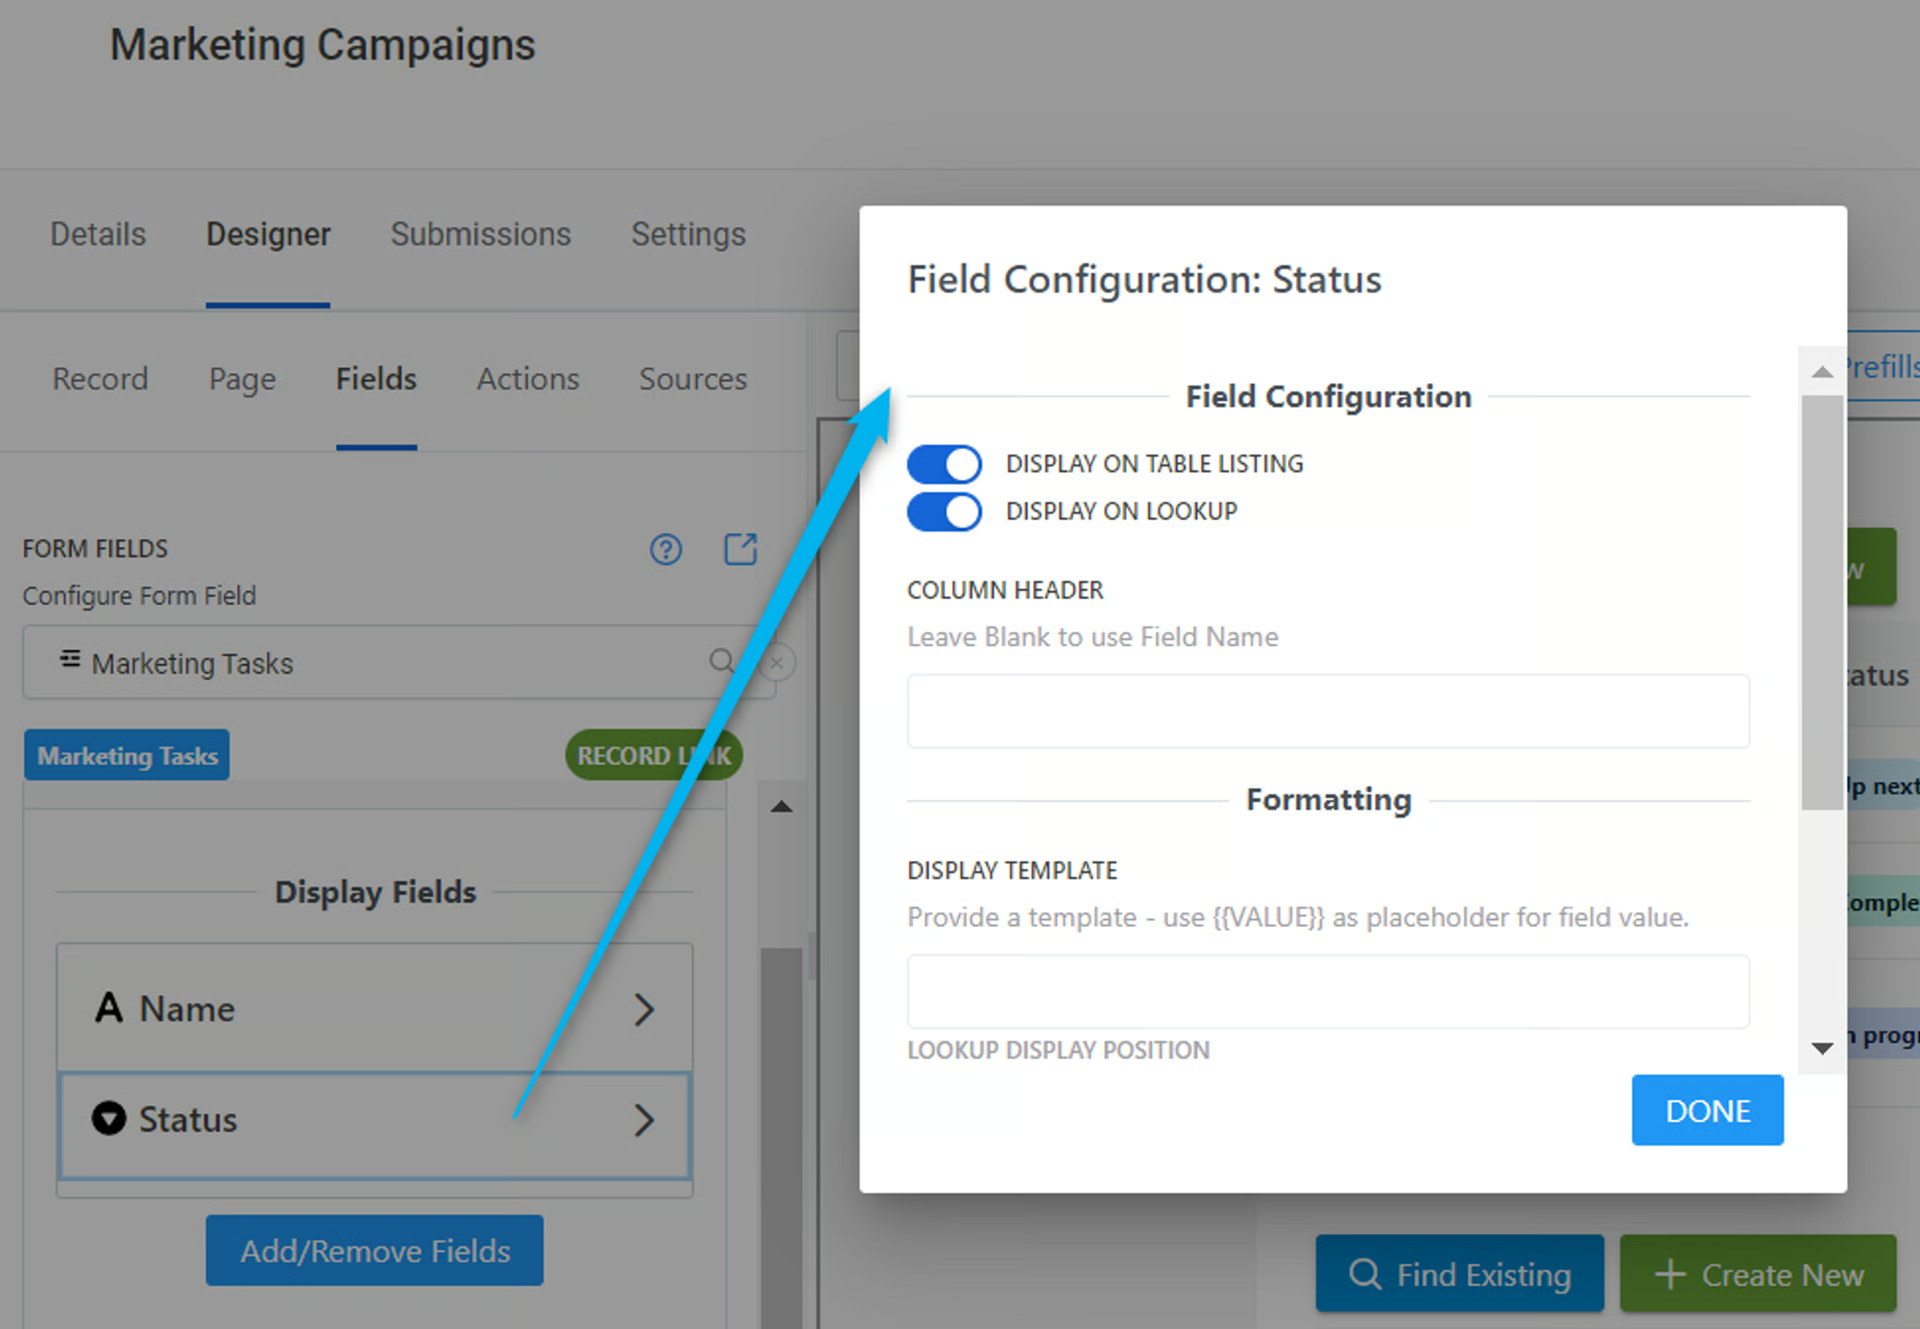
For each field, you can choose when and where it needs to display, add a custom column header, add a Display template such as a $, and choose the Lookup position.
To configure Display settings for each field on your Subform
-
Click each field you chose in your Display Configuration
-
Choose your options for the Field:
Display on Table Listing - Display the field on the form once selected or prefilled
Display on Lookup - Display the field on the lookup screen when choosing a record
Column Header: Add a custom column header - Leave Blank to use Field Name
Formatting
Display Template
- Create your own field data display template. Use the placeholder {{VALUE}} for the field value
Example: Want to display a $ symbol for an amount? Use ${{VALUE}}
Lookup Display Position
- Determines where on the record in the Lookup Display your data value will appear. Depending if you’ve set other Lookup Displays on fields, you will see Primary, Secondary, Image, or Sub Fields as options - See example below for location of Lookup Display positions.
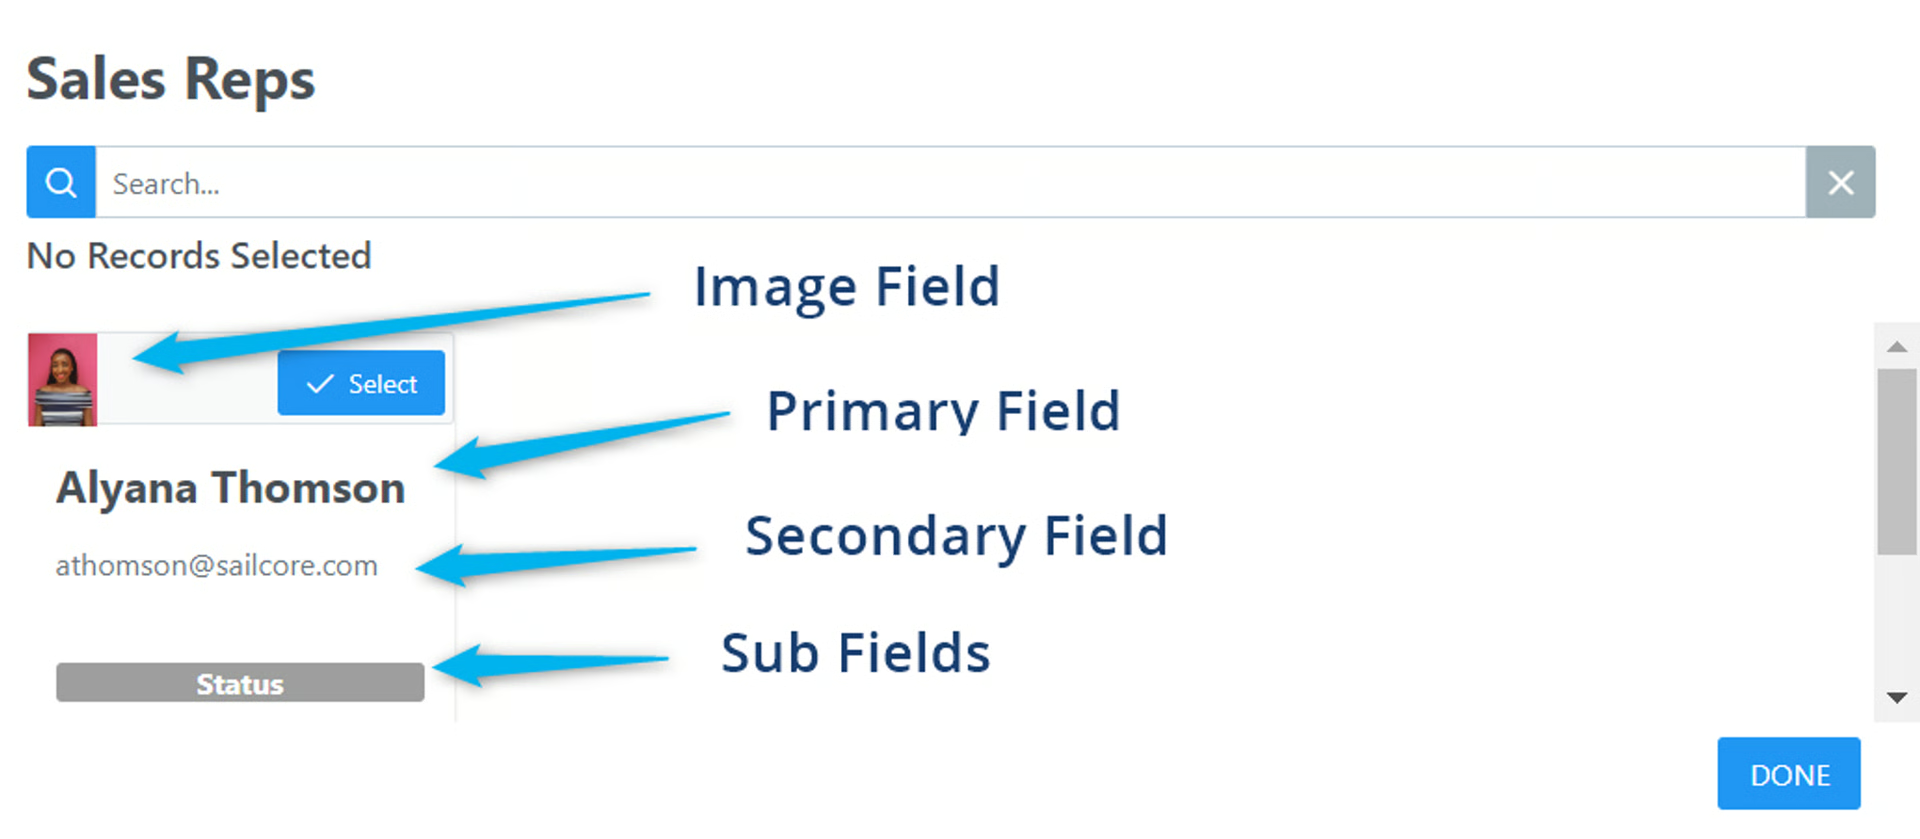
Lookup Display field displays
Advanced Format Options
advanced formatting options for each field. Will display different options depending on the field type - Learn More about adding advanced formatting to your fields.
💡
Related:  Customize Your Form with Extra Options (Advanced)
Build Your SubForm - (Manage Create/Edit SubForm)
Section titled “Build Your SubForm - (Manage Create/Edit SubForm)”Now you need to set up the Linked Record Subform that a form user will see when they create new records or edit existing records in your base.
- Click Subforms Configuration on your Linked Record field menu
- Click Manage Subform
You’ll see a Form Designer just like in your Main Form Designer
- Add the Fields you need by clicking Add/Manage Fields
- Configure each Field as needed - See the
 Form Field Types - Airtable and On2Air Forms
SubForm Permissions
Section titled “SubForm Permissions”You can set specific permissions for your Linked Record Subforms. You can allow or disallow creating new records, updating existing records, bulk record updates, lookup existing records, removal of existing record, bulk removing existing records, and ordering of records.
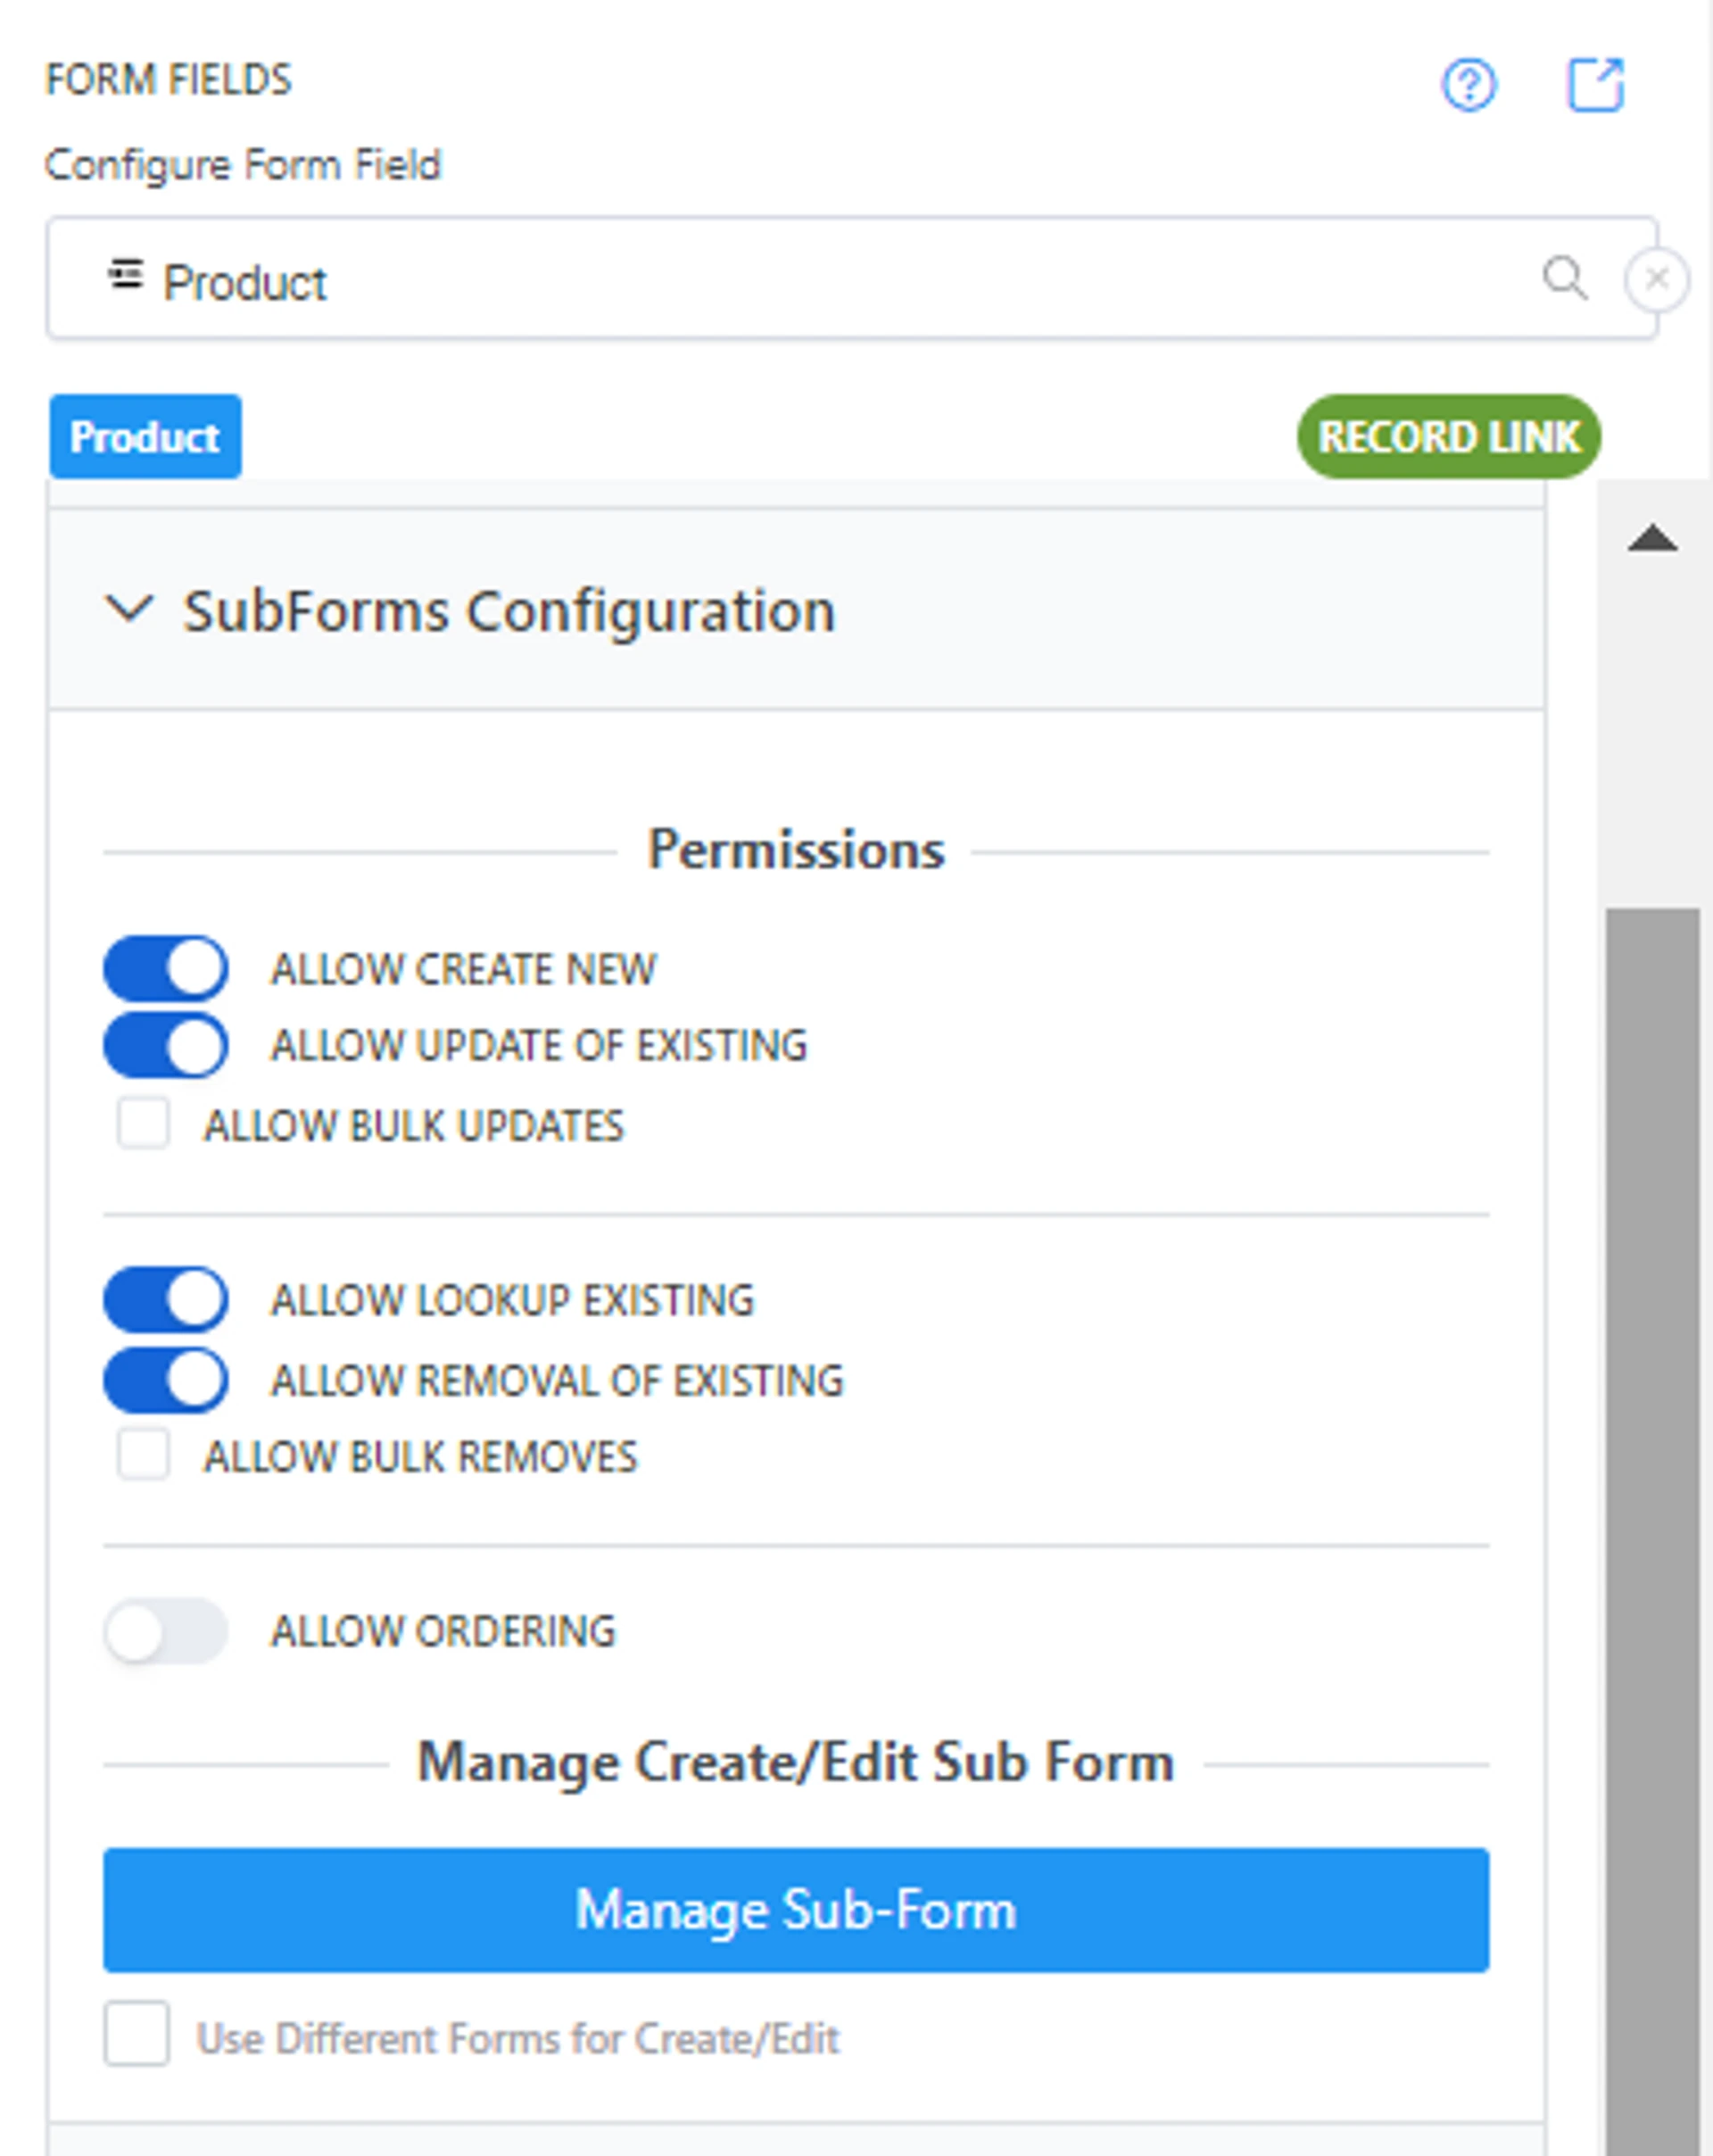
Permissions:
Allow Create New - Allow a form user to create new Airtable records in the Linked Record SubForm
Allow Update of Existing- Allow a form user to update existing Airtable records in the Linked Record SubForm
Allow Bulk Updates- Allow a form user to update Airtable records in bulk (multiple records at once) in the Linked Record SubForm
Allow Lookup Existing - Allow a form user to look up existing Airtable records in the Linked Record SubForm
Allow Removal of Existing - Allow a form user to remove existing Airtable records already displayed on the Linked Record table list
Allow Bulk Removes - Allow a form user to remove existing Airtable records already displayed on the Linked Record table list in bulk (multiple records at once)
Allow Ordering - Allow a form user to reorder Airtable records displayed on the Linked Record table
Lookup Search Configuration
Section titled “Lookup Search Configuration”Choose what linked records the form user can view, edit, or create. By default, all records are available.
Search Fields
Section titled “Search Fields”-
Choose the fields that can be used to Search your linked records
-
Open each field and choose the Field Configuration options
-
Search Fields Matching Style - Select how searches against the search field will be performed Options: Exact Match - The form user must enter a value that exactly matches a search field value Contains - The form user can enter in values that are contained in the search field values
Case Sensitive - Enable if Search Field needs to match exactly, including uppercase, lowercase, or other
Sort Fields
Section titled “Sort Fields”- Select the fields to be used for sorting search results of field
- Choose a field and then choose Ascending or Descending order
- You can add multiple fields used for sorting by clicking Add new option after the first sort
Sort Fields - Select the fields to be used for sorting results of field
- Choose a field and then choose Ascending or Descending order
- You can add multiple fields used for sorting by clicking Add new option after the first sort
Lookup Filter Configuration
Section titled “Lookup Filter Configuration”You can filter your Subform to only display specific records for the form user. You can filter by:
- Views
- Dependencies (current form values)
- Dynamic URL Filters
➡️
Related:  How to Use Filters in On2Air Forms
  What are Dynamic URL Filters in Search for Linked Records
Parent Link Mode - Determine how to link Parent field to this field
Options: Field Match - Match to exact field Custom Formula - Create a filtered search using an Airtable formula
Parent Source Field - Choose the Parent Source field
Parent Matching Style - Select how to link fields with Parent field
Options: Exact Match Contains Does Not Contain Does Not Equal
Case Sensitive - Enable if Parent Field needs to match exactly, including upper case, lower case, or other case
⚙
Related:  Build a Dashboard using Airtable Data with On2Air Forms