Linked Record (+ SubForms)
🔴 On2Air Forms has been shutdown to focus on our On2Air Backups Airtable app Learn more about automated Airtable backups - on2air.com
💡
A Linked Record field in Airtable allows you to link data from one table in Airtable to the other. In On2Air Forms, you can create or edit Linked Records on your form. You can also add multiple Linked Record fields on 1 form to update records from multiple tables at one time. (To display data from your Linked Record in another location on your form once the Linked Record is chosen, check out the  Linked Field Display field type)
See more Fields in the  Form Field Types - Airtable and On2Air Forms
In this article
-
📽 How to Get Started with Linked Records
-
How to Add a Field to Your Form
-
Field Configuration
-
Field Labels
-
Field Status - Display Mode
-
Field Defaults
-
URL Prefill Settings - Pre-Populated Fields
-
Display Configuration
-
Display Fields
-
How to Format Your Linked Records Display
-
SubForms Configuration (Create/Edit Linked Record Forms)
-
SubForm Permissions
-
Build a Linked Record SubForm - (Manage Create/Edit SubForm)
-
Lookup Search Configuration
-
Search Fields
-
Sort Fields
-
Lookup Filter Configuration
-
🎥 Use On2Air Forms to Filter Airtable Records Based on Selection (Parent/Child Fields) - Linked Records
-
Extra Options - View Advanced Options
-
Table and Column Properties
-
Search Properties
-
Controls Properties - Buttons, Icons, Labels
-
User Guides for Customizing
-
Danger Zone
📽 How to Get Started with Linked Records
Section titled “📽 How to Get Started with Linked Records”How to Add a Field to Your Form
Section titled “How to Add a Field to Your Form”Here’s how to add Airtable Fields or On2Air Custom Fields to your Form
➡️
 How to Add Airtable Fields and On2Air Custom Fields to Your Form
Field Configuration
Section titled “Field Configuration”The Field Configuration includes options to give your field a title, add subtitles and helper text, the display mode of the field, field default values, and URL prefills
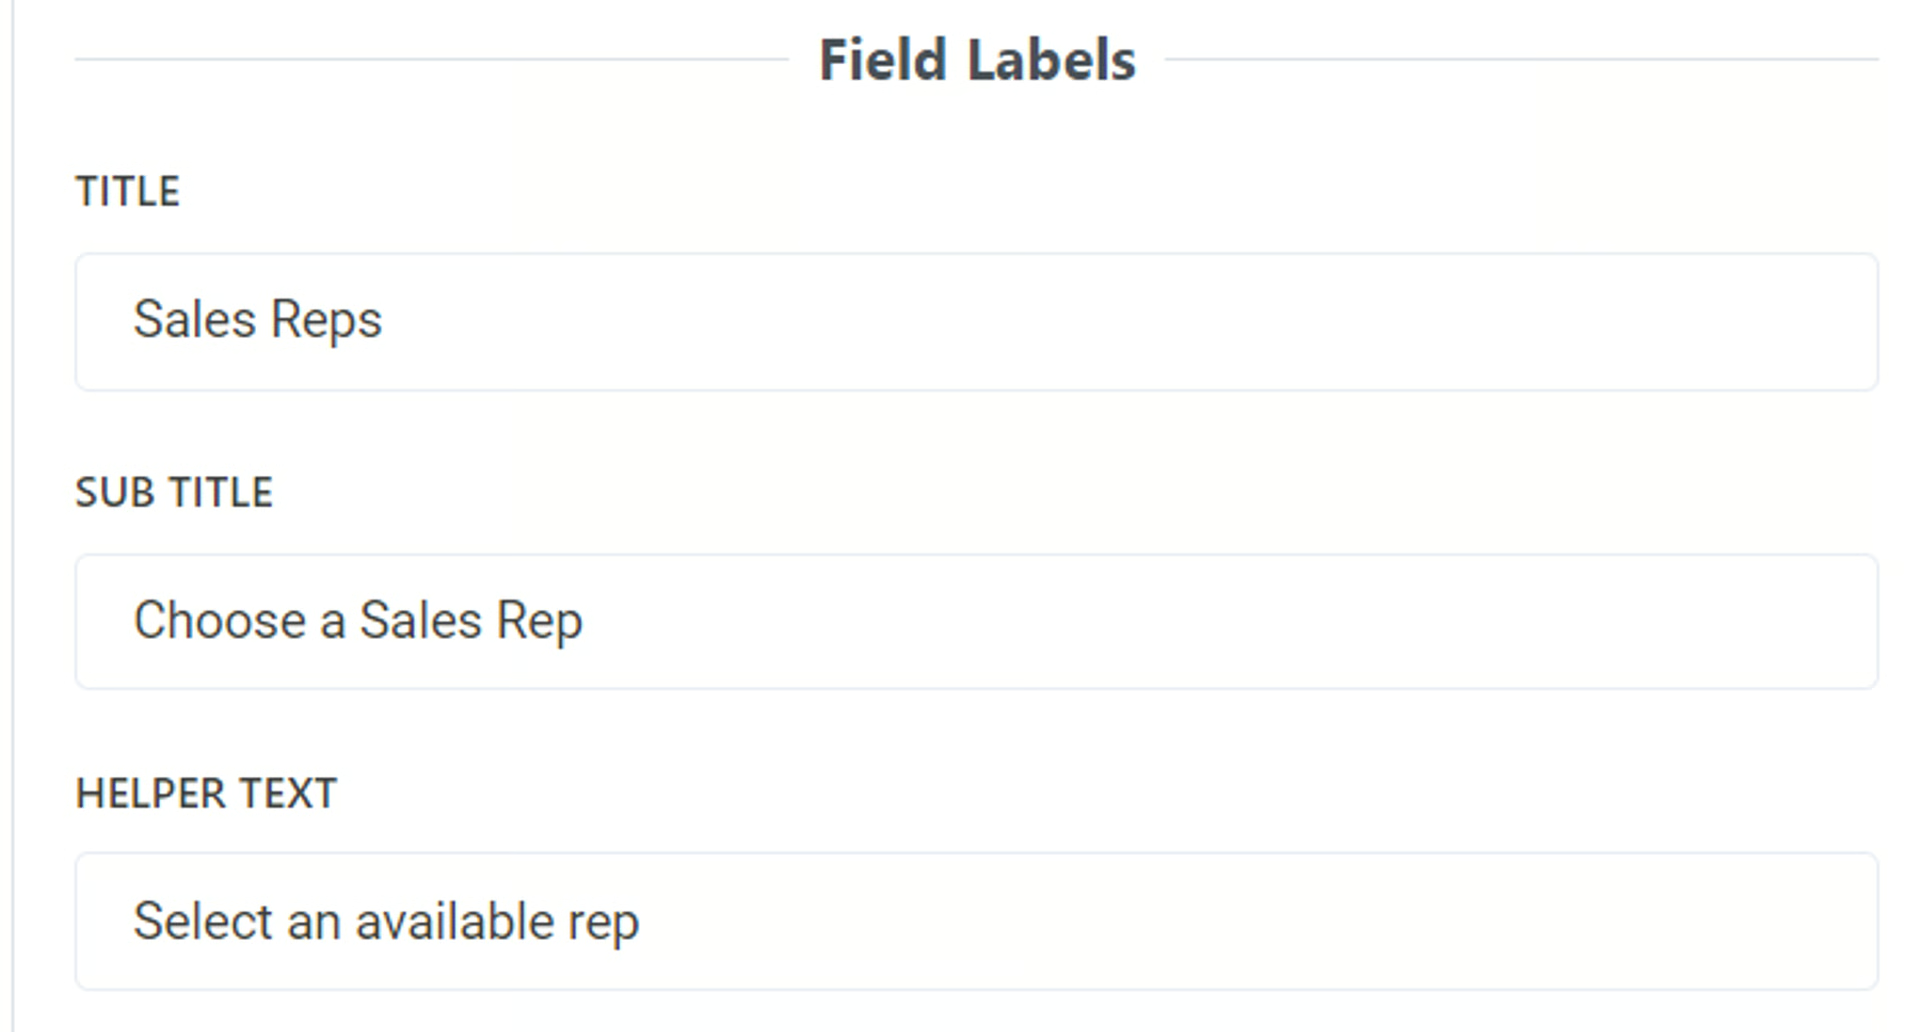
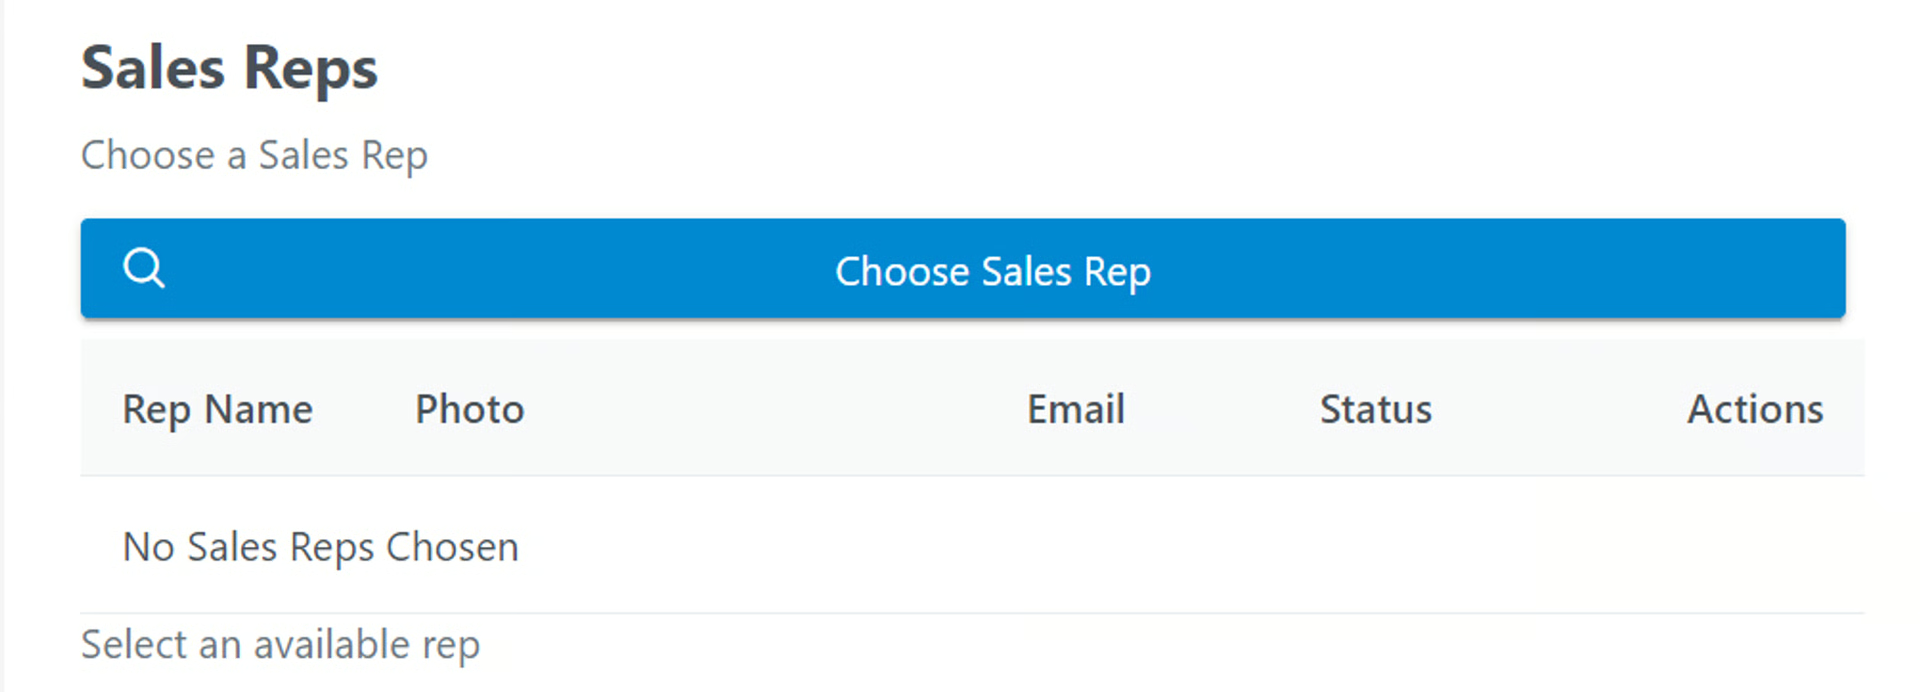
Field Labels
Section titled “Field Labels”Title
- Add a title to be displayed above the field as the main name. To leave blank, add a single space
By default, this is the name of your field in Airtable. You can use a different field name than your base and it will not affect the field name in your base.
Sub Title
- Add a subtitle to be displayed above the field. To leave blank, add a single space
You can use text in this field and you can use Markdown to increase text size, bold, or italics
Related:  Use Markdown with On2Air Forms
Helper Text
- Add helper text to be displayed below the field. To leave blank, add a single space
You can use text in this field and you can use Markdown to increase text size, bold, or italics
Related: Use Markdown with On2Air Forms
Example:
Field Status - Display Mode
Section titled “Field Status - Display Mode”Select Display Mode
- Choose how you want this field displayed on the form

Options:
Optional Field - Standard, editable field - Form user can complete this field, but it is not required
Required Field - Standard, editable field - Form user is required to complete this field
Disabled Field - Standard, non-editable field - Form user can view, but not edit
Display Field - Display the field as Text or other format
Hidden Field - This field will not be displayed for the form user, only internally
Field Defaults
Section titled “Field Defaults”Default Value
- Add a default value to this field that is automatically added to the form field
Depending on the Display Mode you choose, this field value may or may not be editable
To disable editing a default value, choose a Display Mode of Disabled, Display, or Hidden
Use Default on Edit if Empty
- Enable if you want to use the default value on Record Edits if the field has no value when the form is submitted
➡️
Related:  How to Add Default Values to Your Form
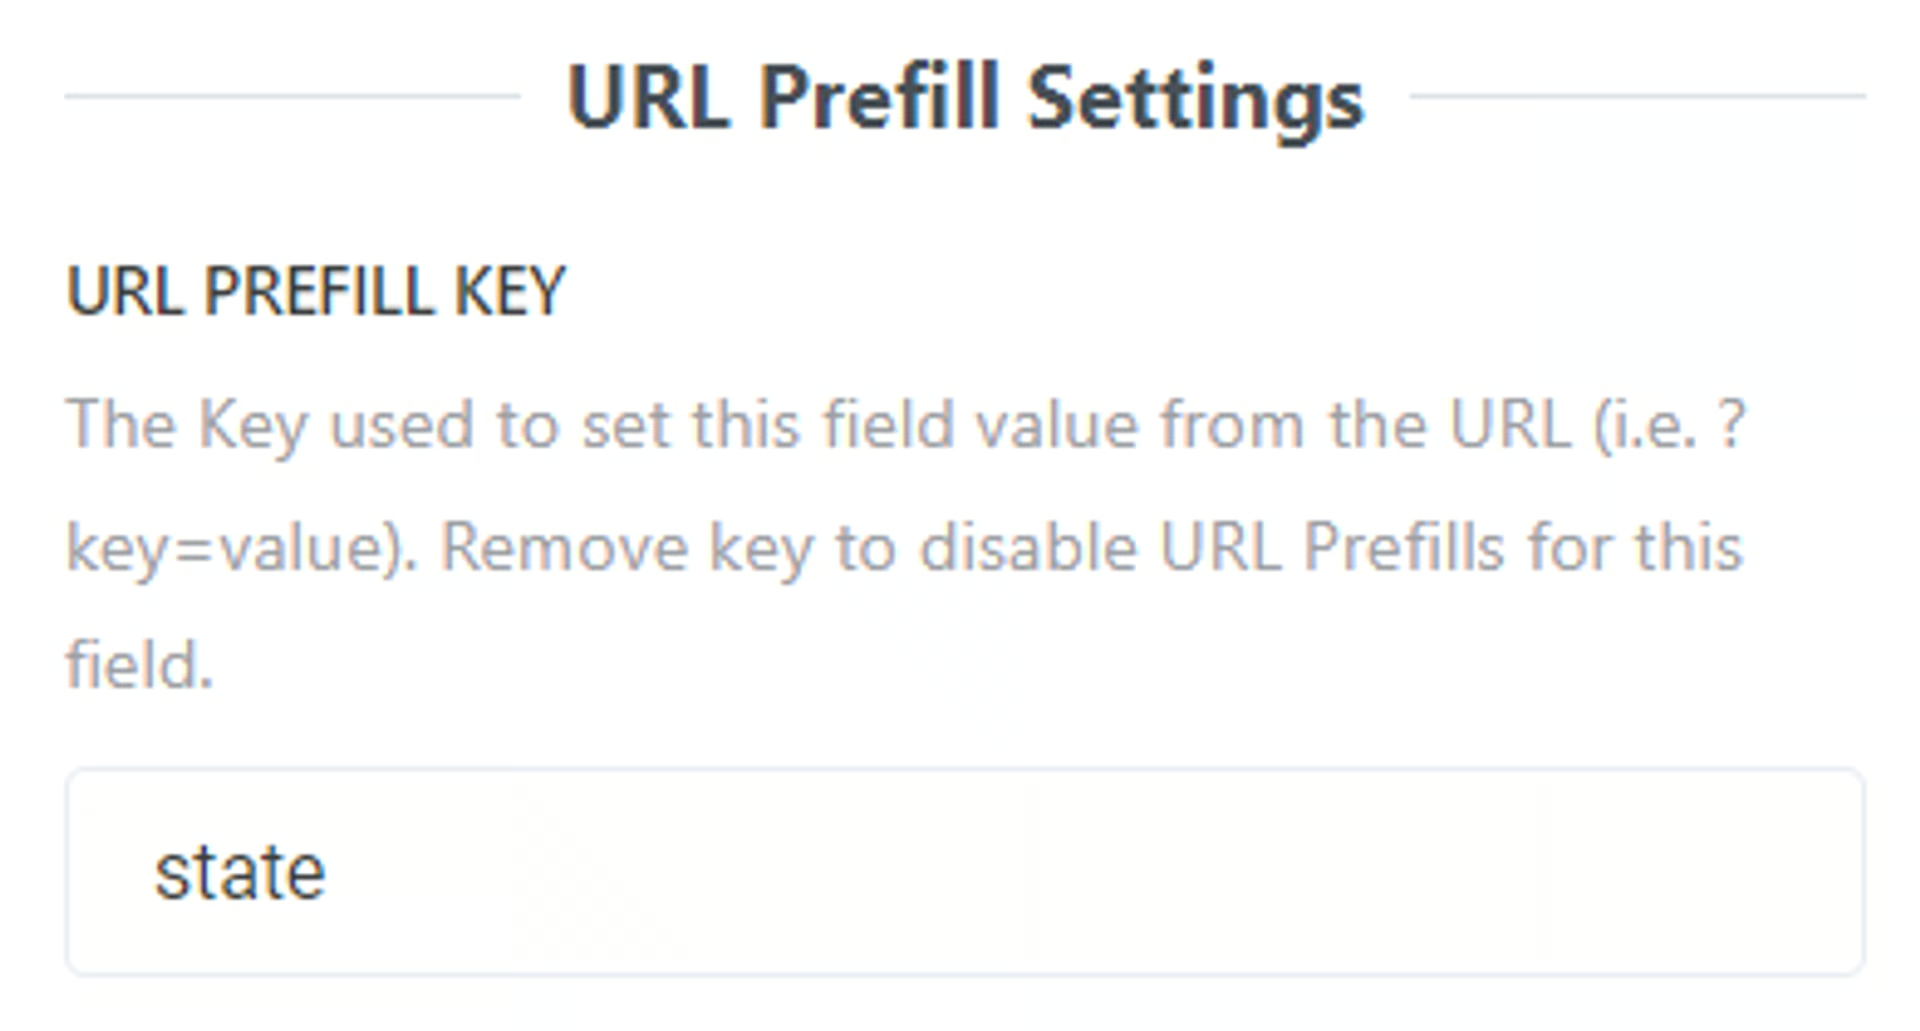
URL Prefill Settings - Pre-Populated Fields
Section titled “URL Prefill Settings - Pre-Populated Fields”You can add pre-populated data to your form fields to make it easier for your form user. You can do this with URL Prefills in On2Air Forms.
➡️
Related:  What is a URL Prefill (Pre-Populated Fields) and How to Use Them in On2Air Forms
URL Prefill Key - The Key used to set this field value from the URL (i.e. ?key=value). Remove key to disable URL Prefills for this field.
For Linked Record URL Prefills
URL Linked Field
- Select your initial field from Linked Table to compare with URL value. Leave blank to use Record ID values
URL Case Sensitive
- Enable if the prefill URL value is case sensitive, meaning it needs to match uppercase, lowercase, etc. exactly
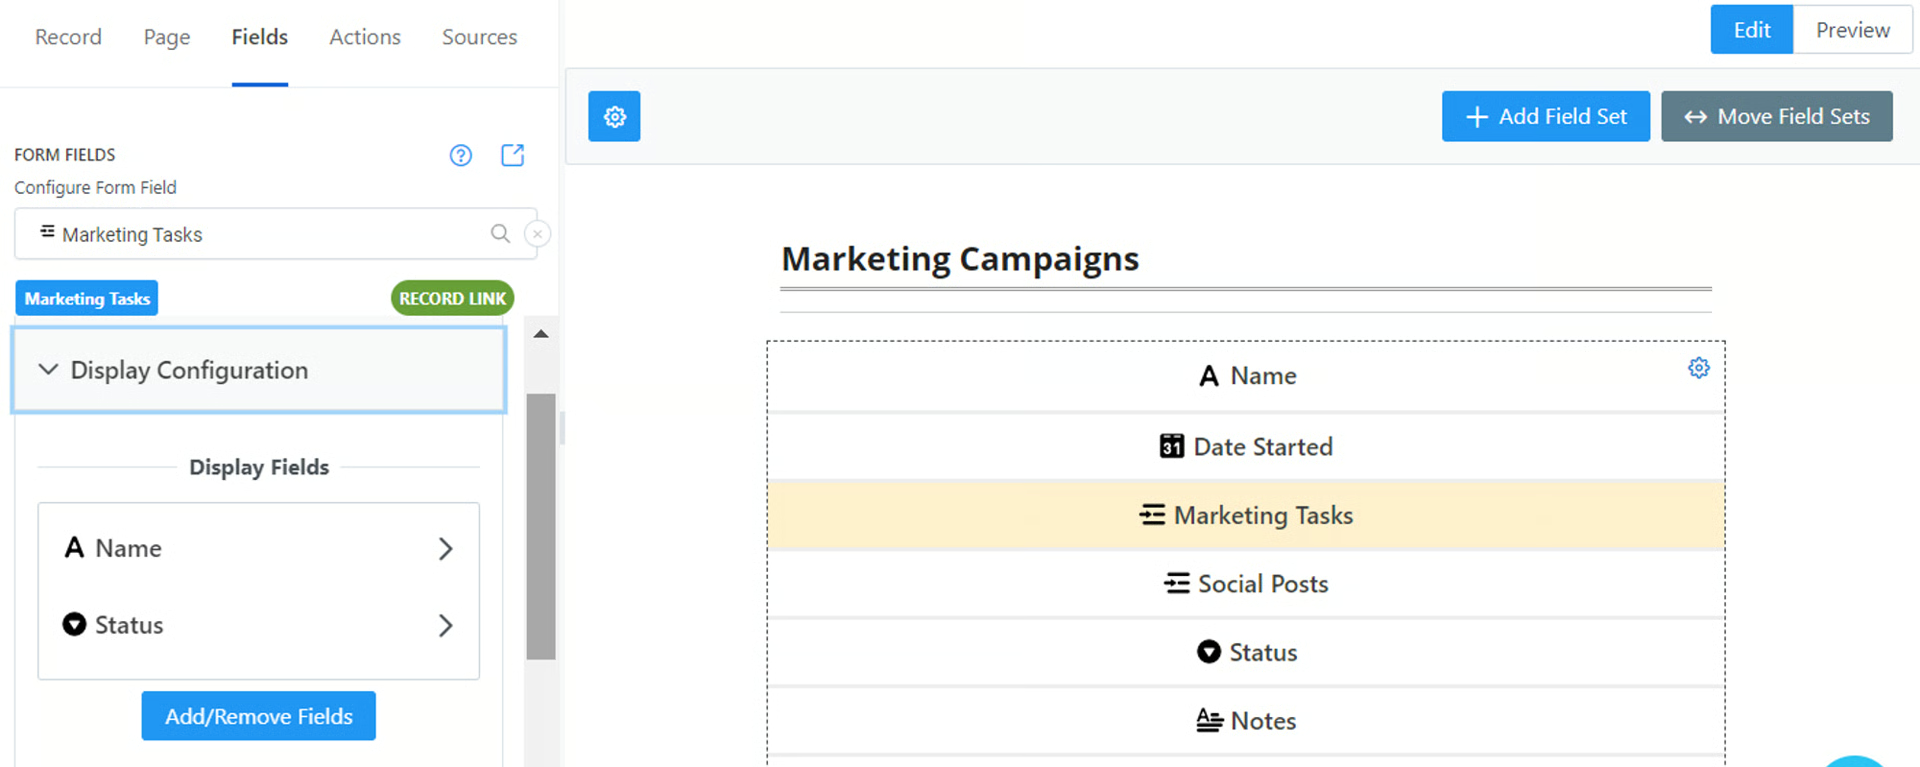
Display Configuration
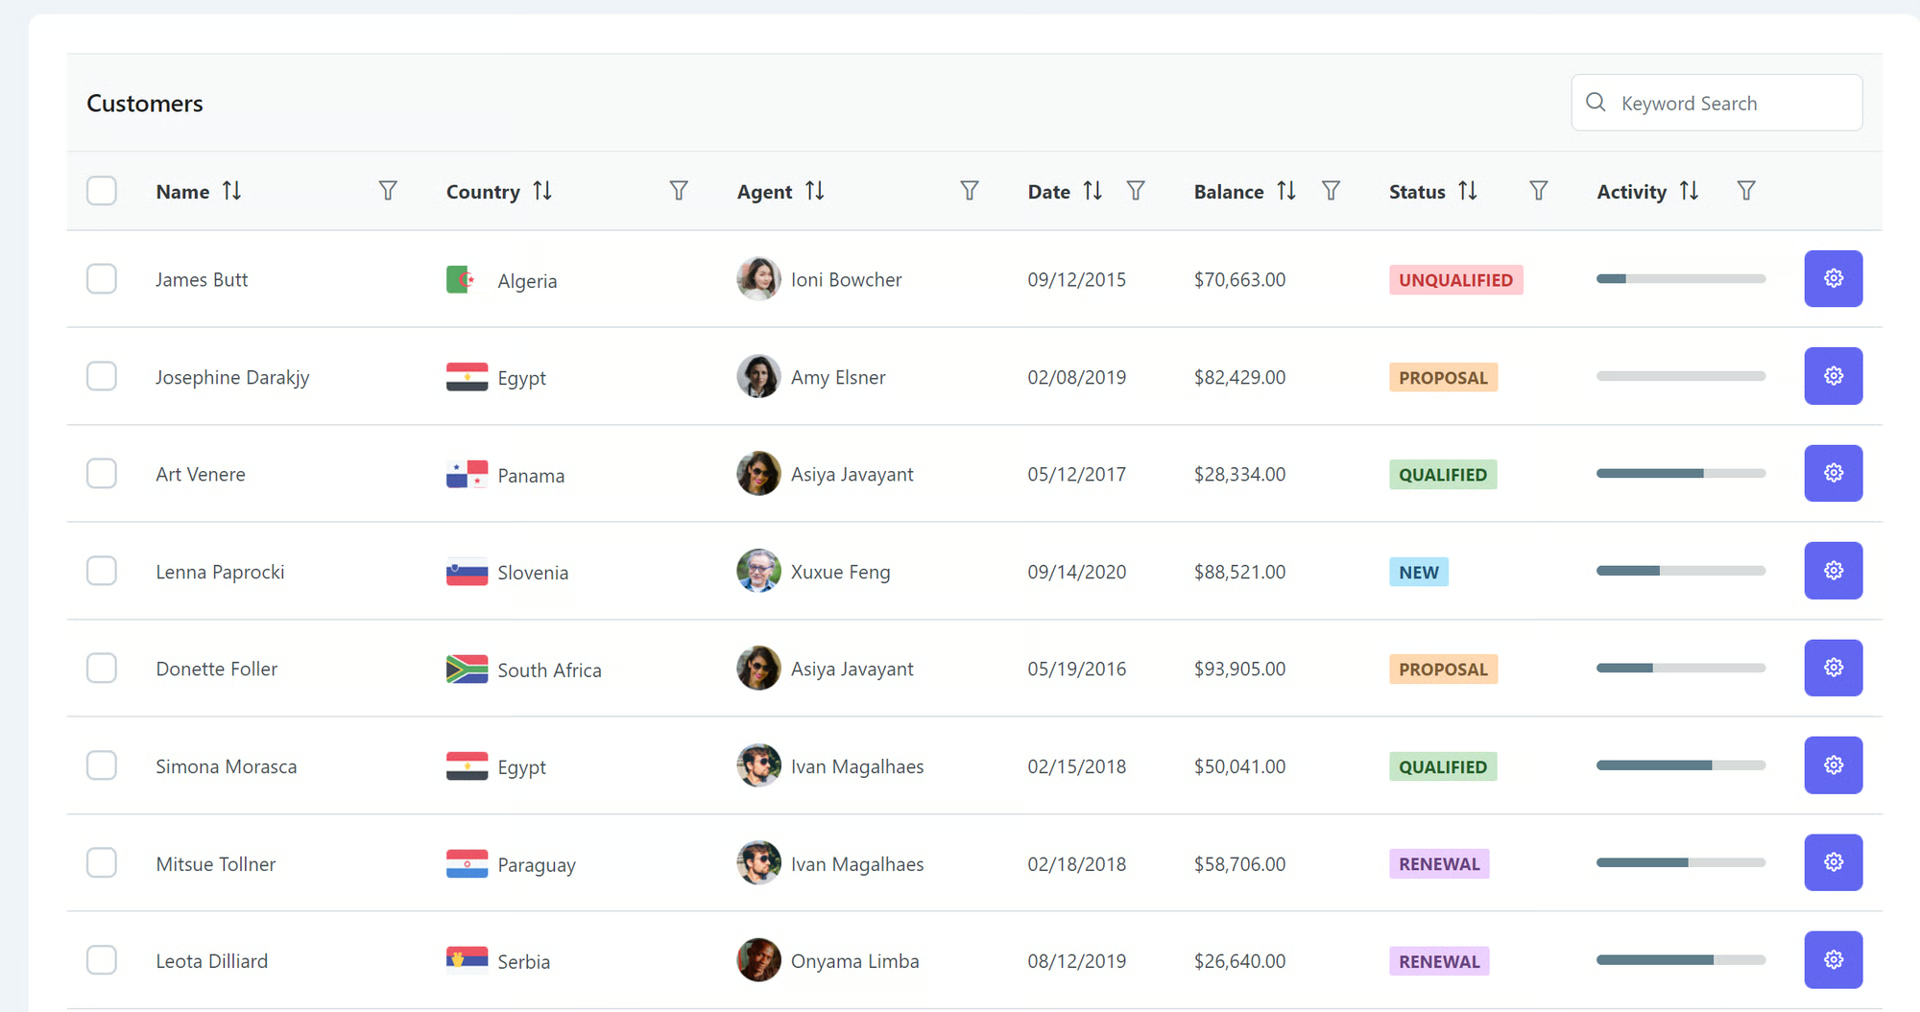
Section titled “Display Configuration”Display Configuration is where you’ll choose what Fields display on both your Linked Record table and in Linked Records lookup/search displayed on your form. Any fields you will need on your table or lookup/search must be added from here. There are options on each field to display or hide it on the table and/or lookup.
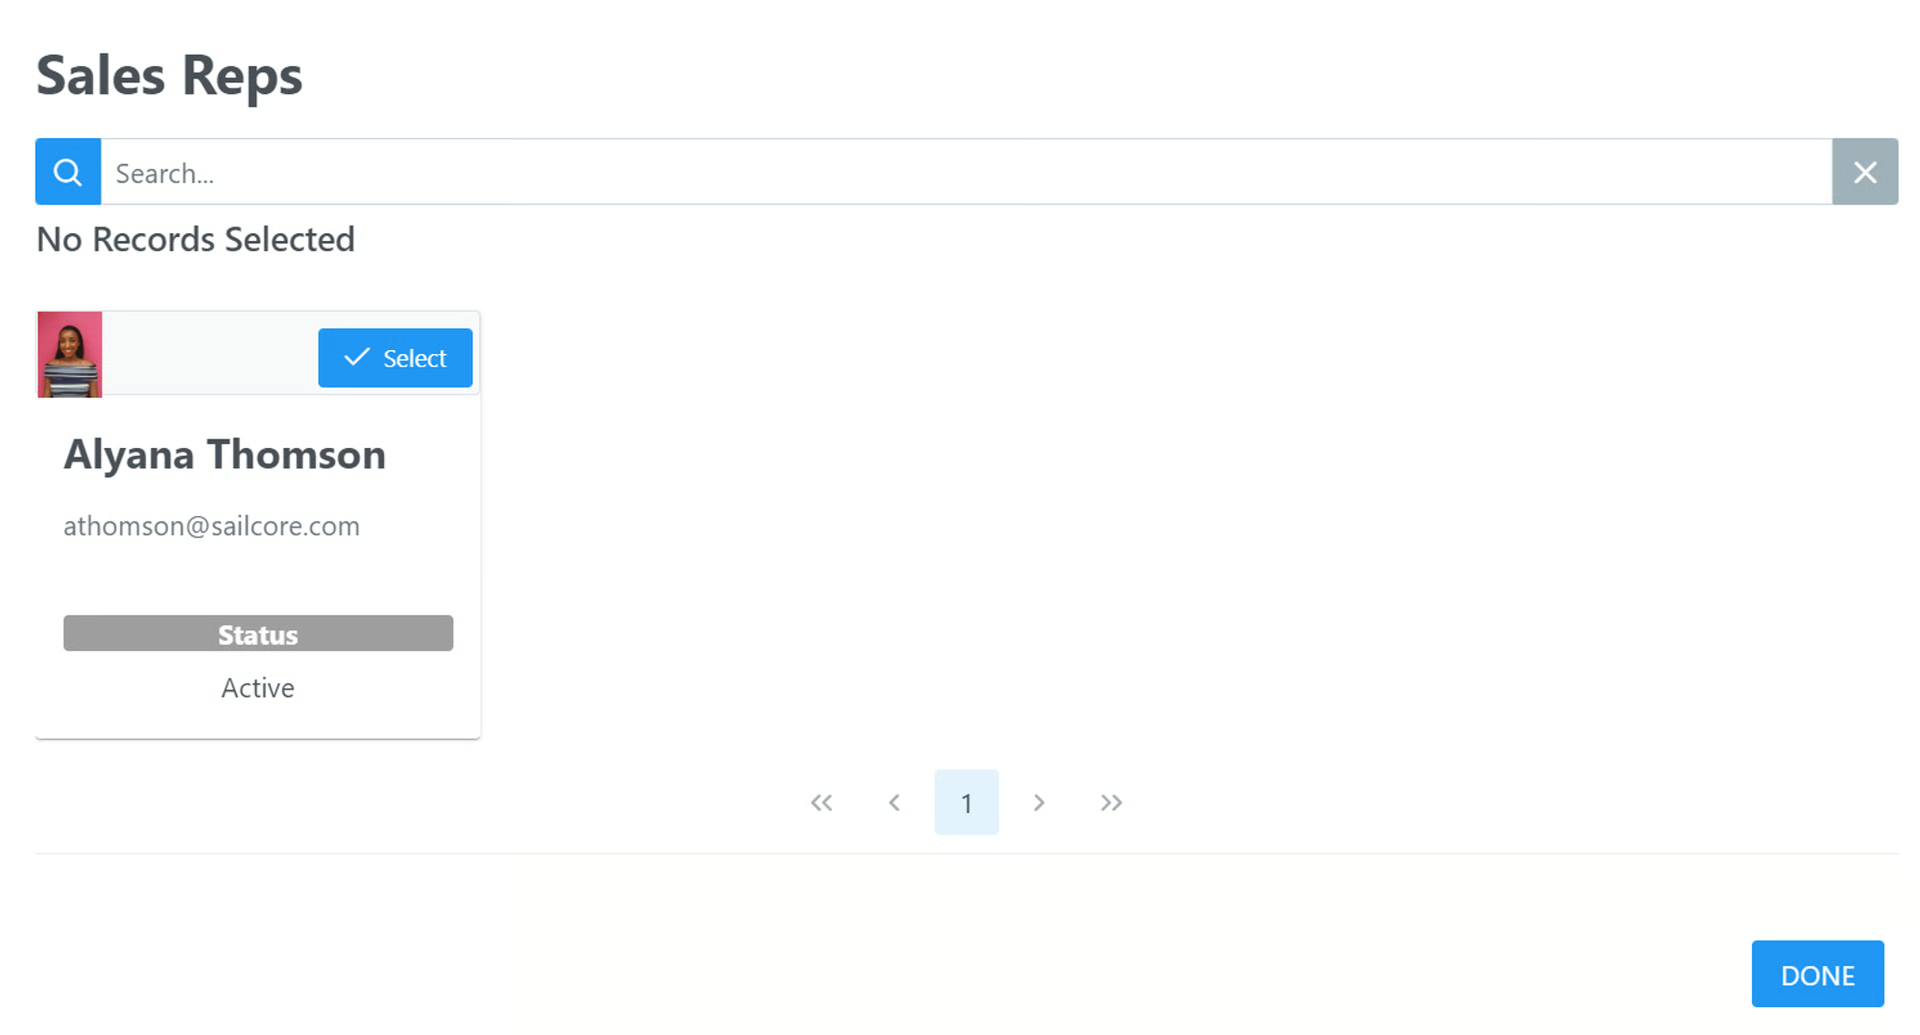
Lookup Display
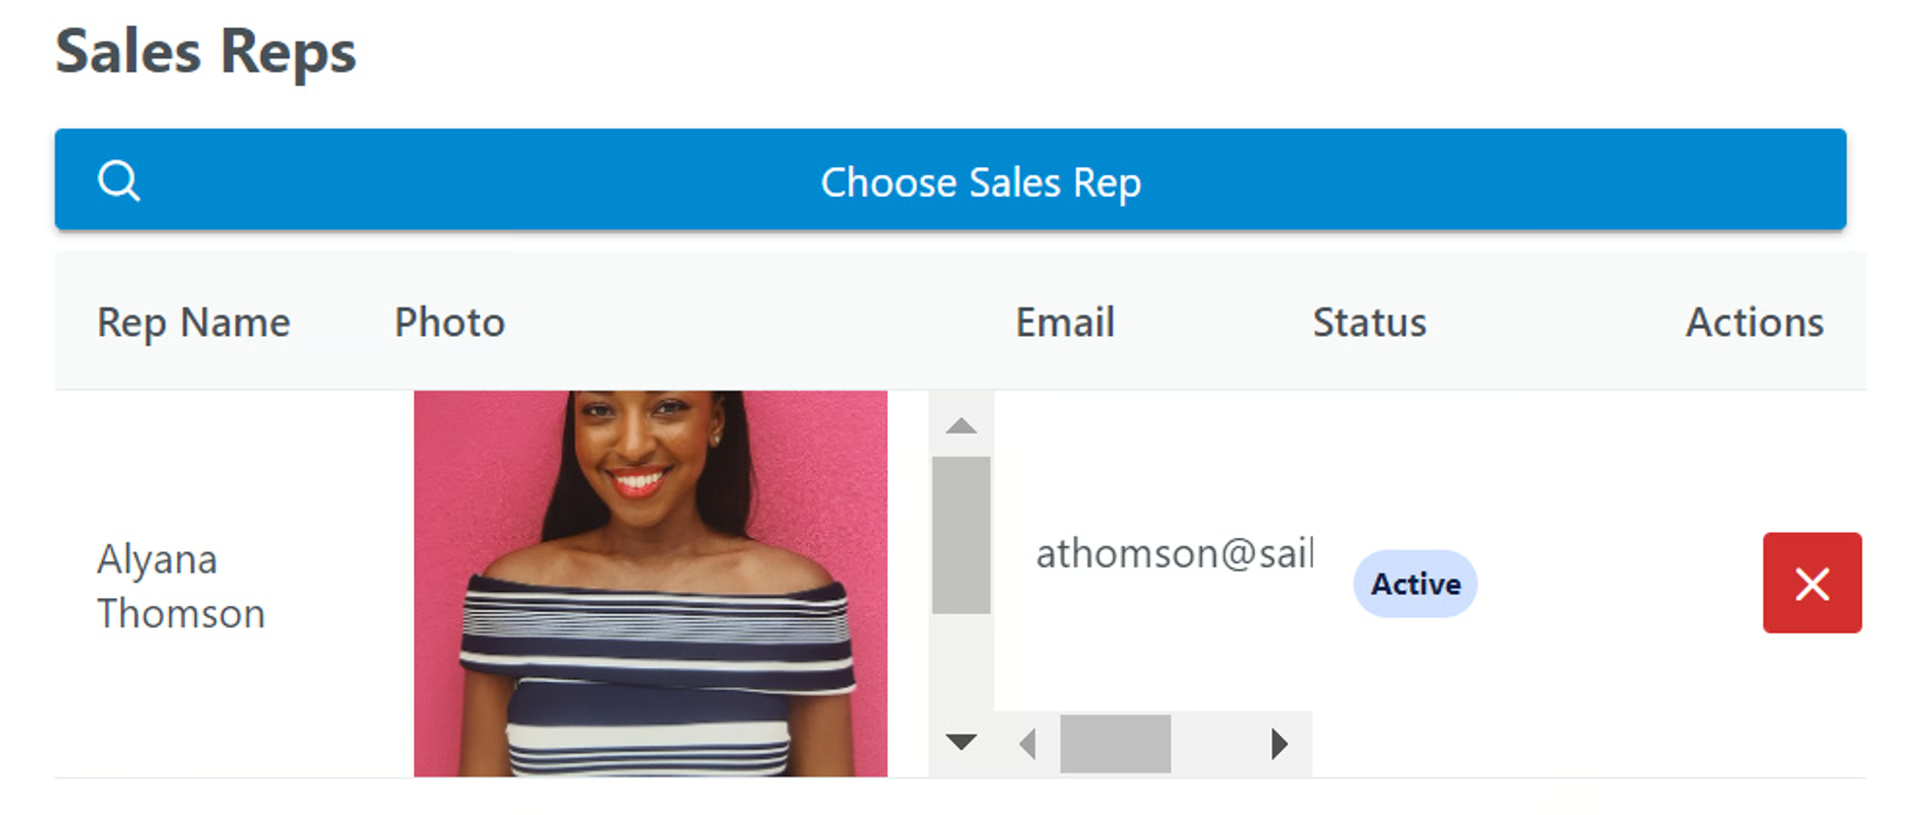
Table Listing
Display Fields
Section titled “Display Fields”- Choose the fields you want displayed on the Table and Lookup
How to Format Your Linked Records Display
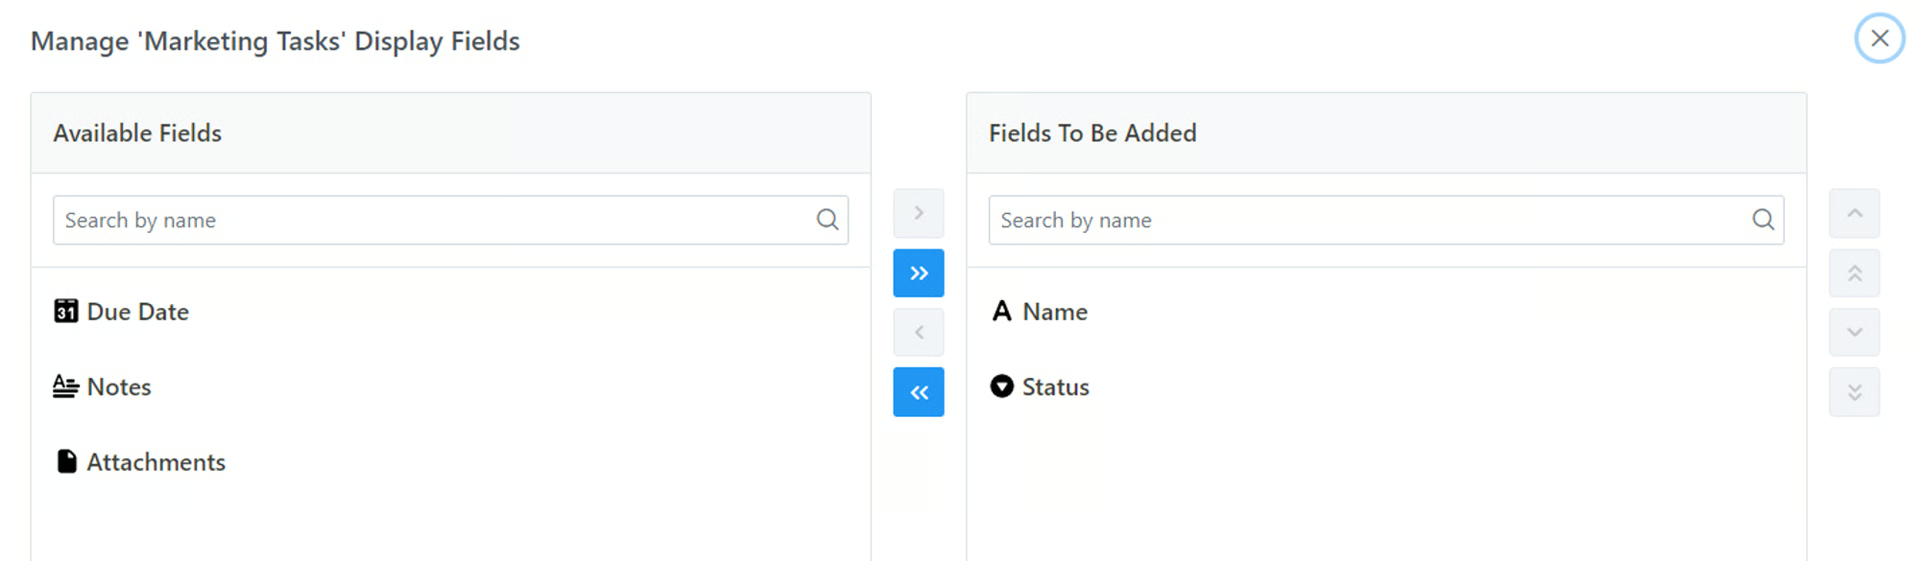
Section titled “How to Format Your Linked Records Display”- Click Add/Remove Fields
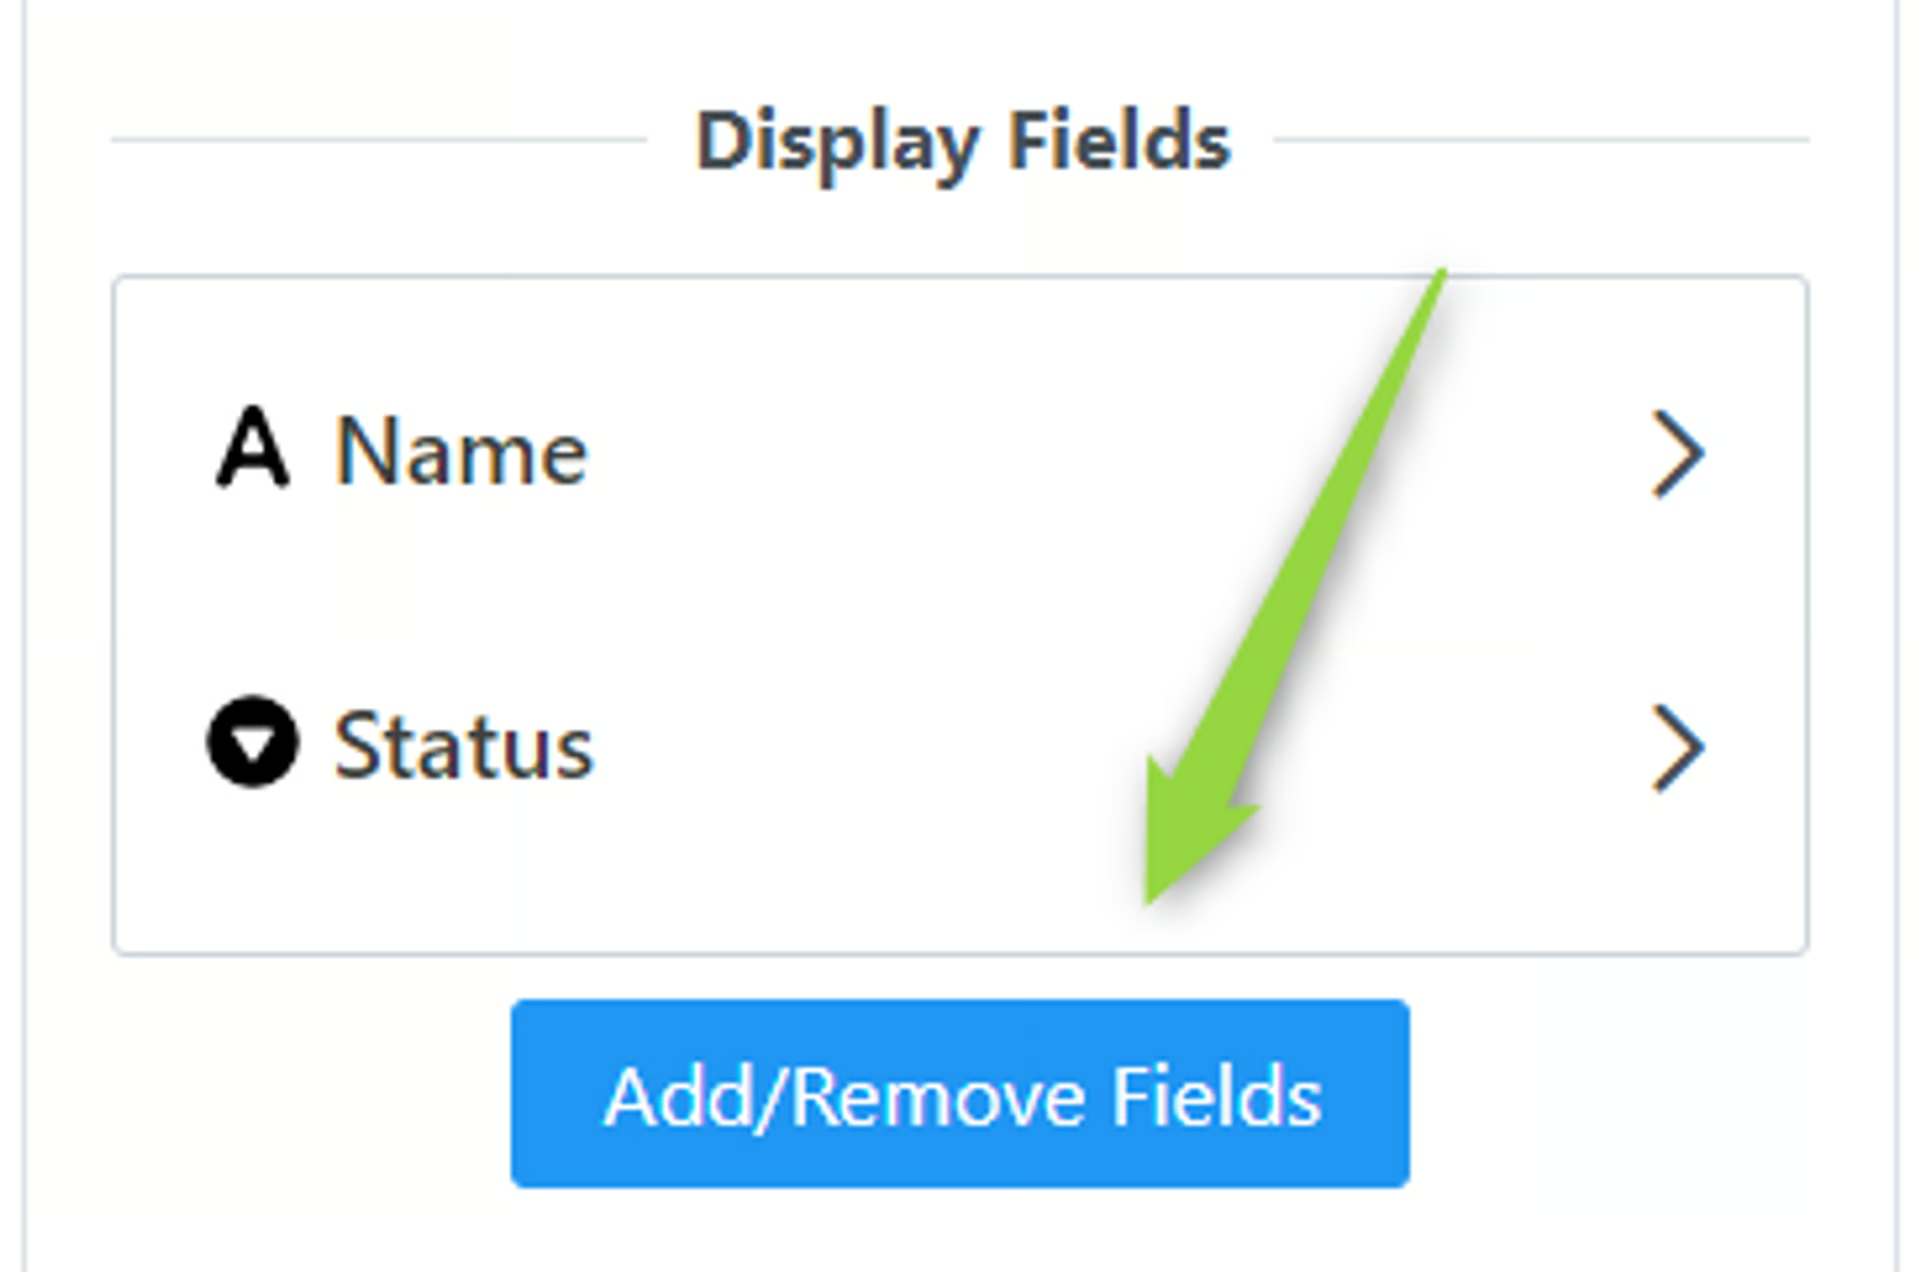
- Choose any field you want displayed on your form table and click the > arrow. To add all fields, click >> and then click Done
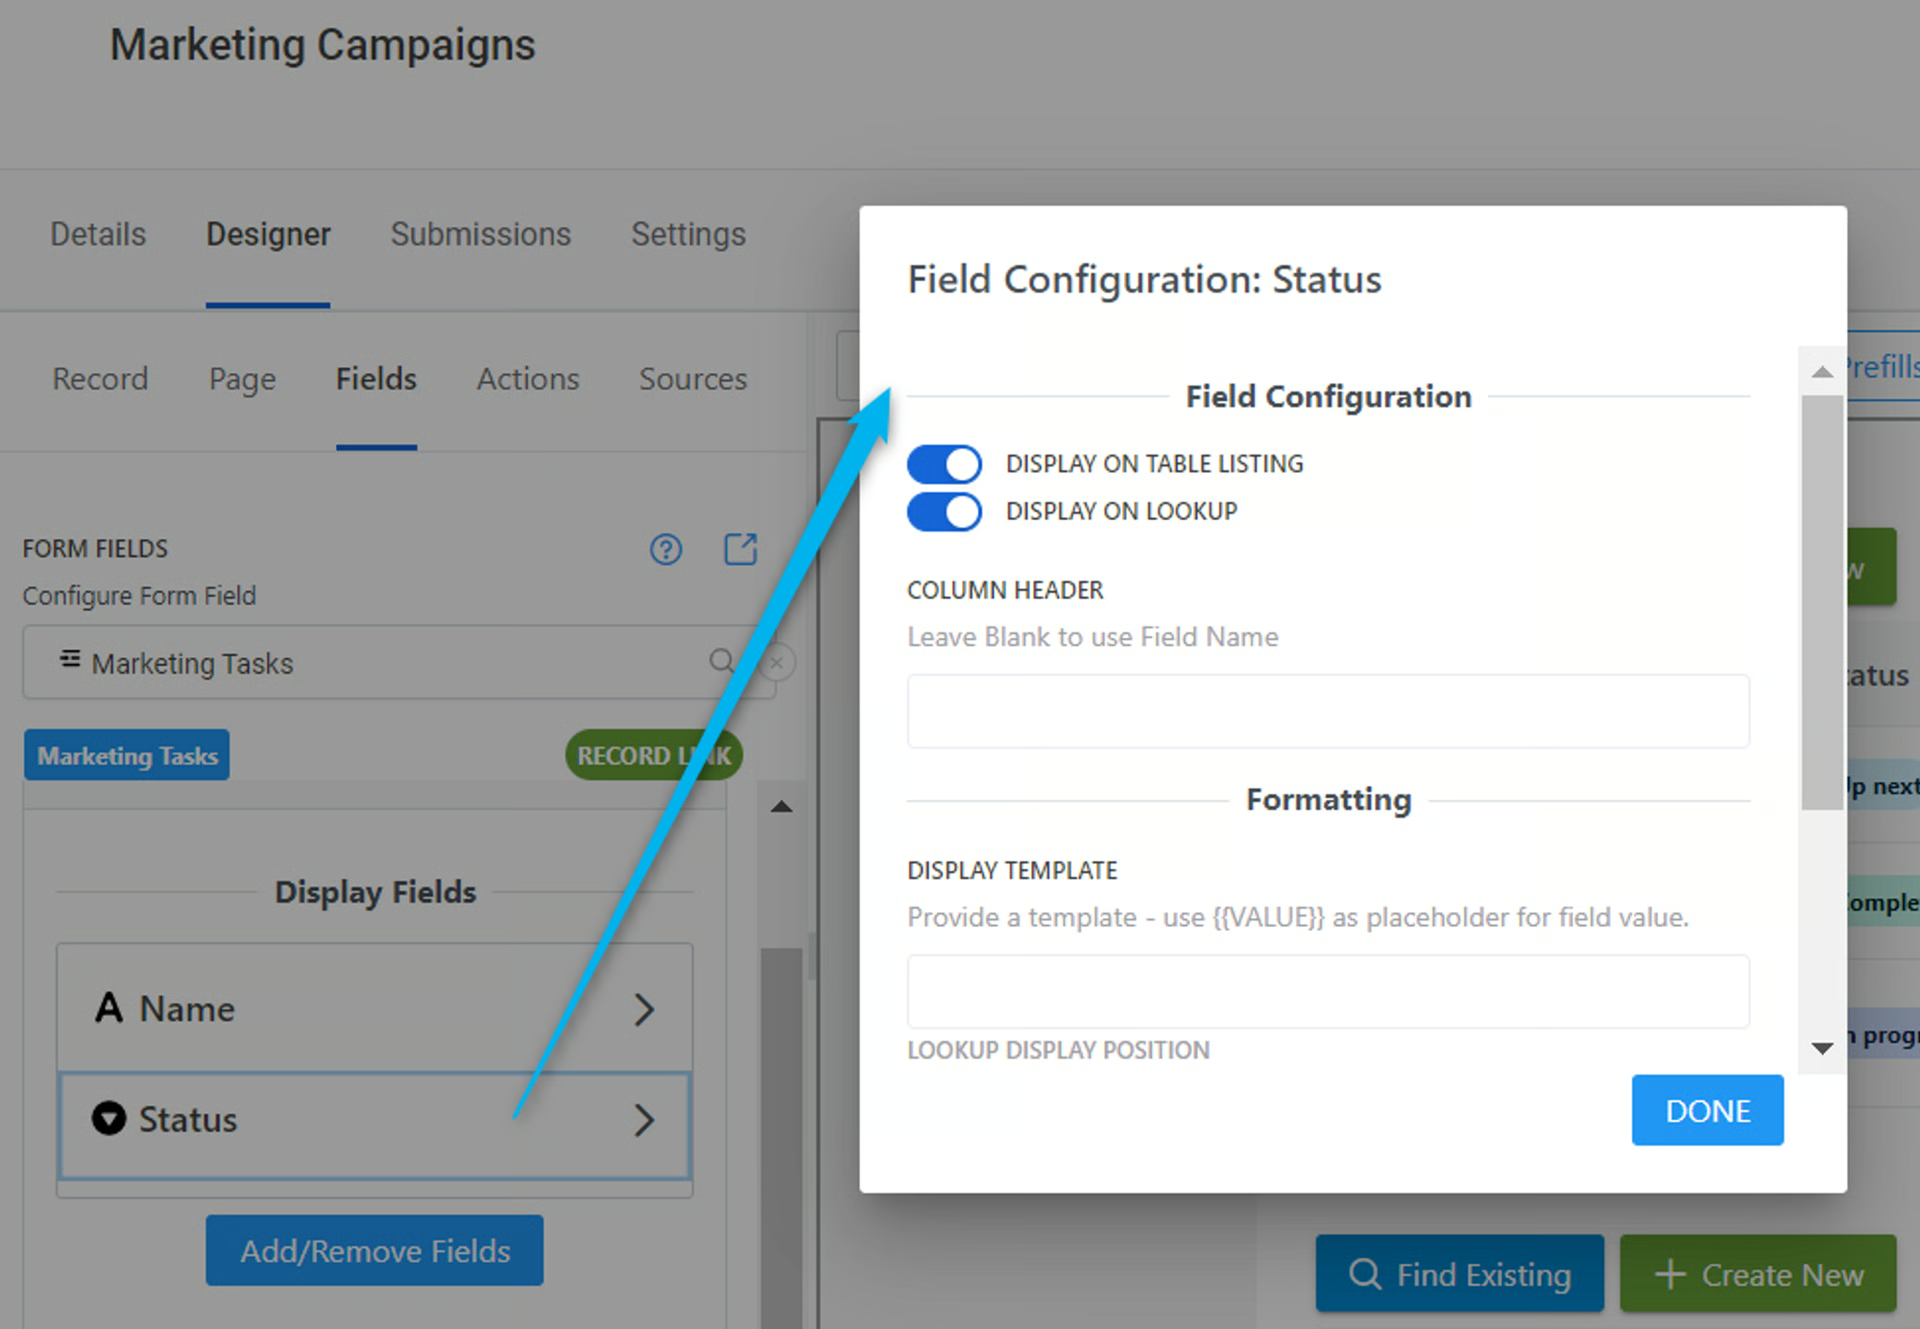
- Once you’ve added your fields to the Display, click on each field and set up the Field Configuration options
-
Display on Table Listing - displays the field value on the table of the main form
-
Display on Lookup - displays the field value on the Search lookup
-
Column Header - add a custom table column name; leave blank to use the Field Name
-
Display Template - add a custom text template surrounding your field value; use {{VALUE}} as a placeholder for your field value
-
Example: If you want a $ symbol before the value, use ${{VALUE}}
-
Lookup Display Position - Determines where on the record in the Lookup Display your data value will appear. Depending if you’ve set other Lookup Displays on fields, you will see Primary, Secondary, Image, or Sub Fields as options
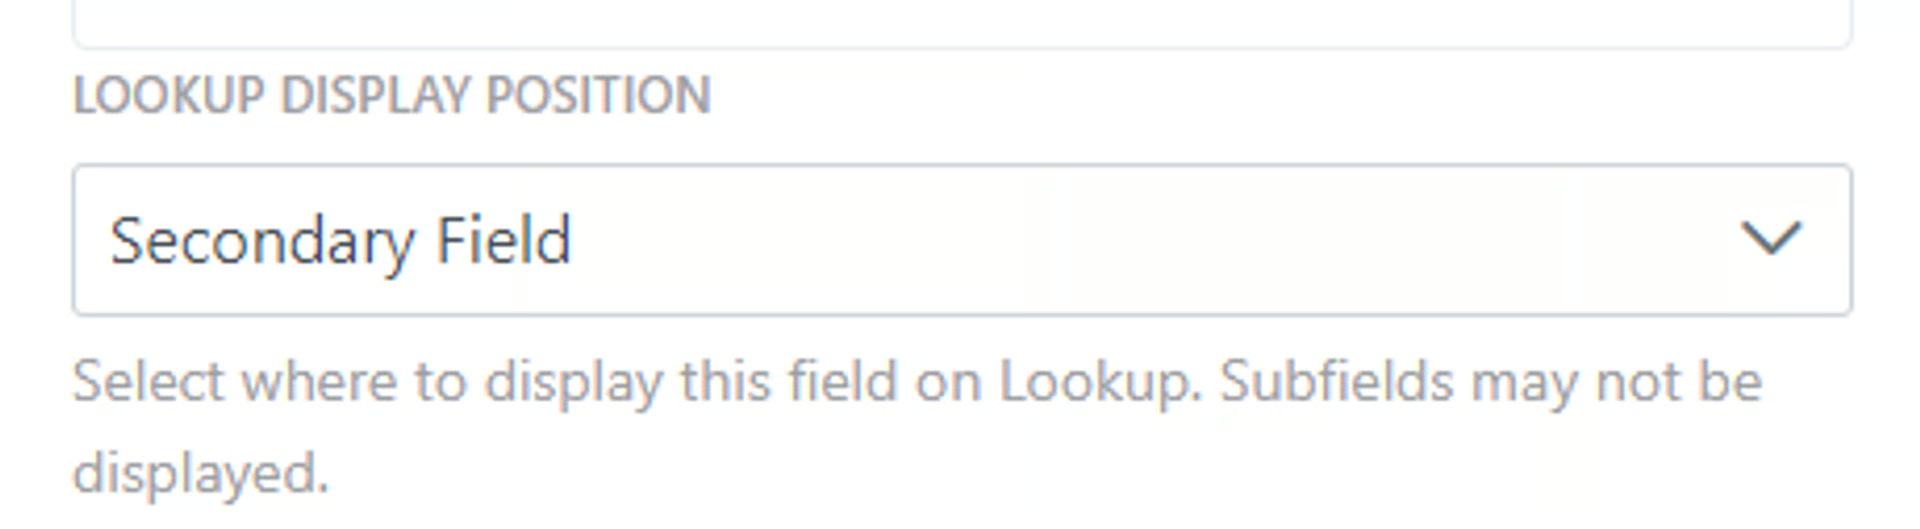
- See Image below for location of Lookup Display positions
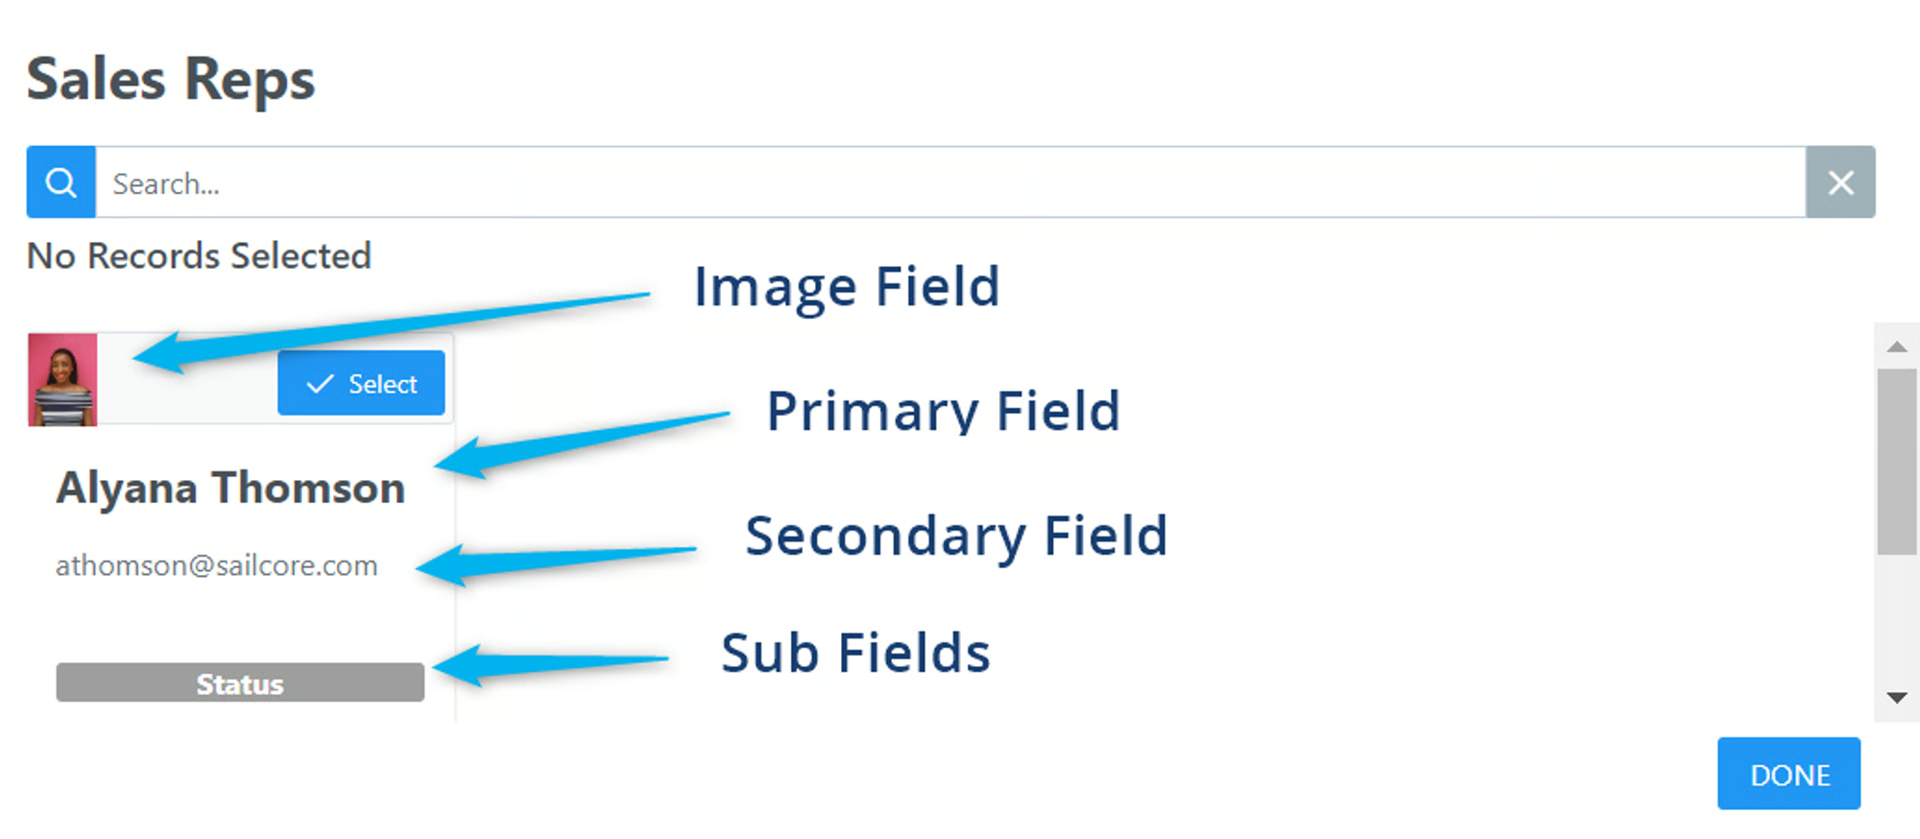
Lookup Display field displays
Advanced Format Options - advanced formatting options for each field. Will display different options depending on the field type - Learn more about adding advanced formatting to your fields.
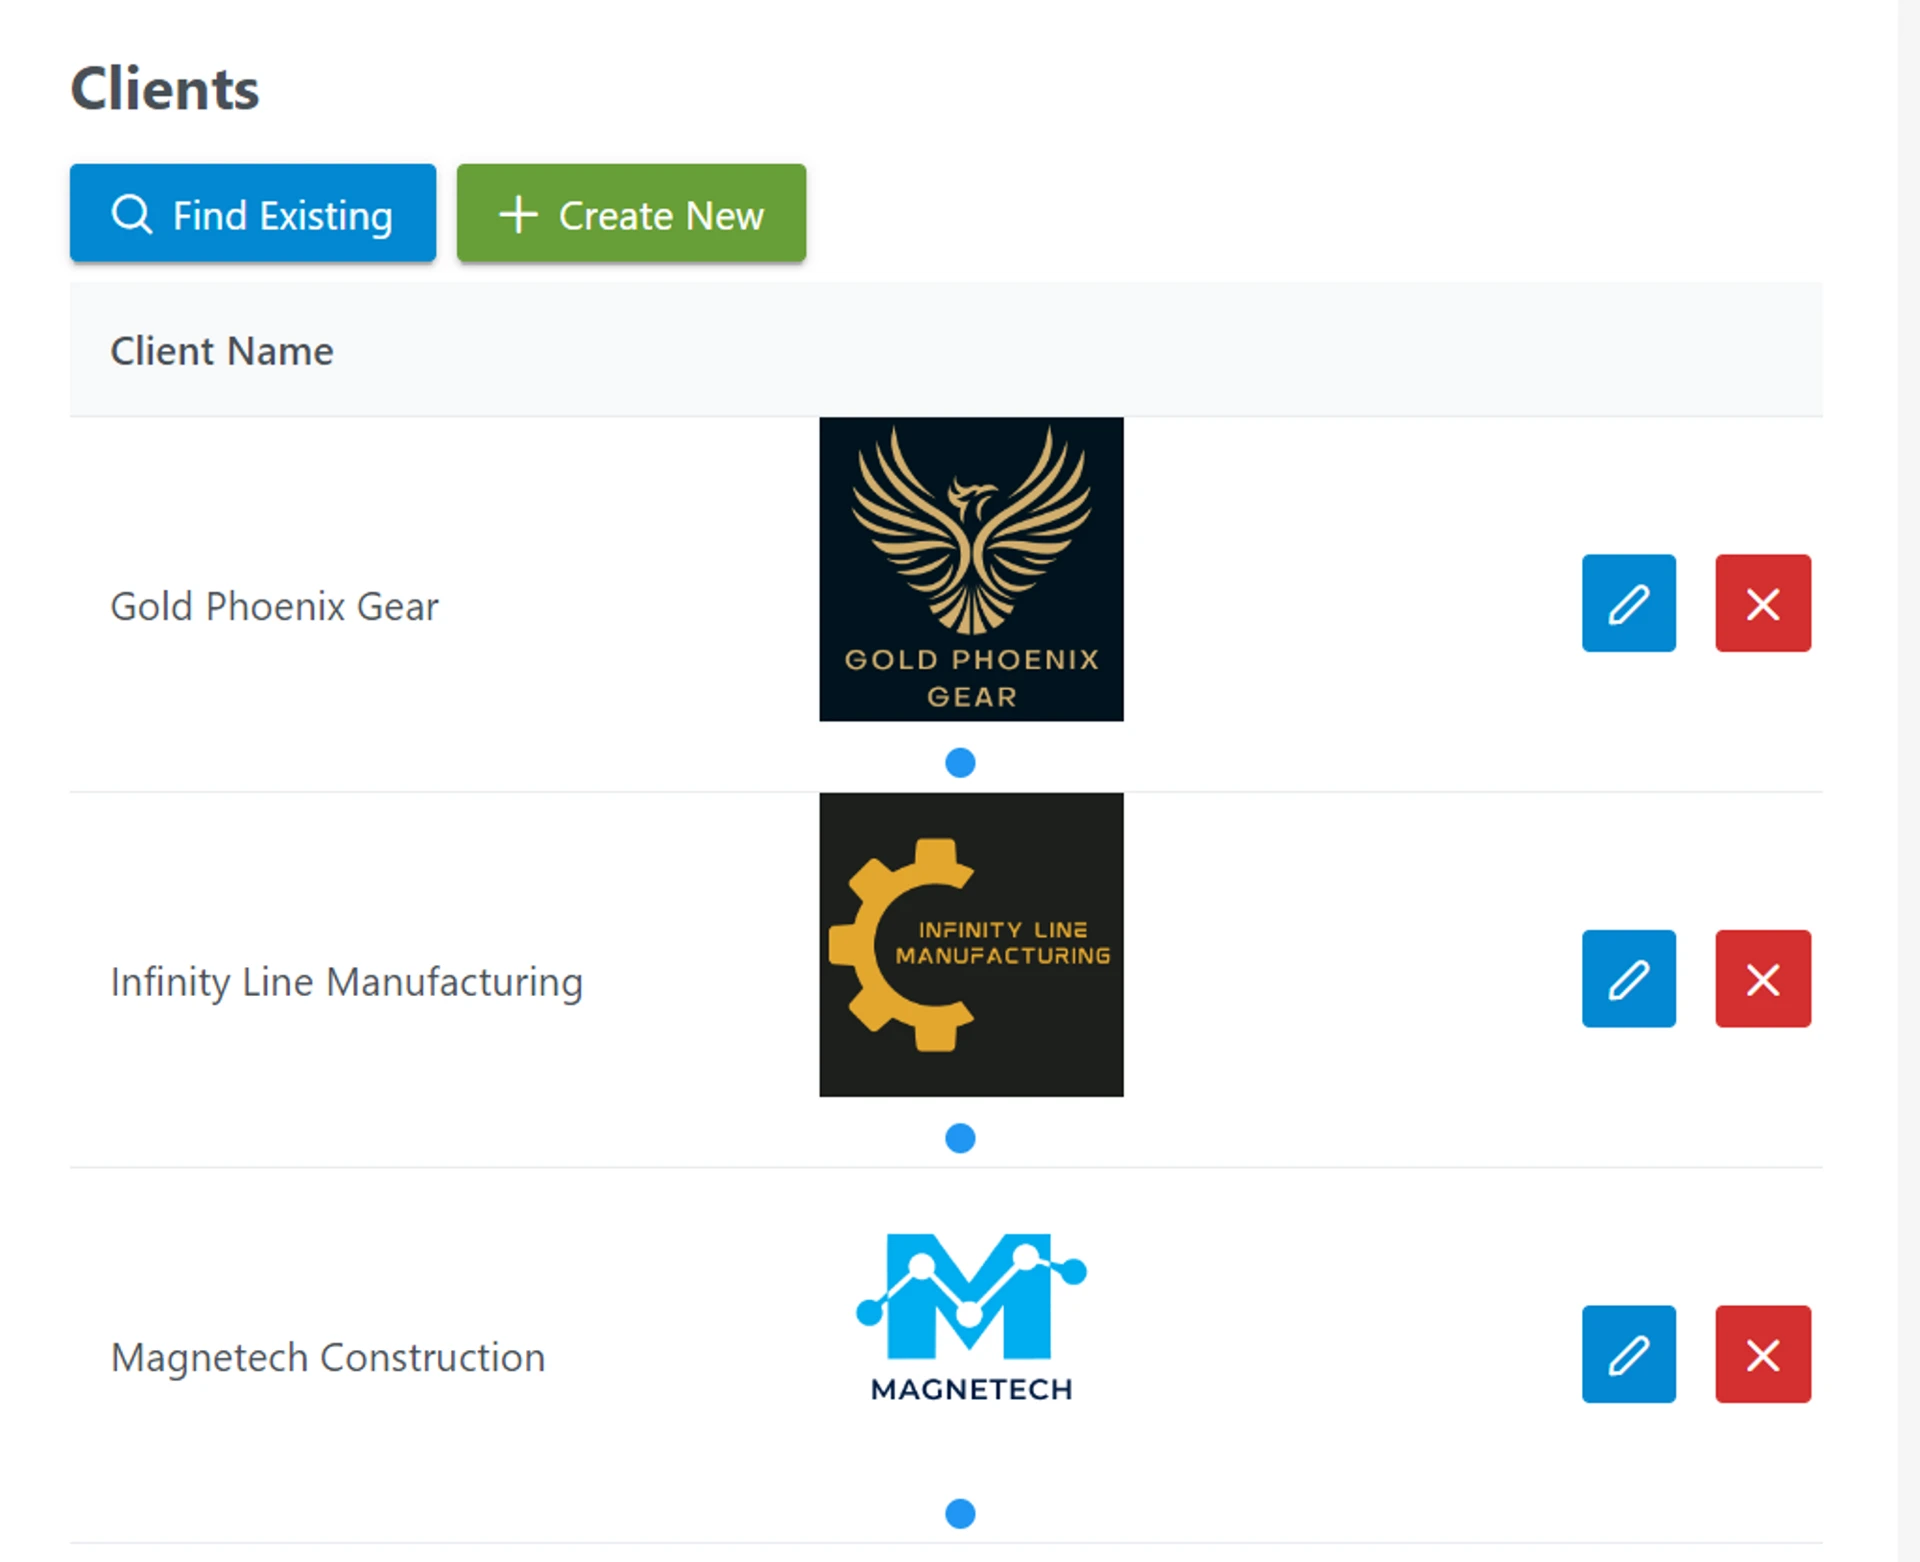
SubForms Configuration (Create/Edit Linked Record Forms)
Section titled “SubForms Configuration (Create/Edit Linked Record Forms)”With SubForms, you can create a form within your form in order to update multiple tables in your Airtable base with one form. SubForms are created within  Linked Record (+ SubForms) Fields.
SubForm Permissions
Section titled “SubForm Permissions”You can set specific permissions for your SubForm records. You can allow or disallow creating new records, updating existing records, bulk record updates, lookup existing records, removal of existing record, bulk removing existing records, and ordering of records.
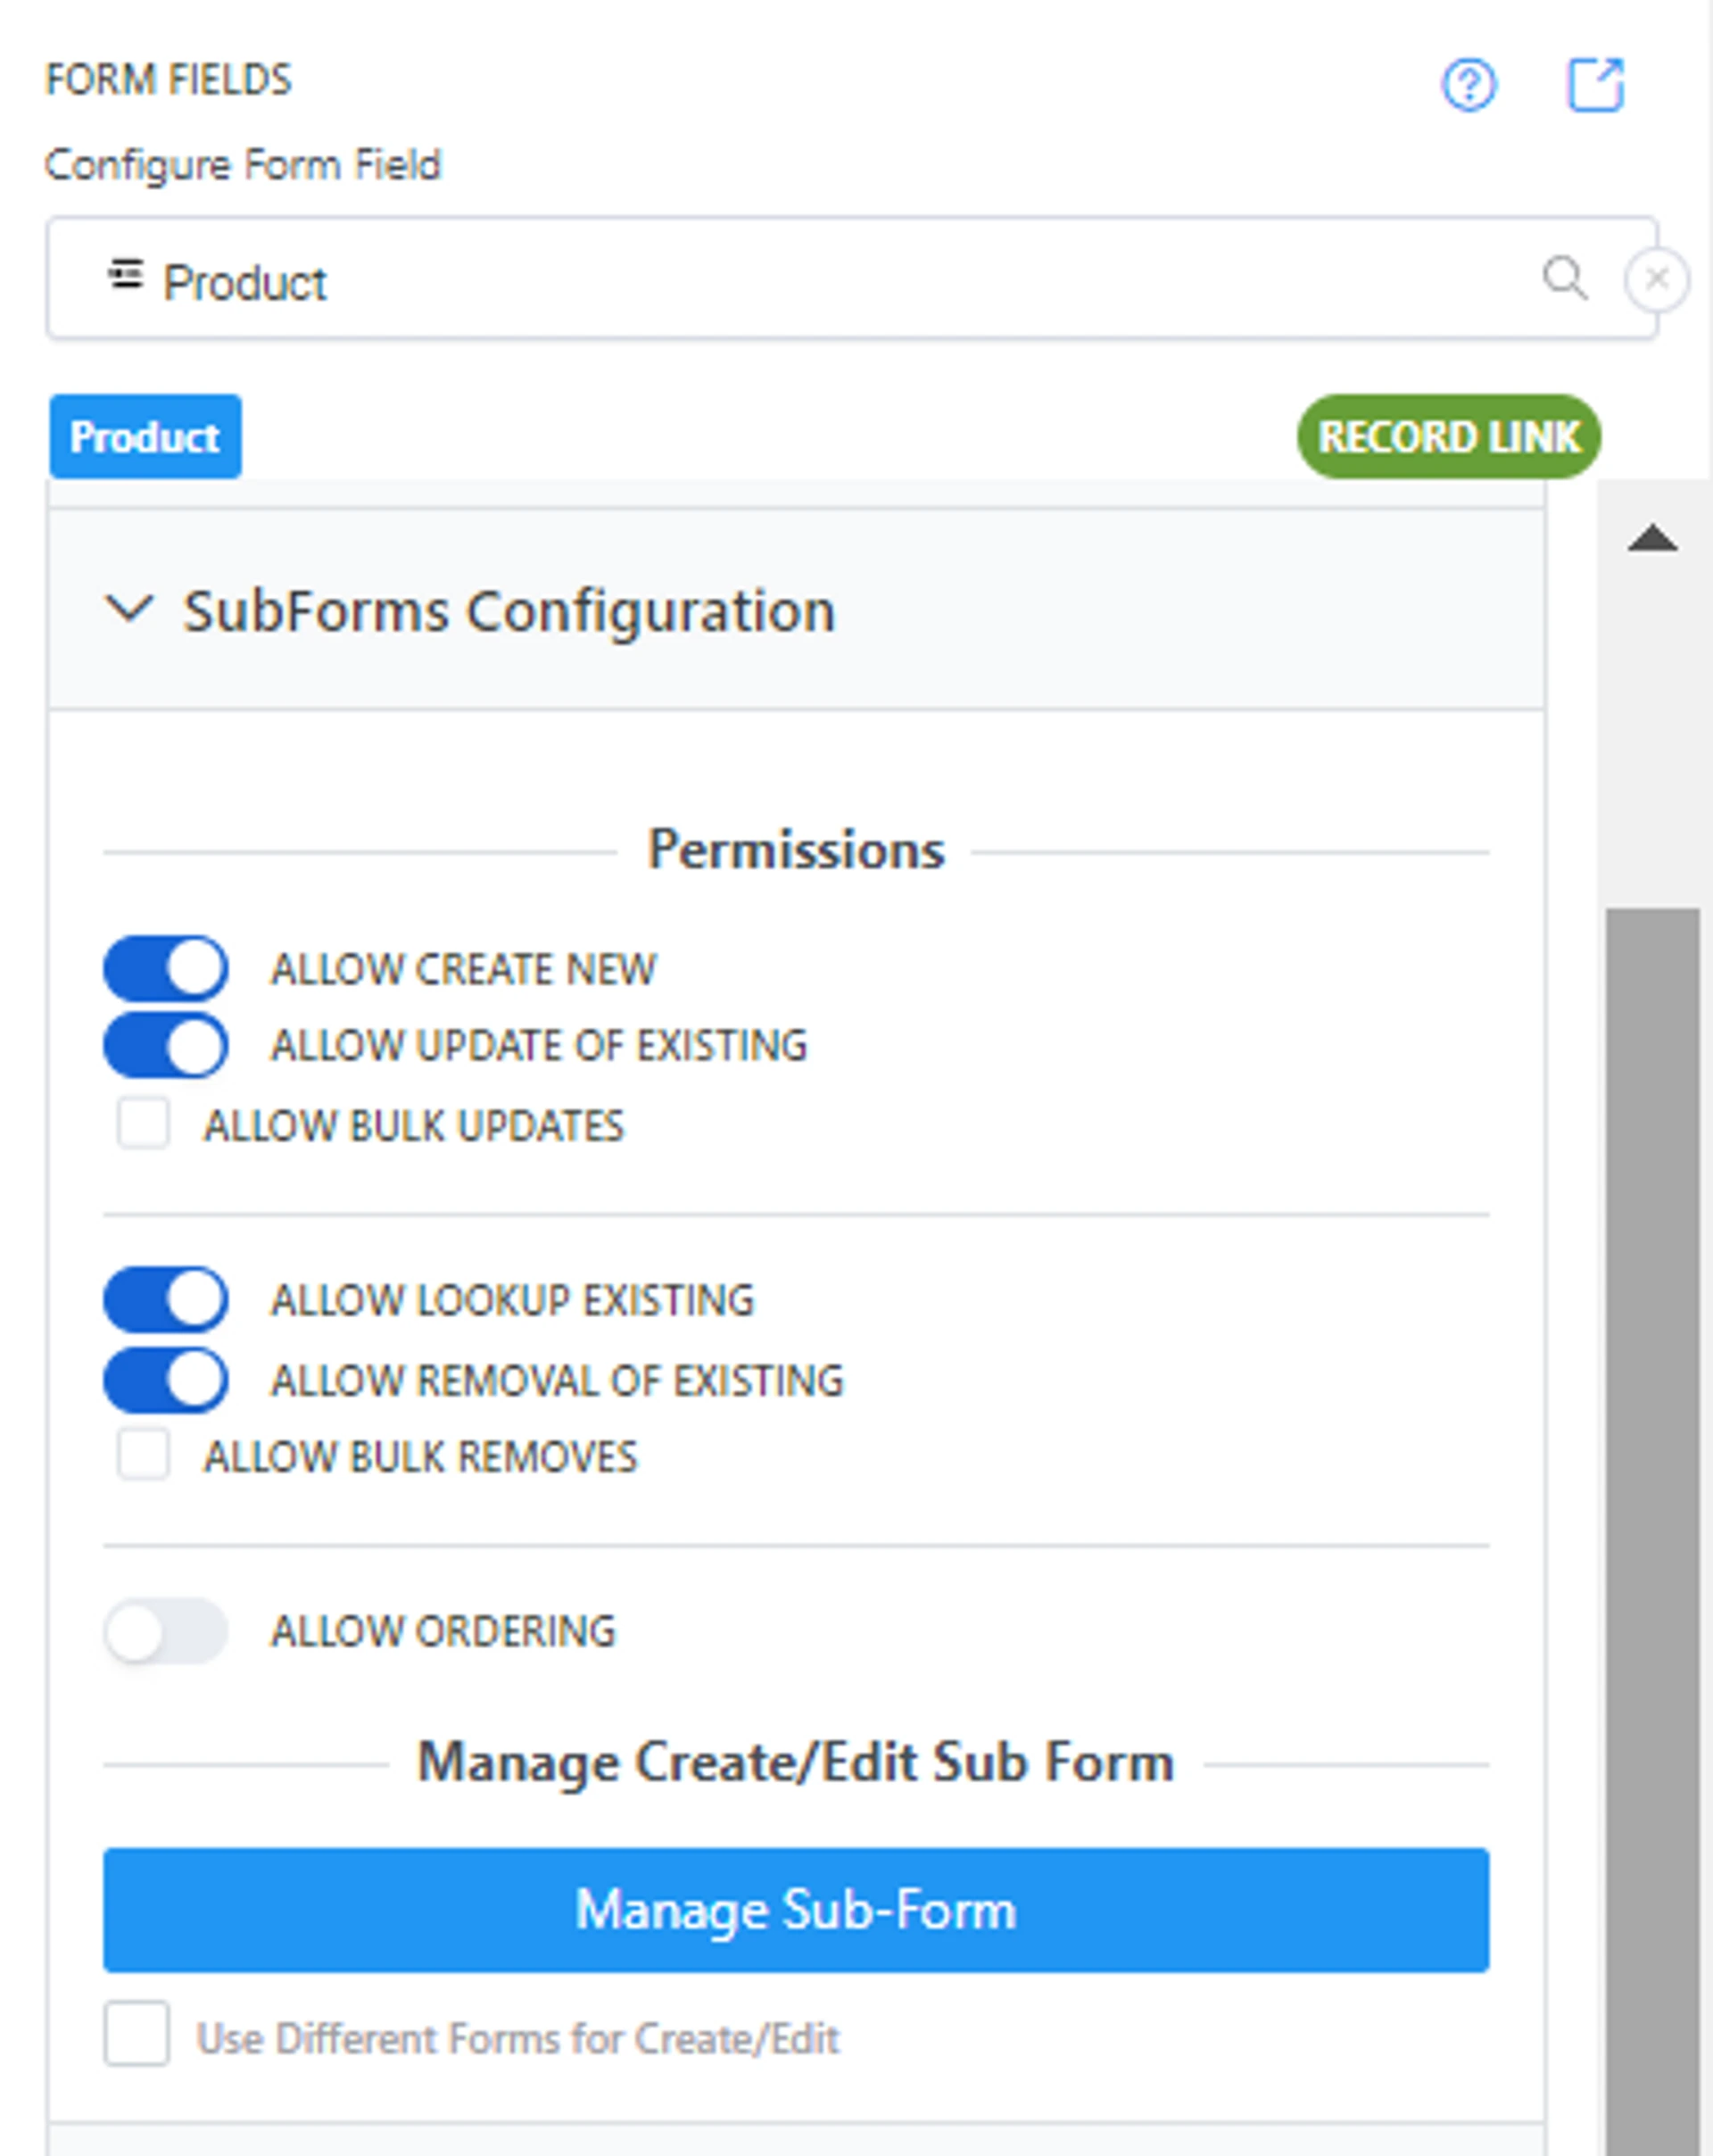
Allow Create New - Allow a form user to create new Airtable records in the SubForm
Allow Update of Existing- Allow a form user to update existing Airtable records in the SubForm
Allow Bulk Updates- Allow a form user to update Airtable records in bulk (multiple records at once) in the SubForm
Allow Lookup Existing - Allow a form user to look up existing Airtable records in the SubForm
Allow Removal of Existing - Allow a form user to remove existing Airtable records already displayed on the SubForm table list
Allow Bulk Removes - Allow a form user to remove existing Airtable records already displayed on the SubForm table list in bulk (multiple records at once)
Allow Ordering - Allow a form user to reorder Airtable records displayed on the SubForm table
Build a Linked Record SubForm - (Manage Create/Edit SubForm)
Section titled “Build a Linked Record SubForm - (Manage Create/Edit SubForm)”To create and edit Linked Records, you need to set up the Subform in Subform Configuration.
💡
Learn how to  Create and Edit Linked Records with Subforms (Update Multiple Tables from 1 Form)
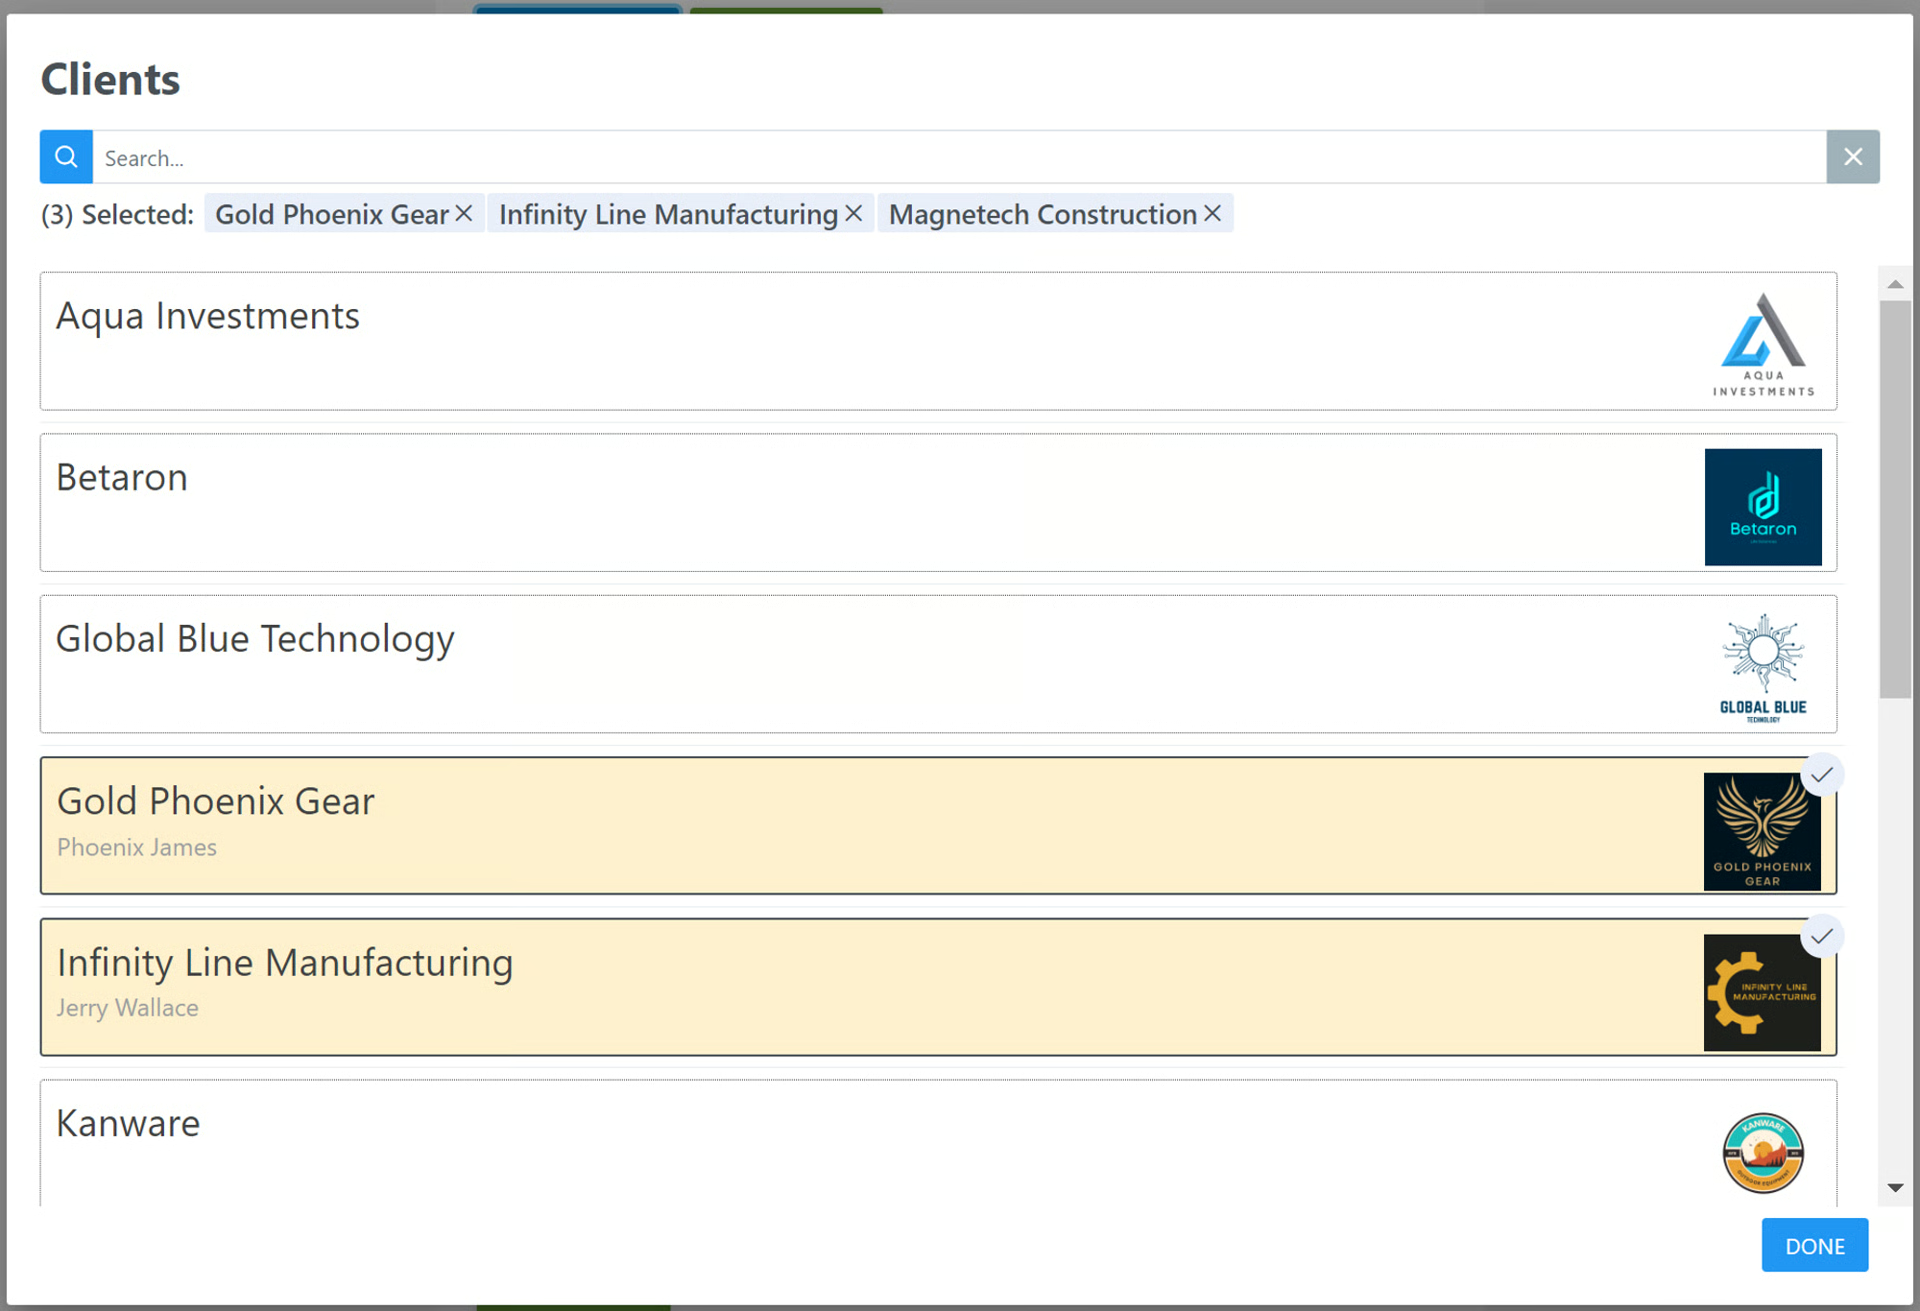
Lookup Search Configuration
Section titled “Lookup Search Configuration”Choose how the fields the form user can use to search Linked records from your Subform fields
Search Fields
Section titled “Search Fields”-
Choose the fields that can be used to Search your linked records
-
Open each field and choose the Field Configuration options
-
Search Fields Matching Style - Select how searches against the search field will be performed Options: Exact Match - The form user must enter a value that exactly matches a search field value Contains - The form user can enter in values that are contained in the search field values
Case Sensitive - Enable if Search Field needs to match exactly, including uppercase, lowercase, or other
Sort Fields
Section titled “Sort Fields”- Select the fields to be used for sorting search results of field
- Choose a field and then choose Ascending or Descending order
- You can add multiple fields used for sorting by clicking Add new option after the first sort
Sort Fields - Select the fields to be used for sorting results of field
- Choose a field and then choose Ascending or Descending order
- You can add multiple fields used for sorting by clicking Add new option after the first sort
Lookup Filter Configuration
Section titled “Lookup Filter Configuration”The Lookup Filter allows you to limit what data can be viewed or edited in the Linked Record field.
⚙
Related:  How to Filter Records with Parent - Child Relationships (States > Cities in the State)
🎥 Use On2Air Forms to Filter Airtable Records Based on Selection (Parent/Child Fields) - Linked Records
Section titled “🎥 Use On2Air Forms to Filter Airtable Records Based on Selection (Parent/Child Fields) - Linked Records”Parent Link Mode - Determine how to link Parent field to this field
Options: Field Match - Match to exact field Custom Formula - Create a filtered search using an Airtable formula
Parent Source Field - Choose the Parent Source field
Parent Matching Style - Select how to link fields with Parent field
Options: Exact Match Contains Does Not Contain Does Not Equal
Case Sensitive - Enable if Parent Field needs to match exactly, including upper case, lower case, or other case
➡️
Related:  What are Dynamic URL Filters in Search for Linked Records
Extra Options - View Advanced Options
Section titled “Extra Options - View Advanced Options”With Advanced Options, you can further customize your linked record table display.
- Open the Extra Options menu in your Field
- Click View Advanced Options
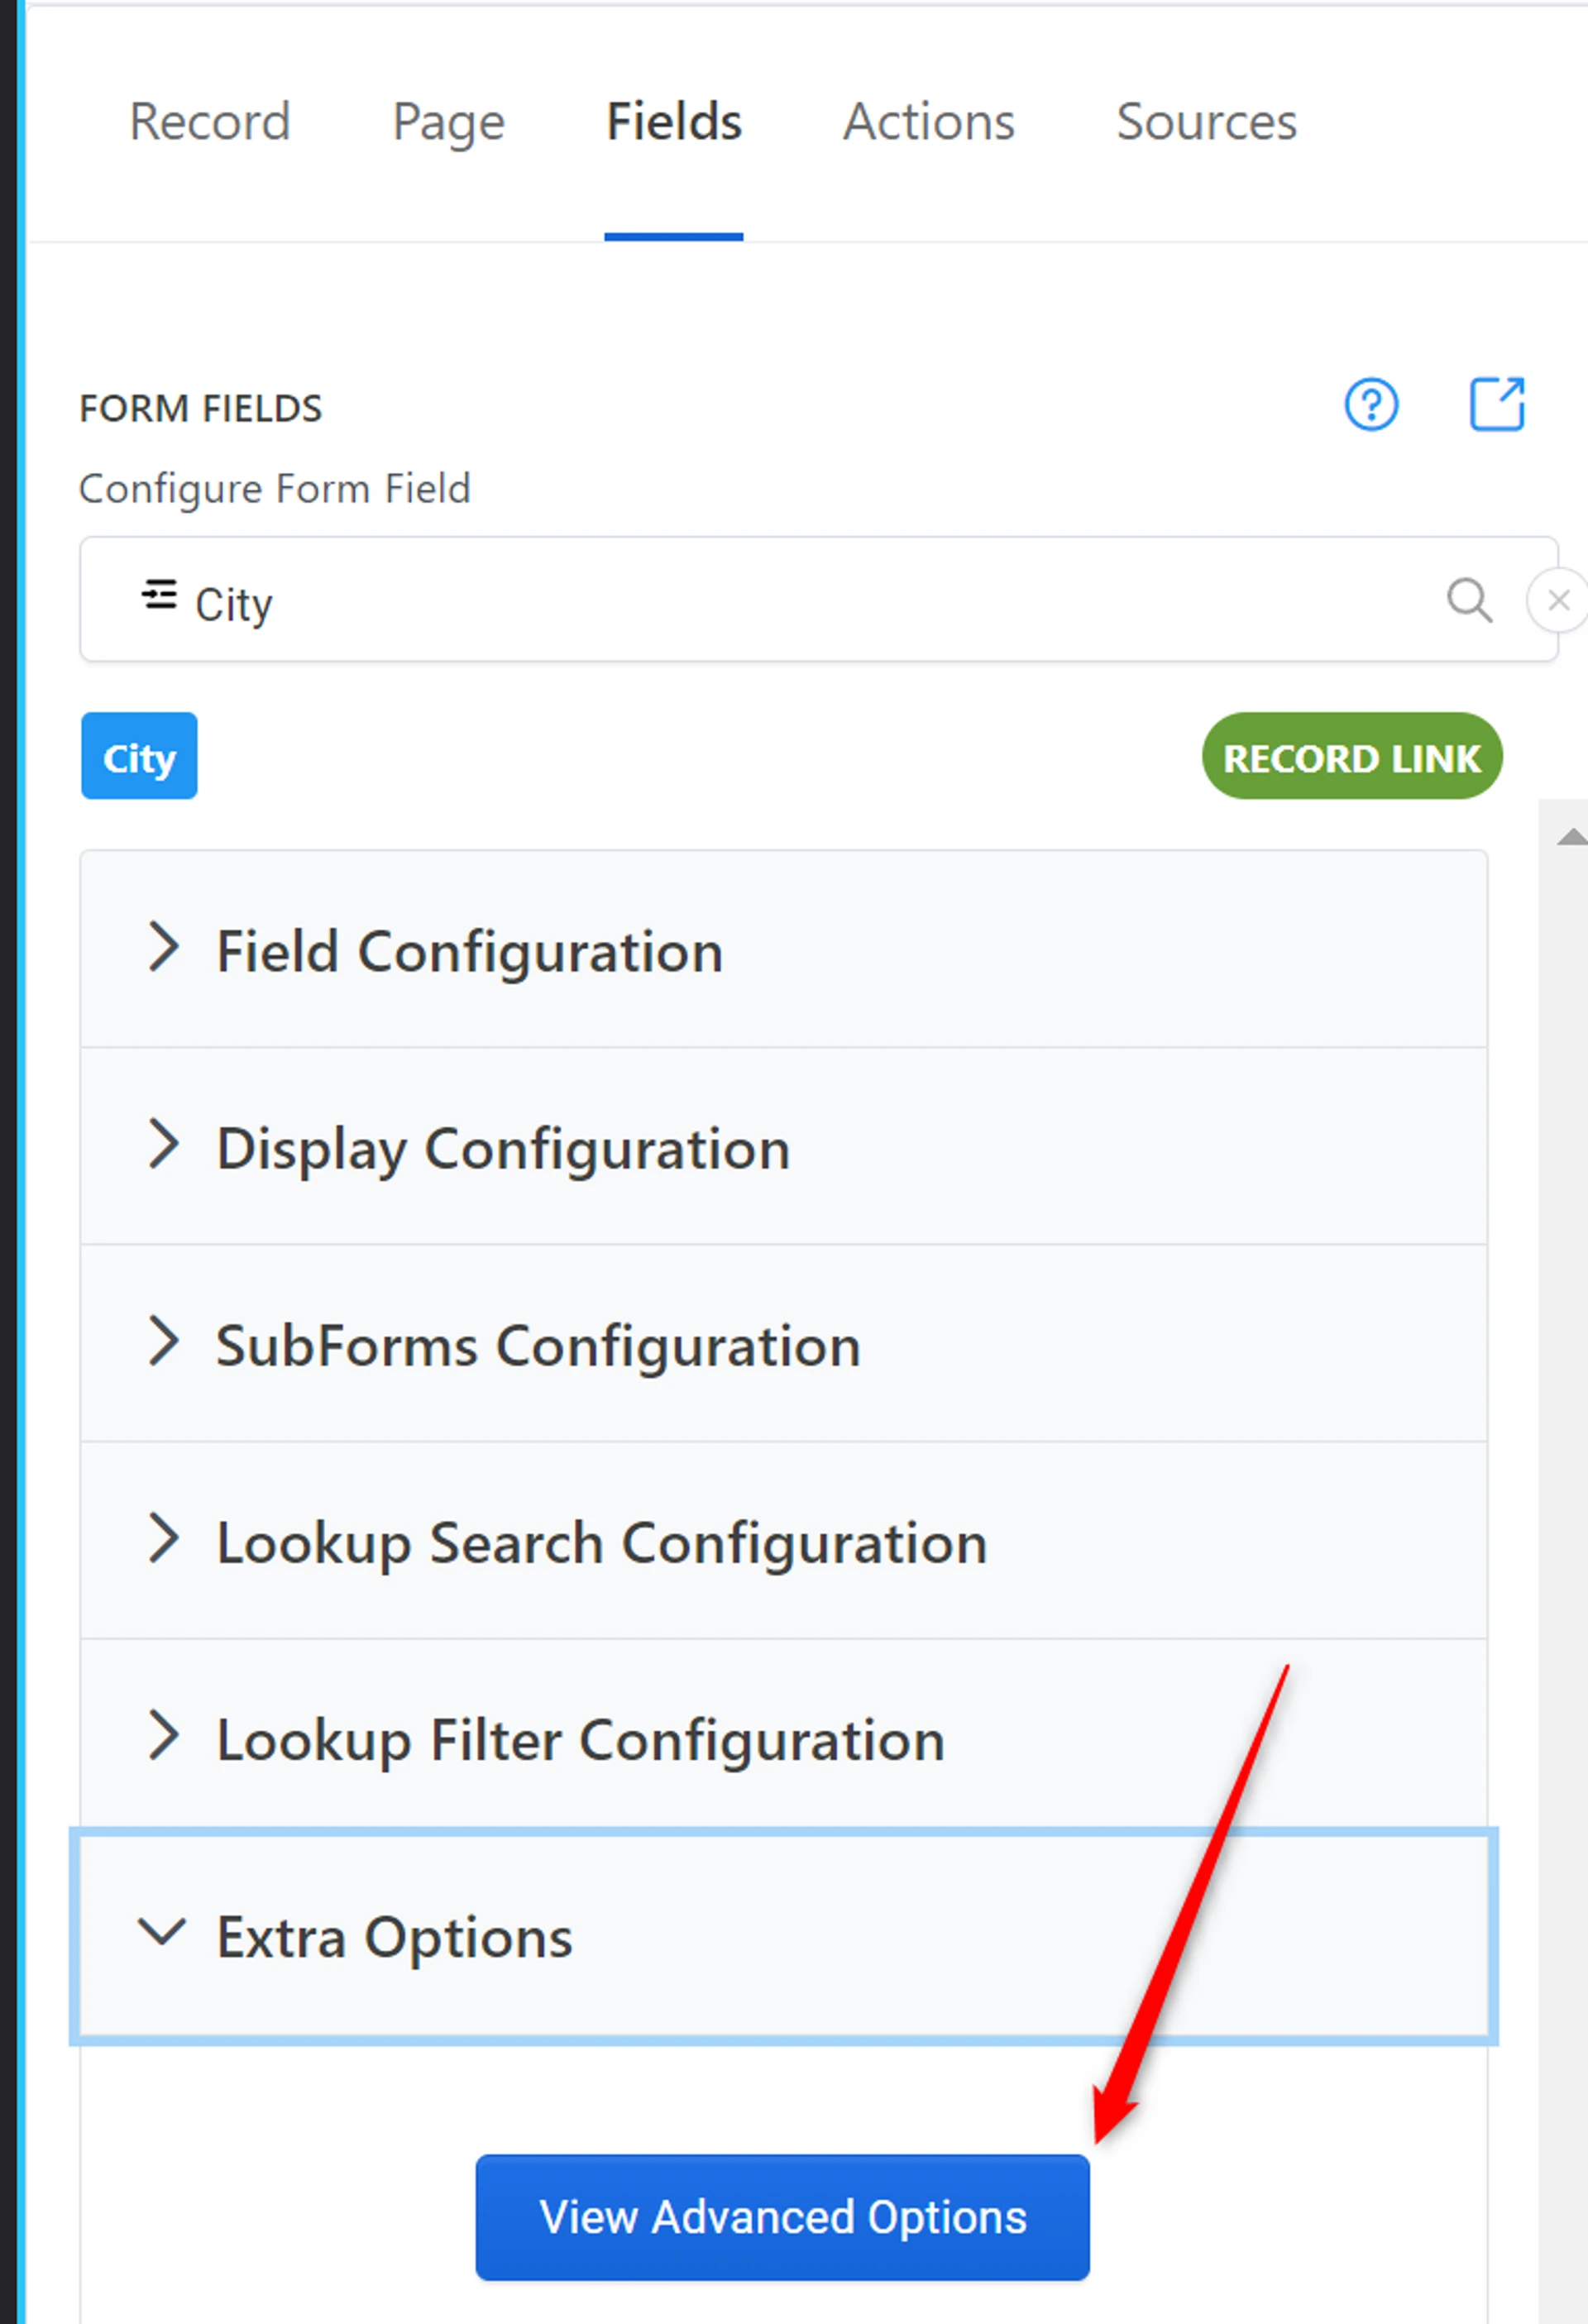
Advanded/Custom Settings Available
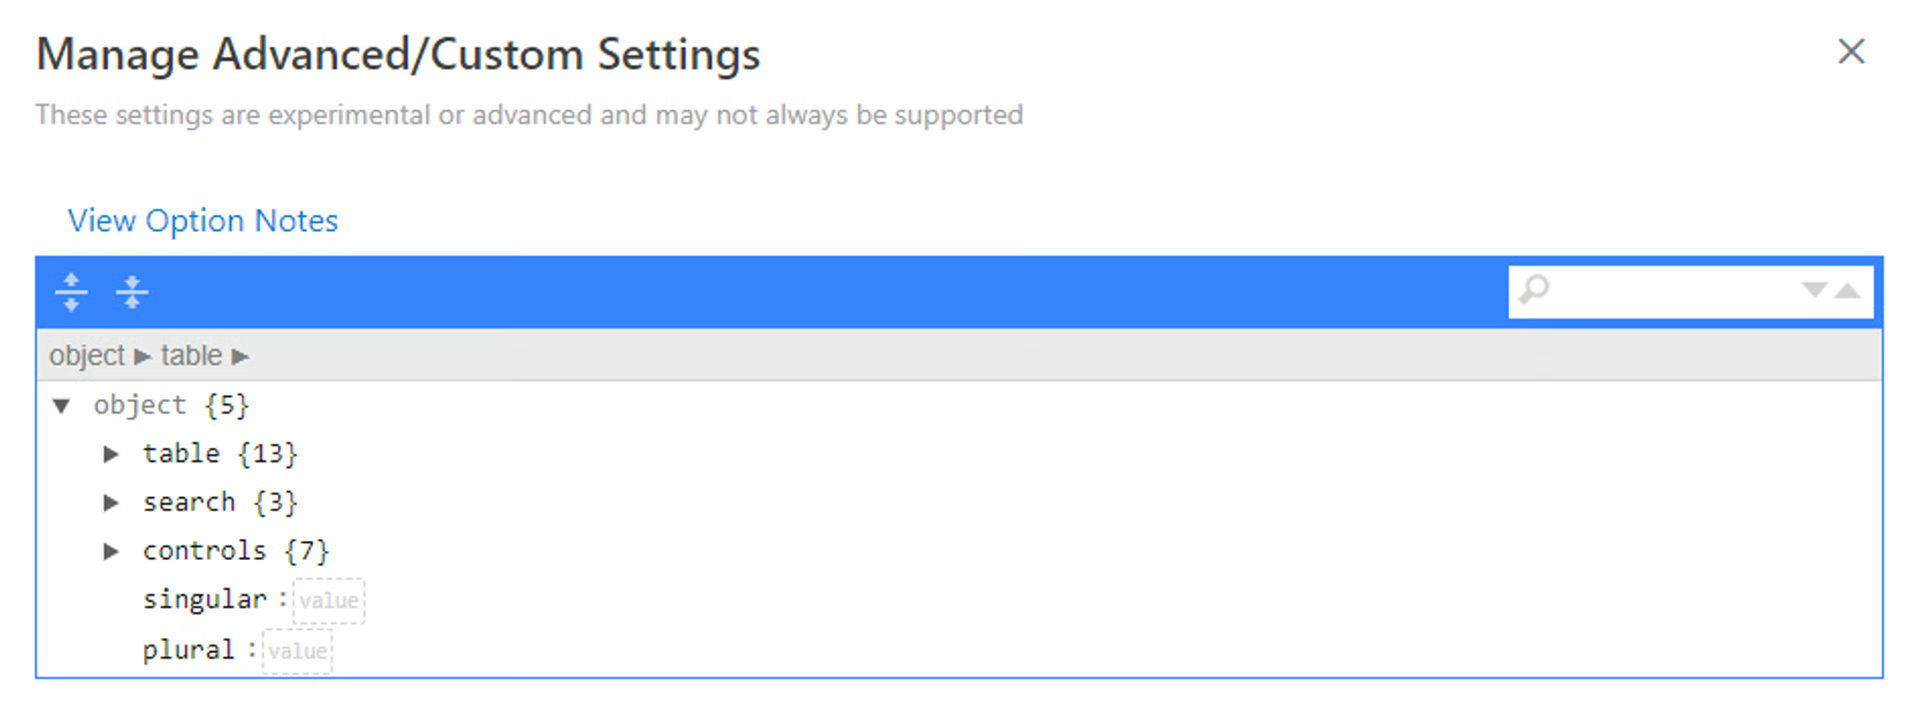
Table and Column Properties
Section titled “Table and Column Properties”You can use the Advanced settings to make your table Sortable, Scrollable, add a Style, and more.
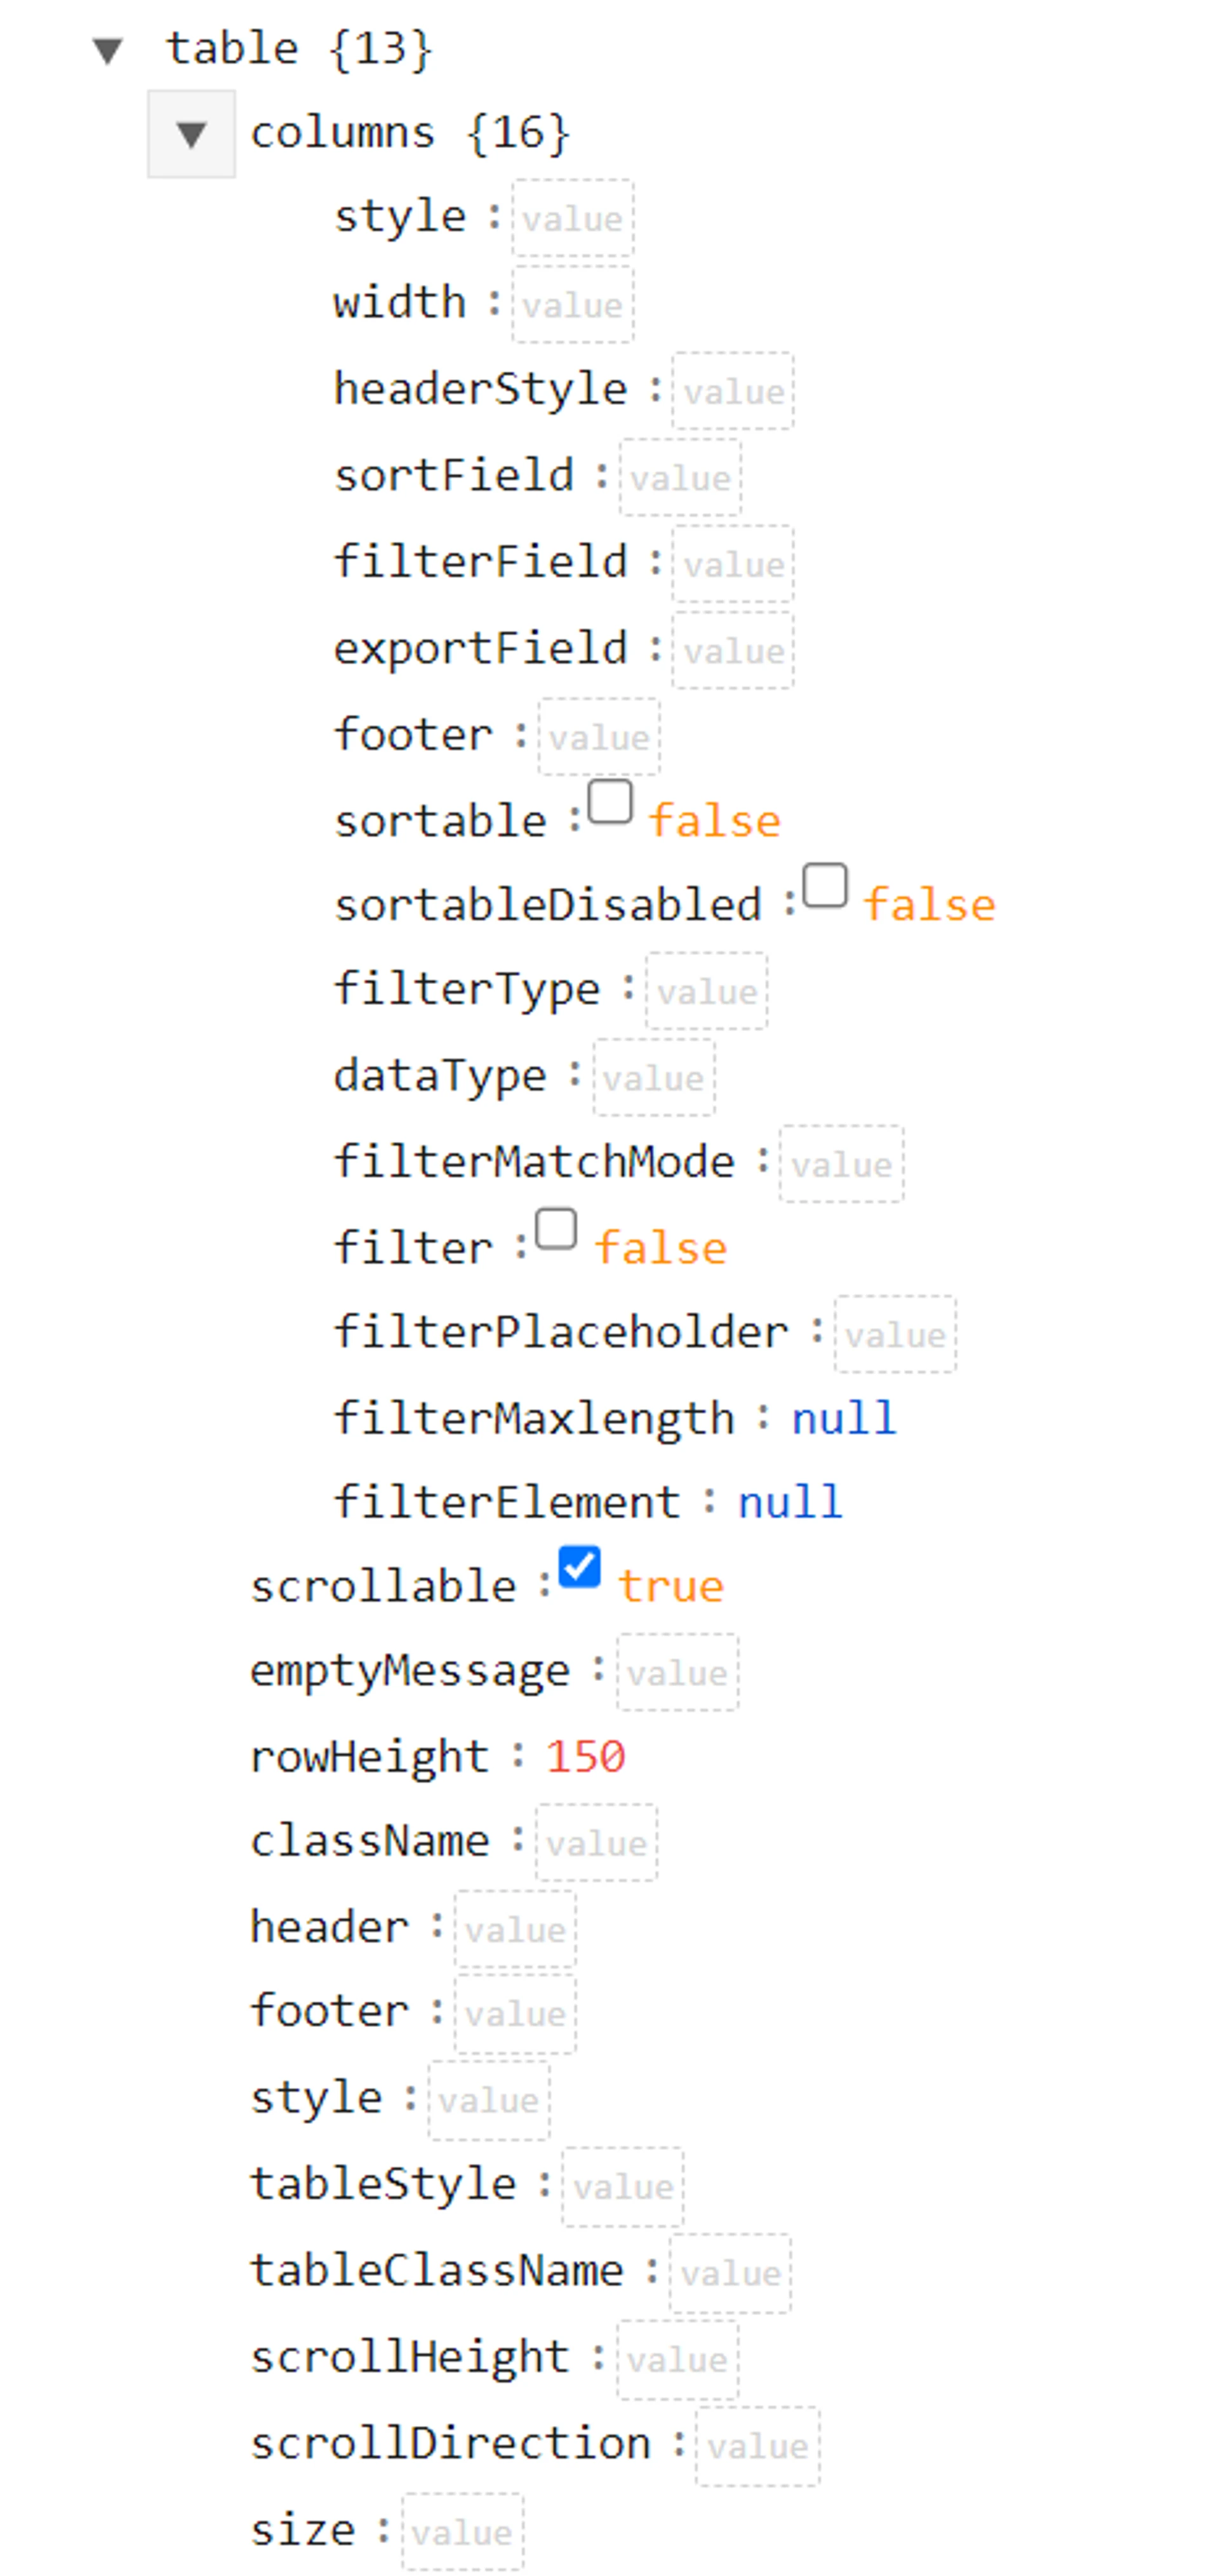
Name
Description
className
Style class of the column.
emptyMessage
Add text to display when a table is empty
footer
Footer content of the column.
header
Header content of the column.
rowHeight
Set height of row - use pixels - example: 100px
scrollable
Enable horizontal scrolling - default is true/enabled
scrollDirection
scrollHeight
style
Inline style of the column.
tableClassName
tableStyle
[
size
](/content/on2air-help-center/app-documentation/on2air-forms/advanced-linked-record-options/size)
Change size of table to small, normal, or large - click for visual example
dataType
Depending on the dataType of the column, suitable match modes are displayed.
exportField
Property of a row data used for exporting, defaults to field.
filter
Defines if a column can be filtered.
filterElement
Element for custom filtering.
filterField
Property of a row data used for filtering, defaults to field.
filterMatchMode
Defines filterMatchMode; “startsWith”, “contains”, “endsWith”, “equals”, “notEquals”, “in”, “lt”, “lte”, “gt”, “gte” and “custom”.
filterMaxlength
Specifies the maximum number of characters allowed in the filter element.
filterPlaceholder
Defines placeholder of the input fields.
filterType
Type of the filter input field.
headerStyle
Inline style of the header.
sortable
Defines if a column is sortable.
sortableDisabled
When enabled, the data of columns with this property cannot be sorted or changed by the user.
sortField
Property of a row data used for sorting, defaults to field.
width
Defines the width of the field column - use pixels - example: 50px
Search Properties
Section titled “Search Properties”Customize how your linked records are displayed in the Search/Lookup box
Name
Description
card_height
set the card height of the list of linked records in the search box - uses pixels - enter as numerals - example: 100
layout
choose layout type of grid or list - default is list
num_cols
set the number of columns for the grid layout - not applicable to list layout
instant_single_select
if checked (true), will automatically select the result if only 1 result found and its a Single Select Linked Record
Controls Properties - Buttons, Icons, Labels
Section titled “Controls Properties - Buttons, Icons, Labels”Choose how your buttons, icons, and labels are displayed. Click the Controls toggle, then choose the appropriate setting
Name
Description
full_width
make buttons full width
classes
Add classes to the following buttons on your form: Cancel, Lookup, Lookup_Disabled, Create, Edit, Display, Order, Remove, Grouping - See available options
disabled
Disable the following buttons on your form: Cancel, Lookup, Create, Edit, Display, Order, Remove - click the checkbox to disable the corresponding button
tooltip
Add a tooltip to the following buttons on your form: Cancel, Lookup, Lookup_Disabled, Create, Edit, Display, Order, Remove
styles
Add any valid CSS style to the following buttons on your form: Cancel, Lookup, Lookup_Disabled, Create, Edit, Display, Order, Remove, Grouping
labels
Add text labels to the following buttons on your form: Cancel, Lookup, Lookup_Disabled, Create, Edit, Display, Order, Remove - Example: If you want your button to say Create Estimate, just type Create Estimate in the button label field
icon
Add icons to the following buttons on your form: Cancel, Lookup, Create, Edit, Display, Order, Remove - See the list of available icons - Enter the icon shortcode - Example: pi-camera will add the camera icon
singular
add a singular label for your linked record name
plural
add a plural label for your linked record name - displays when no records are chosen on your form
User Guides for Customizing
Section titled “User Guides for Customizing”➡️
Related:  Customize Your Form Styles and Buttons
  Customize Your Form with Extra Options (Advanced)
Danger Zone
Section titled “Danger Zone”Remove - Remove the field from your form
